Presentación en vistas#
Referencia
- Modo:
Modos Objeto, Pose y Edición
- Panel:

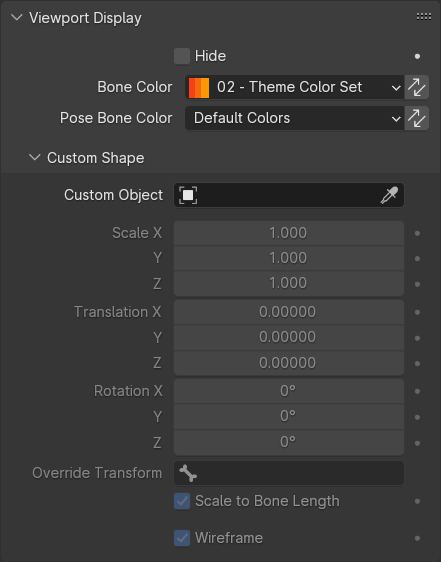
El panel Presentación en vistas en los modos Objeto/Pose.#

El panel Presentación en vistas en el modo Edición.#
Display panel lets you customize the look of your bones.
- Ocultar
Hides the bone in the 3D Viewport. When this is unchecked, the bone’s visibility is determined by the visibility of its bone collections.
- Color del hueso
Either a selection of the theme-dependent colors, or a custom color. This is the primary way to color a bone.
This color is stored on the bone itself, and thus is visible in both Pose and Edit modes. If there are multiple armature Objects that share the same Armature data-block, all armatures will share this color.
- Copy Bone Color to Selected
Copy the bone color of the :term`Active` bone to all selected bones.
- Pose Bone Color (only in Pose mode)
Either a selection of the theme-dependent colors, or a custom color. This is a way to override the bone color on a per-armature object basis.
When this is set to “Default”, the regular Bone Color is shown (see above).
This color is stored on the Pose Bone, and thus is specific to this particular armature object. It is only available in Pose mode. If there are multiple armature Objects that share the same Armature data-block, they each can have unique pose bone colors.
- Copy Bone Color to Selected
Copy the bone color of the :term`Active` bone to all selected bones.
Bone Colors#
Bones can be individually colored. For these colors to be visible, enable the Bone Colors checkbox in the Armature display panel.

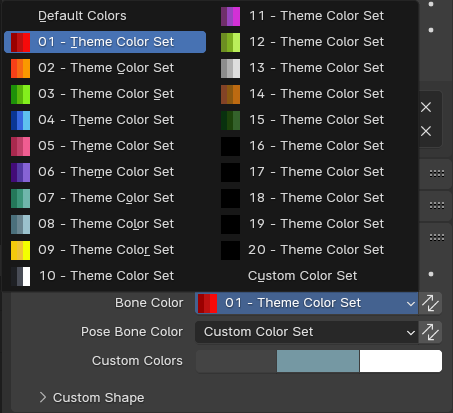
Viewport Display panel in Pose mode, showing the choices in color palettes as well as options for custom colors.#
The primary source of bone colors is the Theme, which defines 20 bone color palettes. Each entry consists of three colors:
- Regular
The color of unselected bones.
- Seleccionar
The second color field is the outline color of selected bones.
- Activo
The third color field is the outline color of the active bone.
As soon as you alter one of the colors, it is switched to the Custom Set option.
Custom Shape#
Blender allows you to give to each bone of an armature a specific shape (in Object Mode and Pose Mode), using another object as «template». In order to be visible the Shapes checkbox has to be enabled ( panel).
- Custom Object
Object that defines the custom shape of the selected bone.
- Escalar X, Y, Z
Additional scaling factor to apply to the custom shape.
- Translation X, Y, Z
Additional translation factor to apply to the custom shape.
- Rotation X, Y, Z
Additional rotation factor to apply to the custom shape.
- Redefinir Transformación
Bone that defines the display transform of the custom shape.
- Scale to Bone Length
Option not to use bones length, so that changes in Edit Mode don’t resize the custom shape.
- Estructura
When enabled, bone is displayed in wireframe mode regardless of the viewport display mode. Useful for non-obstructive custom bone chains.
Flujo de trabajo#
To assign a custom shape to a bone, you have to:
Switch to Pose Mode Ctrl-Tab.
Select the relevant bone by clicking on it.
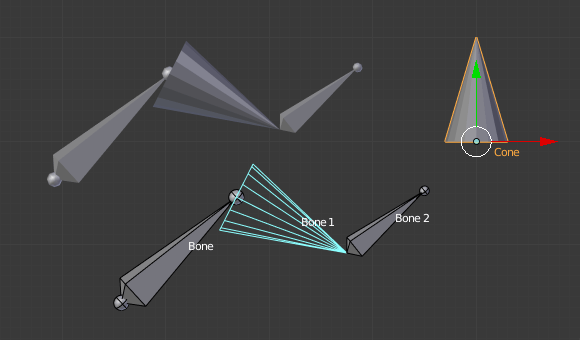
Go to the Display panel Custom Shape field and select the 3D object previously created in the scene; in this example we are using a cube and a cone. You can optionally set the At field to another bone.

The armature with shape assigned to bone. Note the origin of the Cone object.#
Nota
These shapes will never be rendered, like any bone, they are only visible in the 3D Viewport.
Even if any type of object seems to be accepted by the Object field (meshes, curves, even metas…), only meshes really work. All other types just make the bone invisible.
The origin of the shape object will be at the root of the bone (see the bone page for root/tip).
The object properties of the shape are ignored (i.e. if you make a parallelepiped out of a cube by modifying its dimensions in Object Mode, you will still have a cube-shaped bone…).
The «along bone» axis is the Y one, and the shape object is always scaled so that one unit stretches along the whole bone length.
If you need to remove the custom shape of the bone, just right-click in the Custom Shape field and select Reset to default value in the pop-up menu.
So to summarize all this, you should use meshes as shape objects, with their center at their lower -Y end, and an overall Y length of 1.0 unit.