Editing(編集)
Insert Keyframe(キーフレームを挿入)
参照
- Mode(モード):
Object Mode(オブジェクトモード)
- Menu(メニュー):
- ショートカットキー:
I
There are several methods of adding new keys. Namely:
In the 3D Viewport, pressing I will key properties based on the Default Key Channels User Preferences.
When a Keying Set is active, it is used instead of reading the User Preferences.
Hovering over a property and pressing I or with the context menu by RMB a property and choose Insert Keyframe from the menu.
With the User Preference "Pie Menu on Drag" enabled, holding down I and moving the cursor will bring up a pie menu to insert one of Location, Rotation, Scale, and Available.
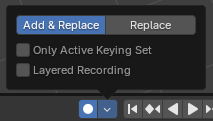
Auto Keyframe

Timeline(タイムライン)のAuto Keyframe(自動キーフレーム)。
Auto Keyframe is the record button in the Timeline header. Auto Keyframe adds keyframes automatically to the set frame if the value for transform type properties changes.
See Timeline Keyframe Control for more info.
Insert Keyframe with Keying Set
参照
- Mode(モード):
Object Mode(オブジェクトモード)
- Menu(メニュー):
- ショートカットキー:
K
Insert Keyframes for specified Keying Set, with menu of available Keying Sets.
Delete Keyframes(キーフレームを削除)
参照
- Mode(モード):
Object Mode(オブジェクトモード)
- Menu(メニュー):
- ショートカットキー:
Alt-I
There are several methods of removing keyframes:
In the 3D Viewport press Alt-I to remove keys from selected objects on the current frame.
When the mouse is over a value, press Alt-I.
RMB a value and choose Delete Keyframe from the menu.
Clear Keyframes
参照
- Mode(モード):
Object Mode(オブジェクトモード)
- Menu(メニュー):
- ショートカットキー:
Shift-Alt-I
Removes all keyframes from the selected object.
Editing Keyframes
Keyframes can be edited in two editors. To do so go to either the Graph Editor or the Dope Sheet.
例
Keyframe Animation
This example shows you how to animate a cube's location, rotation, and scale.
First, in the Timeline, or other animation editors, set the frame to 1.
With the cube selected in Object Mode, press I in the 3D Viewport. This will record the location, rotation, and scale, for the cube on frame 1.
Set the frame to 100.
Use Move G, Rotate R, Scale S, to transform the cube.
Press I in the 3D Viewport.
To test the animation, press Spacebar to play.