Selection & Visibility
Selection Masking(選択マスク)
If you have a complex mesh, it is sometimes not easy to paint on the intended vertices. Suppose you only want to paint on a small area of the Mesh and keep the rest untouched. This is where "selection masking" comes into play. When this mode is enabled, a brush will only paint on the selected vertices or faces. The option is available from the header of the 3D Viewport (see icons surrounded by the yellow frame):

You can choose between Face Selection masking (left button), Vertex selection masking (middle button), and Bone selection (right button). The latter is only available when the mesh has an Armature modifier.
Selection masking(選択マスク) には通常のペイントモードには無い利点がいくつかあります:
モディファイアがアクティブな状態でも、元のメッシュの辺が表示されます。
You can select and deselect faces instead without the need to switch to Edit Mode.
Details About Selecting(選択の詳細)
以下の標準的なオペレーションがサポートされています:
Alt-LMB -- Single faces
Shift-Alt-LMB -- Select more or remove them from the selection.
A -- All faces, A A to deselect.
B -- ボックス選択。
C -- ブラシでの円選択。
Ctrl-I -- Invert selection.
L -- Pick linked (under the mouse cursor).
Ctrl-L -- Select linked.
Ctrl-NumpadPlus -- Extend Selection
Ctrl-NumpadMinus -- Shrink Selection
Alt-LMB -- Vertex Loop Select
Vertex Selection Masking(頂点選択マスク)
参照
- Mode(モード):
頂点ペイントとウェイトペイントモード
- ヘッダー:
- ショートカットキー:
2
このモードでは1つ以上の選択をした頂点だけにペイントすることが出来ます。全ての選択されていない頂点は意図しない変更から守られます。
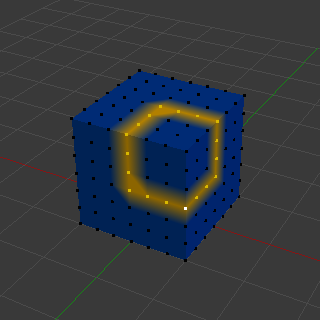
Vertex Selection Masking(頂点選択マスク)。
Face Selection Masking(面選択マスク)
参照
- Mode(モード):
テクスチャペイント、頂点ペイント、ウェイトペイントモード
- ヘッダー:
- ショートカットキー:
1
The Face Selection Masking allows you to select faces and limit the paint tool to those faces, very similar to Vertex selection masking.
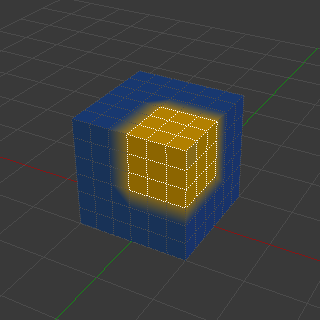
Face Selection Masking(面選択マスク)。
Hide/Unhide Faces(面の非表示/再表示)
参照
- Mode(モード):
Texture, Vertex Paint, and Weight Paint Modes
- Menu(メニュー):
, ,
- ショートカットキー:
Alt-H 、 H 、 Shift-H

非表示になっている面。
Faces can be temporarily hidden to limit painting to only the visible parts of the mesh. Hidden faces cannot be painted or selected until they are revealed again. This can be useful for isolating specific regions of a mesh while painting.
H -- Hide the currently selected faces.
Shift-H -- Hide all unselected faces, isolating the current selection.
Alt-H -- Reveal all hidden faces.
Hide/Unhide Vertices(頂点の非表示/再表示)
You cannot specifically hide only selected faces in vertex mask selection mode. However, the selection is converted when switching selection modes. So a common trick is to:
Switch to Face selection mask mode to have the selection converted to faces.
Refine your selection next or just hide the faces.
Switch back to Vertex Selection mask mode.
Hiding faces will make sure that vertices that belong to visible faces remain visible.
The Clipping Region
To constrain the paint area further you can use the Clipping Region. Press Alt-B and LMB-drag a rectangular area. The selected area will be "cut out" as the area of interest. The rest of the 3D Viewport gets hidden.
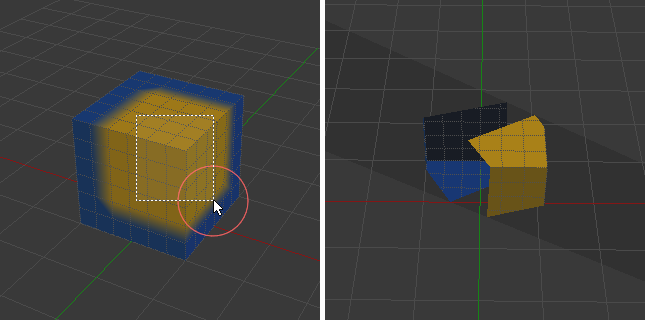
The Clipping Region is used to select interesting parts for local painting.
You make the entire mesh visible again by pressing Alt-B a second time.
All paint tools that use the view respect this clipping, including box select, and of course brush strokes.
There are two helpful reminders that a Clipping Region is used:
The clipping region is drawn as a gray box in the 3D Viewport
The Text Info overlay will state that the perspective is "Clipped"
Select Linked(リンク選択)
参照
- Mode(モード):
Edit Mode(編集モード)
- Menu(メニュー):
- ショートカットキー:
Ctrl-L, Shift-L
Select geometry connected to already selected elements. This is often useful when a mesh has disconnected, overlapping parts, where isolating it any other way would be tedious. Pressing Shift-L will deselect linked any linked elements.
With L you can also select connected geometry directly under the cursor.