Timeline(タイムライン)
The Timeline editor is used to jump to different frames, manipulate keyframes, and control animation playback.

Timeline(タイムライン)。
メインビュー
The X axis represents time, with the numbers 0/50/100/... being frame numbers. The blue line is the Playhead indicating the current frame, and the diamond shapes are Keyframes, points where you specified a certain value for a certain property at a certain time.
ビューの調整
Panning is done by dragging MMB.
Zooming is done by dragging Ctrl-MMB, rolling the mouse Wheel, or pressing NumpadMinus/NumpadPlus.
You can also use the scrollbars located at the bottom and the right of the editor.
プレイヘッド

プレイヘッド。
The Playhead is the blue vertical line showing the current frame number.
It can be moved to a new position by clicking or dragging LMB in the scrubbing area at the top.
You can also move it in single-frame increments by pressing Left or Right, or jump to the beginning or end frame by pressing Shift-Left or Shift-Right.
Frame Range(フレーム範囲)
The Frame Range determines the length of the scene's animation. By default, it's set to start at frame 1 and end at frame 250. You can change this using the Start/End inputs in the Timeline header, or in the Output Properties.
Keyframes(キーフレーム)
By default, the timeline only shows keyframes for selected items. You can make it show all keyframes by unchecking .
You can click a keyframe to select it (and deselect all others), or click it while holding Shift to add it to the selection (or remove it if it was already selected). You can also drag a box to select multiple keyframes in one go.
To move the selected keyframes, simply drag one of them. Alternatively, you can press G, move the mouse, and click LMB to confirm (or RMB to cancel). You can also press S to scale the keyframes in relation to the Playhead.
Markers(マーカー)
詳細については Markers page を参照してください。
ヘッダー

Popovers for Playback and Keying; transport controls; and frame controls
ポップオーバー
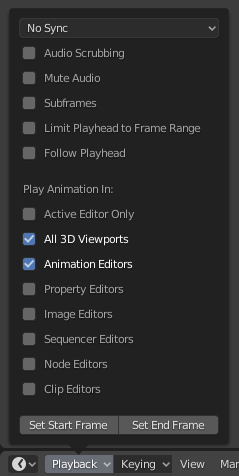
Playback(再生) ポップオーバー

- Sync(シンク)

3D Viewport(3Dビューポート) の赤い FPS 表示。
If animation playback can't keep up with the desired Frame Rate, the actual frame rate (shown in the top left corner of the 3D Viewport) will turn red, and the Sync option determines how the situation should be handled.
- Play Every Frame(毎フレーム再生)
Play every frame, even if this results in the animation playing slower than intended.
- Frame Dropping(コマ落とし)
Playback(再生)がシーンのフレームレートよりも遅くなった場合、フレームをを飛ばします。
- Sync to Audio(音声に同期)
Playback(再生)が遅すぎてオーディオとの同期を維持できない場合、フレームを飛ばします。
- Audio(オーディオ)
- Scrubbing(スクラビング)
Play bits of the sound in the animation (if there is any) while you drag the Playhead around.
- Play Audio
Uncheck to mute all sound.
- Playback(再生)
- Limit to Frame Range
Don't allow moving the Playhead outside of the Frame Range using the mouse.
- Follow Current Frame(現在のフレームに追従)
Automatically pan the view to catch up when the Playhead goes off screen.
- Play In(再生先)
Which editors to update on each animation frame. If an editor is unchecked, it'll only be updated once playback stops (with some exceptions where it'll update on each frame anyway). When starting playback in either the Graph Editor, Dope Sheet or the NLA Editor, all editors will play back regardless of the settings. This is a feature requested by animators to easily play back all views.
- Show(表示)
- Subframes(サブフレーム)
現在のシーンサブフレームを表示して変更できるようにします。
- Set Start/End Frame
Set the scene's start/end frame to the current frame. If the Preview Range is active (see Frame Controls), that one is changed instead.
Keying(キーイング) ポップオーバー

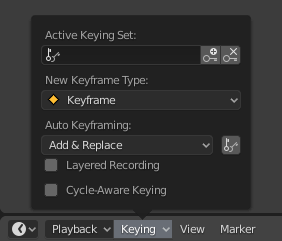
Keying(キーイング) ポップオーバーには、Keyframe(キーフレーム) の挿入に関係するオプションがあります。
- Active Keying Set(アクティブなキーイングセット)

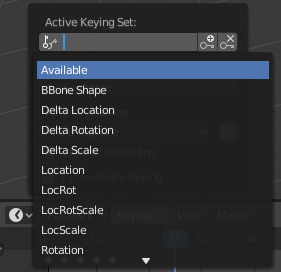
Timeline(タイムライン)のKeying Set(キーイングセット)。
A Keying Set is a named collection of animatable properties. If you select one and then press I while not hovering over any input field, Blender will create keyframes for the properties in that keying set.
If you don't have a keying set selected, you'll get keyframes on a default set of properties instead (e.g. Location/Rotation/Scale for objects).
There are a number of predefined keying sets, but you can also create your own in the Keying Sets panel.
- Insert Keyframes I
Insert keyframes on the current frame.
- Delete Keyframes Alt-I
Delete keyframes on the current frame.
- New Keyframe Type(新規キーフレームタイプ)
The keyframe type for newly created keyframes.
- Cycle-Aware Keying(ループ対応キー挿入)
Trivially cyclic curves に対して Keyframe(キーフレーム) を挿入する時、Cycle の整合性を保ったままハンドルが適用されます。(既存の Cycle を微調整する際にとても便利です):
キー挿入を Cycle の基本周期の外側で行った際に、周期の内側へのキー挿入に変換されます。
終了キーの1つを上書きすると、それに応じてもう片方が更新されます。
In addition, when adding a new curve into an action with a Manual Frame Range and Cyclic Animation enabled, the curve is automatically made cyclic with the period matching the frame range. For convenience, this check and conversion is also done before adding the second keyframe to such a curve.
Auto Keying

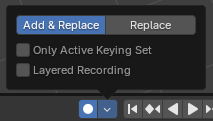
Auto Keying button.
When the record button () is enabled, Blender will automatically create keyframes on the current frame whenever you transform an object or bone in the 3D Viewport (or change one of its transform properties in the Properties Editor).
One special use case is to record a camera path as you fly through the scene. See Fly/Walk Navigation.
注釈
Auto Keying only works for transform properties (Location, Rotation, Scale). It won't create a keyframe if you change, say, the color of a material -- you still have to do that manually.
- Mode(モード)
- Add & Replace(追加と置換)
Add or replace keyframes as needed.
- Replace(置き換え)
既存 Keyframe(キーフレーム) への置き換えのみを行います。
- Only Active Keying Set(アクティブキーイングセットのみ)
By default, Auto Keying will create keyframes even for properties that are not in the active keying set. Use this checkbox to change that.
- Layered Recording(レイヤーレコーディング)
Adds a new NLA Track for every pass made over the animation to allow non-destructive tweaking.
トランスポート コントロール
These buttons are used to set the current frame and control playback.

トランスポート コントロール。
- Jump to Start Shift-Left
Sets the Playhead to the start of the frame range.
- Jump to Previous Keyframe Down
Moves the Playhead to the previous keyframe.
- Rewind Shift-Ctrl-Spacebar
Starts playing the animation in reverse.
- Play Spacebar
Starts playing the animation.
- Jump to Next Keyframe Up
Moves the Playhead to the next keyframe.
- Jump to End Shift-Right
Sets the Playhead to the end of the frame range.
- Pause Spacebar
Stops playing the animation.
フレームコントロール
- Current Frame(現在のフレーム) Alt-Wheel
The number of the frame that's currently being displayed in the 3D Viewport. This is also the location of the Playhead.
- Use Preview Range
The Preview Range is an alternative Frame Range that you can use for focusing on a particular part of the animation. It lets you repeatedly play a short segment without having to manually rewind or change the frame range of the entire scene.
This range only affects the preview in the 3D Viewport; it doesn't affect rendering.
The boundaries of the Preview Range are shown in dark orange. You can quickly configure and enable it by pressing P and dragging a box. To disable it, you can press Alt-P.
- Start/End Frame
The start/end frame of the scene (or the preview range, if active).

