Asset Browser(アセットブラウザー)
The Asset Browser is the main interface for organizing and using assets. To access it, create a new area, click the Editor Type button in its top left corner, and choose Asset Browser.
参考
- Asset Libraries(アセットライブラリ)
- Asset Catalogs
アセットの整理方法。
- Pose Library
Built on top of the Asset Browser.
Interface(インターフェイス)

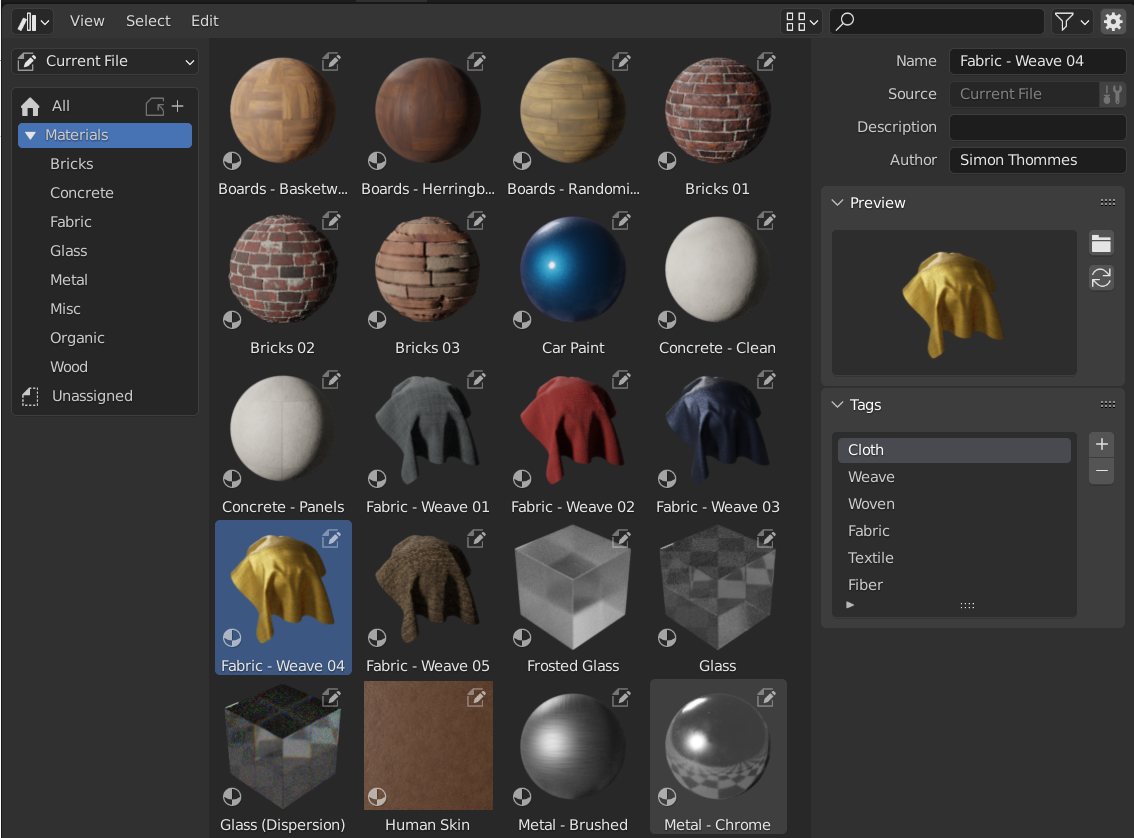
アセットブラウザー、アセットライブラリ内のマテリアルを表示。
ヘッダー
- Display Settings
Adjusts how assets are displayed in the asset list.
- Size(サイズ)
Changes the size of the preview thumbnails.
- Sort By(ソート)
- Name(名前):
Sort the asset list alphabetically.
- Asset Catalog:
Sort the asset list so that assets in the same catalog are kept together. Within a single catalog, assets are ordered by name. The catalogs are in order of the flattened catalog hierarchy.
メイン領域
The center region of the Asset Browser lists the assets contained in the selected catalog.
Click LMB to select a single asset. Additionally hold Ctrl to add/remove that asset to/from the selection, or Shift to select a range of assets. You can also drag LMB to perform a box select.
The region has a context menu with the following operations:
- Refresh Asset Library R
Refreshes the list.
- Clear Asset(アセットをクリア)
Removing Assets を参照してください。
- Clear Asset (Set Fake User)(アセットをクリア(フェイクユーザーを設定))
Removing Assets を参照してください。
- Open Blend File(Blendファイルを開く)
Opens the blend-file containing the asset.
- Display Size(表示サイズ)
Changes the size of the preview thumbnails.
Asset Library Region
The region on the left lets you select an asset library and shows its catalogs. You can show/hide this region by pressing T.
- Asset Library
The asset library whose catalogs to show.
- All Libraries:
Show catalogs from all available libraries.
- Current File:
Show the catalogs in the current blend-file (even if that file is not yet part of an asset library). See The Current File Asset Library for more information.
- Essentials:
Show the catalogs that come bundled with Blender.
Any libraries that you added in the File Path Preferences are listed here too.
- Copy Bundle to Asset Library
Shown when Asset Library is set to Current File and the current blend-file is an asset bundle that's not yet part of an asset library.
Lets you select a target asset library, then opens a File Browser in that library's root folder so you can save the current blend-file there. Once saved, the assets in the blend-file become available as part of the library.
- Catalogs
Tree view that shows the catalogs of the selected asset library. A catalog is a group of assets; when you select one, only the assets in that catalog and its child catalogs will be listed.
You can rename a catalog by double-clicking it, or assign it to a different parent catalog by dragging and dropping.
Pose Library などのアドオンや機能は、ここにカスタムパネルを表示できます。
アセットの詳細領域
The region on the right shows the metadata of the active asset. You can show/hide this region by pressing N or clicking the gear icon in the header.
Only metadata of assets contained in the current blend-file can be edited.
- Name(名前)
The asset's name. Unique for the asset data type within the same blend-file.
- Source(ソース)
アセットを含むblendファイルのフルパス。
- Open Blend File(Blendファイルを開く)
Opens the blend-file that contains the asset in a new Blender instance. When this instance is closed, the Asset Browser will be automatically refreshed.
- License(ライセンス)
Optional name of the license under which this asset is distributed. Not used by Blender itself.
- Copyright
Optional copyright notice. Not used by Blender itself.
- Description(詳細)
Optional asset description. Not used by Blender itself.
- Author(作者)
アセット作成者のオプションフィールド。Blender自体は使用しません。
Preview(プレビュー)
アセットのプレビュー画像を表示します。 アセットのプレビュー を参照してください。
- Load Custom Preview(カスタムプレビューを読込)
Opens a File Browser where you can select a new image for the asset preview.
- Generate Preview(プレビューを生成)
Autogenerate a new preview for the asset.
- Preview(プレビュー)
追加のプレビュー操作メニュー。
- Render Active Object
Generates a preview based on the 3D Viewport's Active object. This is useful for node groups, which cannot automatically generate their own preview.
- Remove Preview
Remove the preview of the asset.
アセットの使い方
As a general rule, an asset can be used by dragging it from the Asset Browser to the desired location. Objects and worlds can be dragged from the Asset Browser into the scene. Materials can be dragged onto the object that should use them. Geometry nodes can also be dragged onto objects to add a Geometry Nodes(ジオメトリノード)モディファイアー. The use of pose assets is different, and is described in Pose Library.
When you drag a collection, it will be added as an instance -- that is, a single object representing the entire collection, meaning the contents aren't visible in the Outliner and can't be edited. You can change this in the following ways:
Use Make Instances Real(インスタンスを実体化) to replace the object by the collection contents.
Alternatively: delete the object, find the collection in the Outliner's Blender File Display Mode(表示モード), and click in its context menu.
There are several things that can happen when an asset is used, depending on the following configuration of the Asset Browser:
- Import Method
Determines how data is managed when an asset is imported. This option can be found in the center of the Asset Browser header (when an asset library other than Current File or Essentials is selected):
- Follow Preferences
Use the import method set in the File Path Preferences.
- Link
The asset will be linked to the current blend-file, and thus be read-only. Later changes to the asset file will be reflected in all files that link it.
- Append
The asset and all its dependencies will be copied into the current file. Dragging a material into the scene three times will result in three independent copies. Dragging an object into the scene three times will also result in three independent copies.
この場合の "依存関係" とは、アセットが参照するすべてのものを意味します。オブジェクトの場合、これはそのメッシュとマテリアルだけでなく、モディファイアー、コンストレイント、ドライバによって使用される他のオブジェクトでもかまいません。
Since the file now has its own copy of the asset, later changes to the asset file will not be reflected in the file it's appended from.
- Append (Reuse Data)(アペンド(データを再利用))
アセットブラウザに特有です。
The first time an asset is used, it will be appended, including its dependencies, just as described previously. However, Blender will keep track of where it originated, and the next time the asset is used, as much data as possible will be reused. Dragging a material into the scene three times will only load it once, and just assign the same material three times. Dragging an object into the scene three times will create three copies of the object, but all copies will share their mesh data, materials, etc.
Since the file now has its own copy of the asset, later changes to the asset file will not be reflected in the file it's appended from.
Tip
Instancing Collections
Mimics the Instance Collections option when appending from the file browser
Some asset types such as collections can be created as an instanced collection. This is done by enabling the Instance option after dragging collection assets into the 3D Viewport. By enabling this option, an empty object is added that uses an instance of the collection. If this option is disabled, the full collection hierarchy will be added to the scene.
Collection Assets from the current file will always be instanced.
アセットが現在のファイルに追加された後、すべての通常のBlender操作が使用可能になることに注意してください。例えば、オブジェクトをシーンにリンクすることを選択できます。これにより、メッシュとマテリアルもリンクされます。次に、メッシュとマテリアルをアセットファイルにリンクしたまま、オブジェクト自体をローカルにすることができます()。これにより、ローカルの、したがって編集可能なオブジェクトが作成され、アセットライブラリの変更に応じてメッシュとマテリアルが自動的に最新の状態に保たれます。
アセットのプレビュー

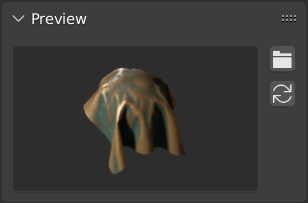
Asset Browser(アセットブラウザー)のプレビューパネル。
Preview images are typically generated automatically when you mark a data-block as an asset. Objects are captured from their local -Y axis, while collections are captured from the global -Y axis (as these don't have a local axis).
If the auto-generated preview image isn't sufficient, you can replace it by a custom one.
ポーズアセットのプレビューについては、 Controlling the Look of Preview Images を参照してください。
アセットバンドル
アセットバンドルは、他のファイルを参照せず、名前が _bundle.blend で終わるblendファイルです。テクスチャやその他の外部ファイルは、現在のblendファイルに パックする 必要があります。
アセットバンドルは、 Asset Browser(アセットブラウザー) を介してアセットライブラリにコピーできます。
アセットバンドル blendファイルを開きます。
Switch its Asset Browser to Current File (if it's not set to that already).
Copy Bundle to Asset Library をクリックします。
コピー先のアセットライブラリを選択します。
A File Browser will open at the root folder of the selected asset library. Choose the desired location of the blend-file, and click the Copy to Asset Library button.
blendファイルが選択した場所に保存され、アセットバンドルの カタログ はすべてターゲットのアセットライブラリにマージされます。
注釈
"アセット" という単語と "バンドル" という単語の両方が一般的に使用されており、必ずしもここで説明されているのと同じ意味であるとは限りません。 "アセットバンドル" として表示されるすべてのもので、 Copy to Asset Library(アセットライブラリへコピー) 機能が利用できるわけではありません。そのためには、バンドルファイルは上記の定義に準拠する必要があります。