Annotations(アノテーション)
The annotation tool is available in multiple editors. It can be used to add notes to e.g. 3D objects or node setups. The arrow in the screenshot below is an annotation.
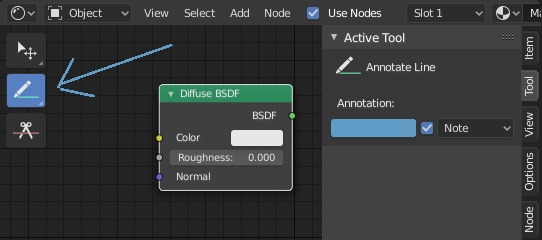
ノード エディタでのアノテーションツール。
アノテーションツール
The annotation tool can be activated in the Toolbar and has the following sub-tools:
- Annotate(アノテート)
メインエリアでフリーハンドのストロークを描画します。
- Annotate Line(アノテートライン)
クリックとドラッグで、線を作成します。オプションで、線の開始と終了の矢印スタイルを選択できます。
- Annotate Polygon(アノテートポリゴン)
Click multiple times to create multiple connected lines, then press Return or Esc to confirm.
- Annotate Eraser(アノテート消しゴム)
クリックとドラッグで線を削除します。 で 消しゴムの Radius(半径) を設定できます。
Tool Settings(ツールの設定)
共通
- Color(カラー)
既存のストロークと新しいストロークの色を調整します。
- Annotation Layer(アノテーションレイヤー)
Annotation Layers(アノテーションレイヤー) にアクセスするための、現在のレイヤーの名前を示すポップオーバーメニュー。
- Placement(配置)
アノテーションを描画する場所を決定します。
- 3D Cursor(3Dカーソル):
Only available in the 3D Viewport. The new annotations become part of the 3D scene; they're drawn on an imaginary plane that goes through the 3D Cursor(3Dカーソル) and is aligned to your view.
- Surface(サーフェス):
Only available in the 3D Viewport. The new annotations become part of the 3D scene; they're drawn onto the surface of the object under the mouse. If there is no surface, you get the same behavior as 3D Cursor.
- Image(画像):
Only available in 2D editors such as the Image Editor. The annotations become part of the 2D space, meaning their position and size change as you pan and zoom in the editor.
- View(ビュー):
The new annotations are 2D and get stuck to the screen. They keep the same position, rotation and size no matter how you pan, orbit or zoom in the editor.
- Only End Points Surface Placement
Only use the first and last parts of the stroke for snapping.
- Project Onto Selected Surface Placement
Only project the strokes onto selected objects.
- Stabilize Stroke(ストロークの安定化)
ポイントの位置を遅らせて修正することにより、描画中のストロークのジッターを減らすのに役立ちます。
- Radius(半径)
連続するストロークの最終ポイントからの最小距離。
- Factor(係数)
滑らかさ係数。値を大きくするとストロークが滑らかになりますが、描画感覚はストロークを引っ張っているように感じられます。
Annotate Line(アノテートライン)
- Style Start(スタイル開始)、End(終了)
線の開始または終了に使用する装飾。これは、たとえば、シーン内で特定の詳細を示す矢印を作成するために使用できます。
Annotation Layers(アノテーションレイヤー)
アノテーションツールを有効にすると、右サイドバーの パネルへ、複数のレイヤーを管理するための設定が表示されます。
- Opacity(不透明度)
既存のストロークと新しいストロークの不透明度を調整します。
- Thickness(幅)
既存のストロークと新しいストロークの太さを調整します。
Onion Skin(オニオンスキン)
カレントフレームの前後のフレームで作成された、ストロークのゴーストを表示します。オニオンスキニングは、3D Viewport(3Dビューポート) と Sequencer(シーケンサー) でのみ機能します。Grease Pencil(グリースペンシル) ドキュメント内の Onion Skinning の解説を参照してください。
- Before(前)/After(後)
ゴーストフレームの現在のフレームの前と後に使用する色。数値は、現在のフレームの前と後に表示するフレームの数を定義します。