Copy Global Transform
Copy and paste object and bone transforms with ease.
When copying, the global (World Space) transform is placed on the clipboard. This can then be pasted onto any object or bone, at the current frame or at another one.
Since the transform is placed on the clipboard as text, you can even copy-paste it into an instant messenger and send it to someone else.
Enabling Add-on
Open Blender and go to Add-ons(アドオン) section of the Preferences(プリファレンス).
Search "Copy Global Transform" and check the Enable Extension checkbox.
Interface(インターフェイス)

Located in .
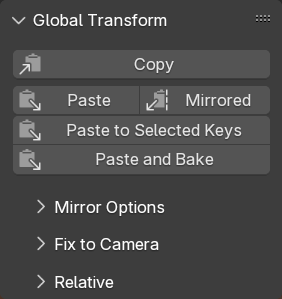
The figure on the right shows the main functionality of the Copy Global Transform panel. The collapsed panels are described each in their own section below.
Description(詳細)
- Copy(コピー)
Inspects the active Object (in Object mode) or Bone (in Pose mode) and places its current global transform onto the clipboard as a matrix.
- Paste
Takes the copied global transform and applies it to the active Object or Bone. This is done by adjusting its location, rotation, and scale properties.
- Mirrored
Same as 'Paste' above, but then mirrored relative to some other object or bone. This can be useful, for example, to copy the foot position of one foot to the other. See Mirror Options below.
- Paste to Selected Keys
Paste as described above and additionally use auto-keying to update one or more frames. The key selection is used to tell Blender which frames this should happen on; it does not influence which parts of the transform are keyed. What is keyed is determined by the active keying set.
- Paste and Bake
Almost the same as Paste to Selected Keys. Instead of only pasting on the selected keys, Paste and Bake will paste & auto-key on every frame between the first and last selected keys.
Mirror Options

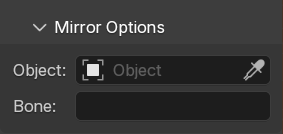
The copied transform can be mirrored relative to an object or a Bone. This requires choosing that object or bone first.
- Armature + Bone
Choosing an Armature object as mirror object will show the bone selector. You can use that to pick the bone to use as mirror. This will always use the named bone on that specific armature object.
- Bone Only
When you choose no mirror object at all, you can still choose a bone name. This is used for mirroring against a bone in the active armature. This can be useful to mirror bone transforms relative to the 'chest' bone of the active character.
- Object Only
This will just mirror relative to the chosen object.
After pasting with 'Paste Mirrored', the mirror axes can be chosen in the redo panel.
Fix to Camera

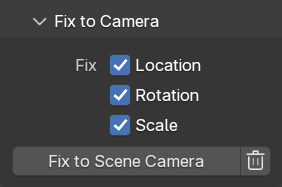
Also known as "bake to camera", this operator will ensure selected objects/bones remain static (relative to the camera) on unkeyed frames.
This is done by generating new keys. These keys will be of type 'Generated' so that it remains clear which keys were manually created, and which were generated. This way the tool can be re-run to re-generate the keys.
Ensure your animation is keyed using constant interpolation. If this is not the case yet, bake your animation (at least the transform channels). This tool does _not_ work with the "Stepped" F-Curve modifier
Choose which of the Location/Rotation/Scale channels you want to fix to the camera. When unsure, make sure they are all checked.
Press the "Fix to Camera" button.
To undo the effect of the "Fix to Camera" operator, click on the trash bin button. That will remove all the generated keys in either the scene range or the frame range.
The tool operates on the scene frame range, or on the preview range if that is active. Keys outside that range are ignored, both when fixing to the camera and when removing generated keys.
警告
This tool assumes that all keys with type 'Generated' are equal. It will overwrite them (or remove them, depending on which button you press).
Relative Copy-Paste

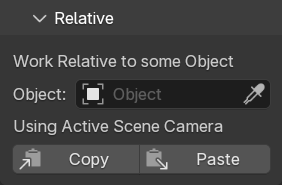
The "Relative" panel has copy/paste buttons that work relative to a chosen object. When copying, the world-space transform is determined, and then adjusted to become relative to the world-space transform of the chosen object. When pasting, this happens in reverse.
If no object is chosen, the copy/paste will happen relative to the active scene camera. What is the active scene camera is determined for every action, so when you paste it can be different from when you copied. This can help to keep an object visually in the same place when switching cameras, or when switching between scenes.
制限
Pasting a transform adjusts the Object/Bone's location, rotation, and scale. This means that when copying a skewed transform, this skew is lost.
If there are constraints on the Object/Bone, the resulting visual transformation may not be the same as the pasted one. To give a concrete example: if you have a constraint that adds a rotation, it will always add that rotation on top of the pasted transform.
参考
Pose Library for a way to manage and share entire poses.
参照
- Category(カテゴリー):
Animation(アニメーション)
- Description(詳細):
Simple add-on for copying world-space transforms.
- Location(位置、場所):
- File(ファイル):
copy_global_transform.py
- Author(作者):
Sybren A. Stüvel
- メンテナー:
Sybren A. Stüvel
- License(ライセンス):
GPL 2+
- サポートレベル:
Official(公式)
- Note(メモ):
このアドオンはBlenderにバンドルされています。