Editing UVs
After unwrap, you will likely need to arrange the UV maps, so that they can be used in texturing or painting. Your goals for editing are:
Stitch pieces (of UV maps) back together.
Minimiza o espaço desperdiçado em uma imagem.
Alarga as faces onde você deseja mais detalhes.
Redimensiona / Alarga as faces que estão esticadas.
Encolhe (ou recolhe) as faces que estiverem muito granulares e que possuem muitos detalhes.
With a minimum of dead space, the most pixels can be dedicated to giving the maximum detail and fineness to the UV texture. A UV face can be as small as a pixel (the little dots that make up an image) or as large as an entire image. You probably want to make major adjustments first, and then tweak the layout.
Transformar
Referência
- Editor:
UV Editor
- Mode:
Edit Mode
- Tool:
- Menu:
Move G
Rotacionar R
Escalonar S
Shear Shift-Ctrl-Alt-S
Bloqueio de eixos
As transformações podem ser bloqueadas para um dos eixos pressionando X ou Y após acionar alguma das ferramentas de transformação. Adicionalmente, manter o BMM pressionado também funciona para restringir os movimentos para o eixo X ou Y.
Vertex Slide
Referência
- Mode:
Edit Mode
- Menu:
Vertex Slide will transform a vertex along one of its adjacent edges. Use Shift-V to activate tool. The nearest selected vertex to the mouse cursor will be the control one. Move the mouse along the direction of the desired edge to specify the vertex position. Then press LMB to confirm the transformation.
- Fator
Determines the amount of slide performed. Negative values correspond to slides toward one vertex, while positive ones, refer to the other one.
- Even E
By default, the offset value of the vertices is a percentage of the edges length along which they move. When Even mode is active, the vertices are shifted by an absolute value.
- Flipped F
When Flipped is active, vertices move the same distance from adjacent vertices, instead of moving from their original position.
- Clamp Alt or C
Toggle clamping the slide within the edge extents.
Edge Slide
Referência
- Mode:
Edit Mode
- Menu:
Slides one or more edges across adjacent faces with a few restrictions involving the selection of edges (i.e. the selection must define a valid loop, see below).
- Fator
Determines the amount of slide performed. Negative values correspond to slides toward one face, while positive ones, refer to the other one.
- Even E
Forces the edge loop to match the shape of the adjacent edge loop. You can flip to the opposite vertex using F.
- Flipped F
When Even mode is active, this flips between the two adjacent edge loops the active edge loop will match.
- Clamp Alt or C
Toggle clamping the slide within the edge extents.
- Mirror Editing
Lets you propagate the operation to the symmetrical elements of the mesh (if present, in local X direction).
Aleatorizar
Referência
- Editor:
UV Editor
- Mode:
Edit Mode
- Menu:
Randomize the scale, rotation and offset of selected UV islands. The Randomize Transform tool in the UV editor works similar to Randomize Transform tool in the 3d view.
- Random Seed
Changes the random seed used by the pseudo-random number generator, producing a different transform result for each seed value.
- Localização
Amount to randomize location.
- Rotação
Amount to randomize rotation.
- Scale Even
Apply the same scale to the U coordinate and V coordinate.
- Escala
Amount to randomize scale in U and V coordinates.
Espelhar
Referência
- Editor:
UV Editor
- Mode:
Edit Mode
- Menu:
- Atalho:
Ctrl-M
UVs can be mirrored on the Y axis or the X axis:
Espelhar em X
Espelhar em Y
You can also use the hotkeys X or Y, or hold the MMB and drag in the mirror direction.
Copiar as coordenadas UV espelhadas
Referência
- Editor:
UV Editor
- Mode:
Edit Mode
- Menu:
Copies UV coordinates from one side of a symmetrical mesh to the mirrored side.
The operator searches for mirrored vertices across the chosen mesh axis and copies their UV coordinates to the corresponding selected vertices. This is useful when working with symmetrical models where UVs only need to be edited on one side.
Only selected vertices are affected.
- Mesh Axis
Defines the axis used to find mirrored vertices in the mesh.
- -X to +X:
Copy UVs from the negative X side to the positive X side.
- -Y to +Y:
Copy UVs from the negative Y side to the positive Y side.
- -Z to +Z:
Copy UVs from the negative Z side to the positive Z side.
- +X to -X:
Copy UVs from the positive X side to the negative X side.
- +Y to -Y:
Copy UVs from the positive Y side to the negative Y side.
- +Z to -Z:
Copy UVs from the positive Z side to the negative Z side.
- UV Axis
Defines the UV axis used when mirroring UV coordinates.
- X:
Mirror UV coordinates across the horizontal UV axis.
- Y:
Mirror UV coordinates across the vertical UV axis.
- Precisão
Tolerance used when searching for mirrored vertex pairs.
Higher values allow matching vertices that are slightly offset from perfect symmetry.
Snap
Referência
- Editor:
UV Editor
- Mode:
Edit Mode
- Menu:
- Atalho:
Atalho: Shift-S
Snapping in the UV Editor is similar to Snapping in 3D. For the snap to pixel options to work an image has to be loaded.
- Seleção para os pixeis
Moves selection to nearest pixel. See also Round to Pixels below.
- Seleção para o cursor
Moves selection to 2D cursor location.
- Seleção para o cursor (deslocamento)
Moves selection center to 2D cursor location, while preserving the offset of the vertices from the center.
- Seleção para os adjacentes não selecionados
Moves selection to adjacent unselected element.
- Cursor para os pixeis
Atrai o cursor para os pixeis mais pŕoximos.
- Cursor para a seleção
Move o cursor para o centro da seleção.
- Cursor to Origin
Places the cursor to the location (0, 0, 0).
Fundir
Referência
- Editor:
UV Editor
- Mode:
Edit Mode
- Menu:
- Atalho:
Atalho: Tecl. Num. Barra á dir.
- At Center
Moves selected UVs to their average position.
- At Cursor
Moves selection UVs to 2D cursor location.
By Distance
Referência
- Editor:
UV Editor
- Mode:
Edit Mode
- Menu:
Merges selected UVs within the specified Merge Distance.
- Merge Distance
Maximum distance between merged vertices.
- Unselected
Merge selected to other unselected vertices.
- Vértices compartilhados
Merge UVs that correspond to the same mesh vertex, even if they have different UV coordinates.
Split
Referência
- Editor:
UV Editor
- Mode:
Edit Mode
- Menu:
- Atalho:
Alt-M
- Selection Y
Splits (disconnects) the selection from the rest of the UV. The border edge to any non-selected elements are duplicated.
Note that the «copy» is left exactly at the same position as the original, so you must move it to see it clearly.
Rip Move UV
Referência
- Editor:
UV Editor
- Mode:
Edit Mode
- Menu:
- Atalho:
V
The Rip Move UV operator separates selected UV elements (vertices, edges, or faces) from connected components, creating a «rip» in the UV map. After the separation, the selection enters move mode, allowing precise control over where and how the UV elements are pulled apart.
This is useful for isolating UV islands or unwrapping overlapping elements without affecting surrounding geometry.
Nota
The Rip Move UV operator is not compatible with Sync Selection. To use this tool, make sure Sync Selection is disabled in the UV Editor.
Veja também
Rip Region Tool – Modal version of the rip operator.
Mesh editing Rip – Similar functionality for mesh editing in the 3D Viewport.
Desdobrar
Referência
- Editor:
UV Editor
- Mode:
Edit Mode
- Menu:
- Atalho:
U
Blender offers several ways of mapping UVs. The simpler projection methods use formulas that map 3D space onto 2D space, by interpolating the position of points toward a point, axis or plane through a surface. The more advanced methods can be used with more complex models, and have more specific uses.
Pin & Unpin
Referência
- Editor:
UV Editor
- Mode:
Edit Mode
- Menu:
- Atalho:
P, Alt-P
You can pin UVs so they do not move between multiple unwrap operations. When Unwrapping a model it is sometimes useful to «Lock» certain UVs, so that parts of a UV layout stay the same shape, and/or in the same place. Pinning is done by selecting a UV, then selecting Pin from the UVs menu, or the shortcut P. You can Unpin a UV with the shortcut Alt-P.
Pinning is most effective when using the Unwrap method of UV mapping, for organic objects. An example is when you are modeling a symmetrical object using the Mirror Modifier. Some of the UVs on the mirror axis may be shared across the mirrored counterparts. You could pin the UVs that correspond to the midline, then align them on the X axis, and they will stay in that location.
The sculpting tools, Pinch and Relax, will not move any pinned UVs. This allows you to pin the borders, or around interior holes, and gives even more control to the sculpt tools.
Pinning also works great with the Live Unwrap tool. If you pin two or more UVs, with Live Unwrap on, moving or scaling the pinned UVs will interactively unwrap the model. You can even use the Grab sculpting tool to move the pinned UVs. This helps with fitting a UV island to a certain shape or region.
Invert Pins
Referência
- Editor:
UV Editor
- Mode:
Edit Mode
- Menu:
Pin all unpinned selected UVs and unpin all currently selected pinned UVs.
Mark/Clear Seams
Referência
- Editor:
UV Editor
- Mode:
Edit Mode
- Menu:
See Costuras.
Seams from Islands
Referência
- Mode:
View mode
- Menu:
Adds seams at the boundaries of existing UV islands. This is useful when modifying the UVs of already unwrapped meshes.
Empacotar ilhas
Referência
- Editor:
UV Editor
- Mode:
Edit Mode
- Menu:
The Pack Islands tool can be used to optimize the UV layout by adjusting existing islands to efficiently fill the Texture Space. Based on the options selected, the tool will scale, translate and rotate the islands, ensuring a specified margin exists between them to maximize the usage of the UV space. Pinned islands can have additional restrictions applied to customize the packing process even further.
- Shape Method
The method to use when considering the shape of each island.
- Exact Shape (Concave):
Use the complete shape of the island, including filling any holes or concave regions around the island.
- Boundary Shape (Convex):
Takes into account the boundary (Convex Hull) of the island. This method will not place islands inside holes.
- Bounding Box:
Uses the simple bounding box of the island.
- Escala
Scale the islands to fill the unit square, or pack islands towards the lower left corner.
- Rotate
Allows the rotation of islands, as well as translation and scaling, to optimize texture usage.
- Rotation Method
The allowable rotations to use for each island.
- Any:
Any rotation which improves the packing is allowed.
- Axis-aligned:
The island will first be rotated into a smallest rectangle. Additional rotation will only be in 90-degree turns.
- Cardinal:
Like the four cardinal directions on a compass, North, South, East and West, only 90-degree turns will be allowed.
- Margin Method
The method to use when calculating the empty space between islands.
- Scaled:
Use scale of existing UVs to multiply margin.
- Adicionar:
Simple method, just add the margin.
- Fraction:
Precisely specify the fraction of the UV unit square for margin. (Slower than other two methods.)
- Margens
The scale for the empty space between islands.
- Lock Pinned Islands
An island which has any of its UVs pinned is considered a Pinned Island. With this option, Pinned Islands will be unable to move. The other islands will pack around them.
- Lock Method
Change the way Pinned Islands are packed
- Escala:
The scale of the Pinned Islands will not change.
- Rotação:
Pinned Islands will not rotate.
- Rotation and Scale:
Pinned Islands can translate, but not scale nor rotate.
- Merge Overlapping
Before the main packing operation, overlapping islands are detected and temporarily combined. During packing, the relative rotation and position of the merged islands are preserved.
- Pack To
Determines the final placement of UV islands after completing the packing operation.
- Closest UDIM:
Pack islands to the UDIM grid nearest to the center of the selection.
- Active UDIM:
Pack islands to the active UDIM image tile or, if no image is available, the UDIM grid tile where the 2D cursor is located.
- Original bounding box:
Find the original bounding box of the selection, packs the islands, and then moves them back inside the original box.
- Custom Region:
Packs islands into a user-defined custom region set with Set User Region. This allows packing islands into arbitrary UV areas, such as reserved atlas regions, trim sheet zones, or layout-specific texture slots. Requires Custom Region to be enabled.
Nota
The performance of the Pack Islands operator is heavily affected by the options selected, and sometimes the options can combine in different ways to produce unexpectedly slower results.
The fastest results can be obtained by using the «Bounding Box» shape method and the «Add» margin method.
Although enabling the «Rotate» option slightly impacts performance, it will often enhance efficiency, making it a good choice to always keep enabled.
However the «Fraction» margin method requires significantly more computation to find the exact scale. For certain layouts, it may even take up to 10 times longer to complete then using the simpler «Add» or «Scaled» methods.
Similarly, the «Exact shape» and «Boundary shape» methods are much slower than the simple «Bounding Box» method.
Escalonar as ilhas por uma média
Referência
- Editor:
UV Editor
- Mode:
Edit Mode
- Menu:
Using the Average Island Scale tool, will scale each UV island so that they are all approximately the same scale.
- Non-Uniform
Reduces average texture stretching within islands by scaling the U and V axes independently.
- Aparar
Reduces average texture shearing within islands by shearing the U axis.
Arrange/Align Islands
Referência
- Editor:
UV Editor
- Mode:
Edit Mode
- Menu:
Arranges the selected UV islands along a straight line on the UV grid. This operator can align islands horizontally or vertically, with customizable starting positions, alignment reference, sorting order, and spacing.
This is useful for organizing UV layouts, aligning modular texture pieces, or arranging UDIM tiles consistently.
- Initial Position
Determines the reference point used to calculate the initial alignment.
- Bounding Box:
Uses the bounding boxes of the selected islands.
- Grade UV:
Aligns islands relative to the UV grid origin (0-1 UV tile).
- Active UDIM:
Aligns islands based on the active UDIM tile.
- Cursor 2D:
Uses the current position of the 2D cursor as the origin.
- Eixos
The axis along which to arrange UV islands.
- X:
Align UV islands horizontally.
- Y:
Align UV islands vertically.
- Alinhar
Determines how the islands are aligned relative to each other.
- Mínimo:
Aligns islands by their minimum boundary.
- Máximo:
Aligns islands by their maximum boundary.
- Center:
Aligns islands by the center of the largest island.
- Nenhum:
Keeps each island’s original offset and alignment.
- Order
Specifies how to order the islands along the chosen axis.
- Largest to Smallest:
Sorts islands by area, from largest to smallest.
- Smallest to Largest:
Sorts islands by area, from smallest to largest.
- Fixo:
Keeps the current selection order.
- Margens
Defines the space between arranged islands, measured in UV units.
Set User Region
Referência
- Editor:
UV Editor
- Mode:
Edit Mode
- Menu:
- Atalho:
Ctrl-B
Defines a rectangular region in the UV Editor to be used as a Custom Region
Once defined, this region can be selected as the Pack To target in the Pack Islands operator by choosing Custom Region and enabling Custom Region.
Custom Region
Referência
- Editor:
UV Editor
- Mode:
Edit Mode
- Menu:
- Atalho:
Ctrl-Alt-B
Enables or disables the use of a Custom Region for UV operations such as Pack Islands.
When enabled, the previously defined user region (created using Set User Region) becomes active and visible in the UV Editor. This region defines the boundaries where UV islands are packed or manipulated.
Disabling this option restores the default behavior, where UV operations apply to the standard unit square or the active UDIM tile.
Minimizar esticamento
Referência
- Editor:
UV Editor
- Mode:
Edit Mode
- Menu:
The Minimize Stretch tool, reduces UV stretch by minimizing the difference between the angles in 3D and the angles in UV space. This operation is similar to the Relax tool with the Geometry Method, but uses a different algorithm.
- Preencher lacunas
Just during minimize stretch, internal holes will be filled with temporary polygons to prevent stretching and overlaps of the surrounding UVs.
- Blend
The fraction between 0 and 1 of the original UVs to blend in once the stretch is minimized. A blend of 0 is the fully minimized stretch. Blend of 0.5 is halfway between the original UVs and the minimize stretch UVs.
- Iterations
More iterations result in smoother UVs, but take longer to process.
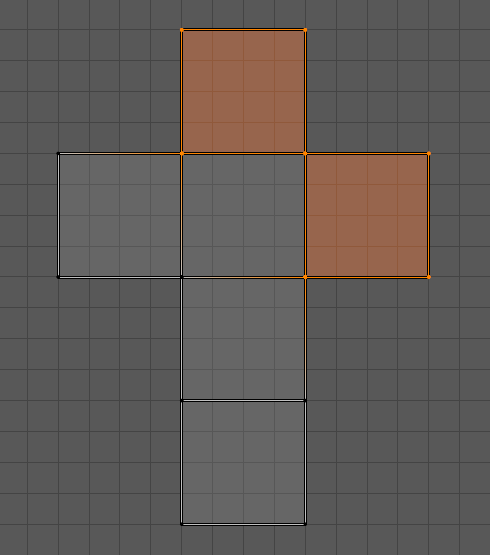
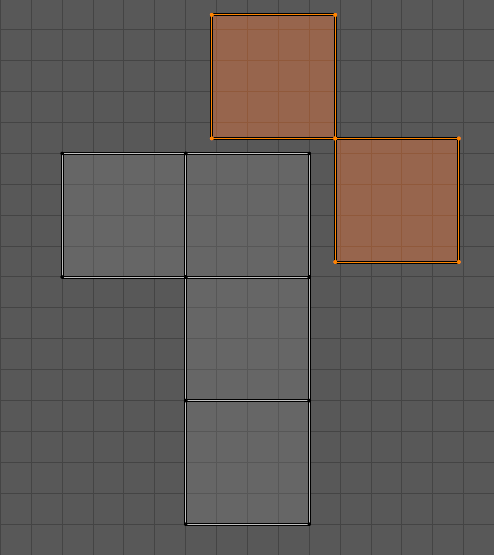
Costurar
Referência
- Editor:
UV Editor
- Mode:
Edit Mode
- Menu:
- Atalho:
Alt-V
The Stitch tool, will join selected UVs that share vertices. You set the tool to limit stitching by distance in the Adjust Last Operation panel, by activating Use Limit and adjusting the Limit Distance.
Alinhar
Referência
- Editor:
UV Editor
- Mode:
Edit Mode
- Menu:
- Atalho:
Shift-W
Moves the selected UV vertices to a line, where that line is specified in different ways by Axis.
- Eixos
- Endireitar:
Positions UV vertices along the line defined by the endpoints.
- Straighten X:
Positions UV vertices horizontally along the line defined by the endpoints.
- Straighten Y:
Positions UV vertices vertically along the line defined by the endpoints.
- Align Auto:
Positions UV vertices automatically chooses the direction based on which is most alignment already.
- Align Vertically:
Positions UV vertices vertically along the line defined by the midpoint of the selection.
- Align Horizontally:
Positions UV vertices horizontally along the line defined by the midpoint of the selection.
- Position Mode Align Vertically: / Align Horizontally:
Determines how the final alignment line position is calculated.
- Média:
Aligns UVs along the average (mean) position of the selection.
- Mínimo:
Aligns UVs along the smallest coordinate value.
- Máximo:
Aligns UVs along the largest coordinate value.
Align Rotation
Referência
- Editor:
UV Editor
- Mode:
Edit Mode
- Menu:
The Align Rotation tool aligns entire islands to either the U or V axis.
The tool has three different methods of operation. The different methods specify the source for the alignment, and also whether to align with both the U and V axes, or just the V axis alone.
When using the Auto method, islands are aligned so that UV edges are aligned to either the U axis or the V axis. This method works best with quads and meshes representing organic subjects.
When using the Edge method, only the selected edges are considered, and the islands will be aligned such that the selected edges are aligned with the V axis. This method works with the selection, so it works best when a particular edge, or edge loop, needs to be aligned in UV coordinates.
When using the Geometry method, the geometry is taken into consideration. Either the X axis, the Y axis, or the Z axis can be used. Suppose the X axis is chosen. Using this method, edges which have a positive extent in the X axis will be rotated in the UV map so that the edge extends upwards in the V axis. This method works best to align multiple islands which share some common geometric property, either in the X, Y or Z axis.
Note that in the Auto method, edges can end up aligned either up or down or left or right depending on the orientation of the island prior to activating the tool. In the Edge method, the alignment of selected edges can be either up or down in the V axis, whatever is closest to the current orientation of the UV island. By comparison, in the Geometry method, the alignment will always be pointing up in the V axis, ignoring any previous orientation.
Move on Axis
Referência
- Editor:
UV Editor
- Mode:
Edit Mode
- Menu:
Moves selected UV coordinates along a chosen axis by a specified distance. This operator is designed for precise UV adjustments and supports multiple movement modes. It is especially useful when combined with the number pad keys for quick directional nudging.
Use the following shortcuts to move UVs directly from the keyboard:
Numpad8 / Numpad2: Move up or down.
Numpad4 / Numpad6: Move left or right.
- Tipo
The movement unit type.
- Dinâmico:
Move using the active grid size. Holding Ctrl while pressing a number pad key activates this mode.
- Pixel:
Move by pixel increments. Holding Shift while pressing a number pad key activates this mode.
- UDIM:
Move by full UV tiles (1.0 UV unit). Using the number pad keys with no modifying keys uses this mode.
- Eixos
The axis along which to move the UVs.
- X Axis:
Move vertices horizontally.
- Y Axis:
Move vertices vertically.
- Distância
The distance to move the UVs, measured in the selected unit type.
Copy UVs
Referência
- Editor:
UV Editor
- Mode:
Edit Mode
- Menu:
- Atalho:
Ctrl-C
For each selected UV island, the Copy UVs tool will copy its topology and UV coordinates into a temporary clipboard for later use with the Paste UVs tool.
Nota
The Copy UVs tool currently uses an internal clipboard which is not shared between instances of blender.
Paste UVs
Referência
- Editor:
UV Editor
- Mode:
Edit Mode
- Menu:
- Atalho:
Ctrl-V
For each selected UV island, the Paste UVs tool will attempt to match the topology of an island stored in the internal clipboard. If a match is found, the UVs stored in the clipboard for the original island will be pasted onto the currently selected island.
For example, if a triangle attached to a quad attached to a quad is in the clipboard, then a different triangle <=> quad <=> quad is selected, then the topologies match, and the UVs will be pasted over the current selection.
For best results, you may want to use the Rip tool, or , prior to using Paste UVs.
Mostrar ou ocultar faces
Referência
- Editor:
UV Editor
- Mode:
Edit Mode
- Menu:
Revelar ocultos Alt-H
Hide Selected H
Hide Unselected Shift-H
Exportar esquema UV
Referência
- Editor:
UV Editor
- Mode:
Edit Mode
- Menu:
When painting textures in an external application, it is often useful to have a reference image showing the UV layout of the mesh. The Export UV Layout operator saves the current UV map as an image that can be used as a guide while painting textures.
The exported image contains lines representing the UV edges within the
standard UV Editor grid (the 0-1 UV space).
Edges outside this range will not appear in the exported image.
By default, only UV faces selected in the 3D Viewport are exported. Selections made only in the UV Editor are ignored.
The exported image can be opened in a painting application and used as a transparent overlay while creating textures. Once the texture is finished, it can be imported back into Blender and used in a material.
For more information on using images as textures, see Image Textures.
Propriedades
Opções de exportação.
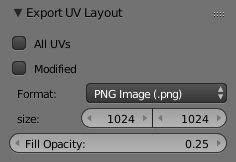
- Todas as UVs
Export all UVs instead of only the faces selected in the 3D Viewport.
- Export Tiles
Controls which UV tiles are exported.
- Nenhum:
Export only UVs in the [0, 1] range.
- UDIM:
Export tiles in the UDIM numbering scheme:
1001 + u_tile + 10*v_tile.- UVTILE:
Export tiles in the UVTILE numbering scheme:
u(u_tile + 1)_v(v_tile + 1).
- Modificado
Export the UVs from the evaluated mesh with modifiers applied.
- Formato
The file format used for the export:
PNG,EPS, orSVG.- Tamanho
The resolution of the exported image in pixels.
- Opacidade de preenchimento
Sets the opacity of the face fill in the exported image.
Edição proporcional
Referência
- Editor:
UV Editor
- Mode:
Edit Mode
- Header:
- Menu:
- Atalho:
O
Proportional Editing is available in UV editing. The controls are the same as in the 3D Viewport. See Proportional Editing in 3D for a full reference.
Opções para UVs
Referência
- Editor:
UV Editor
- Mode:
Edit Mode
- Menu:
- Desdobramento contínuo
Continuously unwraps the selected UV islands while transforming pinned vertices. Note, this is different than the Live Unwrap option in the 3D Viewport.
- Round to Pixels
During UV transforms, you can use Round to Pixels to help with matching features in the image or ensure your UVs have precise horizontal, vertical or diagonal alignment.
Note that Round to Pixels is applied after any snapping modes.
- Desabilitado:
UVs will not be rounded.
- Corner:
Will force the UVs to round to the corner of the nearest pixel of an image if loaded.
- Center:
Will force the UVs to round to the center of the nearest pixel of an image if loaded.
- Restringir para os limites da imagem
For standard textures, this option prevents UVs from being moved outside the 0 to 1 UV range. For UDIMs textures, this option prevents UVs from being moved outside the nearest UDIM tile.
3D Viewport
Rotate UVs
Referência
- Editor:
3D Viewport
- Mode:
Edit Mode
- Menu:
The orientation of the UV texture is defined by each face. If the image is, for example, upside down or laying on its side, use the (in the 3D Viewport in Face Select mode) menu to rotate the UVs per face in 90-degree turns.
Reverse UVs
Referência
- Editor:
3D Viewport
- Mode:
Edit Mode
- Menu:
The tool mirrors the UVs per face, which flips the image over, showing you the image reversed.