Introdução
Os grupos de vértices podem ter potencialmente um grande número de vértices associados e portanto um grande número de pesos de influência (pois há um valor de peso de influência para cada um dos vértices atribuídos). A Pintura de influência é um método para manter grandes quantidades de informações de pesos de influência de uma maneira bastante intuitiva.
Ela é usada inicialmente para os arranjos de animação de malhas, onde os grupos de vértices são usados para definir as influẽncias relativas dos ossos sobre a malha. Mas nós também a utilizamos para o controle de emissão de partículas, da densidade dos cabelos, e para muitos outros modificadores, chaves de formato, etc.
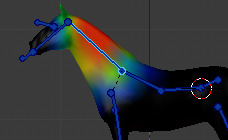
Vertex group in Weight Paint Mode.
You can enter Weight Paint Mode from the Mode selector Ctrl-Tab. The selected mesh object is displayed slightly shaded with a rainbow color spectrum. The color visualizes the weights associated to each vertex in the active vertex group. By default blue means unweighted and red means fully weighted.
You can assign weights to the vertices of the object by painting on it with weight brushes. Starting to paint on a mesh automatically adds weights to the active vertex group (a new vertex group is created if needed).
Vertex Groups can be managed in the palette pop-over in the middle of the header.
O código de cores de pesos de influência
Weights are visualized by a gradient using a cold/hot color system, such that areas of low value (with weights close to 0.0) are displayed as blue (cold) and areas of high value (with weights close to 1.0) are displayed as red (hot). And all in-between values are displayed as rainbow colors (blue, green, yellow, orange, red).
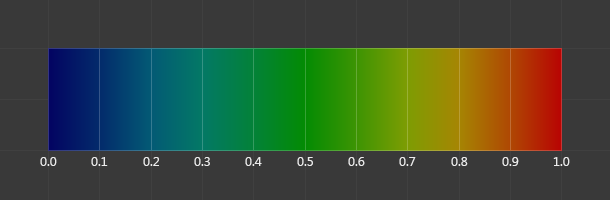
O espectro de cores e seus respectivos pesos de influẽncia.
In addition to the above described color code, Blender has a special visual notation (as an option) for unreferenced vertices: They are displayed as black. Thus you can see the referenced areas (displayed as cold/hot colors) and the unreferenced areas (in black) at the same time. This is most useful when you look for weighting errors. See Viewport Overlays.
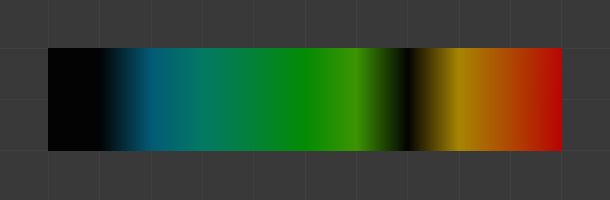
Exemplo de vértices não referenciados.
Nota
You can customize the colors in the weight gradient by enabling Custom Weight Paint Range in the Editing tab of the Preferences.
Normalized Weight Workflow
In order to be used for things like deformation, weights usually have to be normalized, so that all deforming weights assigned to a single vertex add up to 1. The Armature modifier in Blender does this automatically, so it is technically not necessary to ensure that weights are normalized at the painting stage.
However, while more complicated, working with normalized weights has certain advantages, because it allows use of certain tools designed for them, and because when weights are normalized, understanding the final influence of the current group does not require knowing weights in other groups on the same vertex.
These tools are provided to aid working with normalized weights:
- Normalize All
In order to start working with normalized weights it is first necessary to normalize the existing weights. The Normalize All tool can be used for that. Make sure to select the right mode and disable Lock Active.
- Normalizar automaticamente
Once the weights are initially normalized, the Auto Normalize option can be enabled to automatically maintain normalization as you paint. This also tells certain tools that the weights are supposed to be already normalized.
- Vertex group locking
Any vertex group can be locked to prevent changes to it. This can be done via the lock icon in the vertex group list, or using bone selection and the locks pie menu.
This setting prevents accidental edits to groups. However, since it is also respected by Auto Normalize, in the normalized weight workflow it has a more significant meaning of locking the current influence of chosen bones, so that when you paint other bones, the weight is redistributed only between the unlocked groups.
In locations affected by multiple bones, this allows more precise tweaking and re-balancing of weights by temporarily focusing on a subset of bones. This can also be aided by the Lock Relative option, which displays unlocked groups as though re-normalized with the locked groups deleted, thus making it appear as if the locked groups did not even exist.
- Pintura múltipla
Finally, the Multi-Paint option allows treating multiple selected bones as if they were one bone, so that the painting operations change the combined weight, preserving the ratio within the group. Combined with locking, this allows balancing between one set of bones versus the rest, excluding a third set that has its influence not affected in any way due to locks.
Technically, this option does not require the normalized workflow, but since non-normalized weights can add to more than 1, the weight display behaves best with Auto Normalize enabled.
Dica
For example, when dealing with a bone loop, e.g. mouth or an eye, selecting the loop with Multi-Paint exposes the falloff between the loop as a whole and surrounding bones, while locking the surrounding bones and using Lock Relative displays the falloff between bones within the loop. Thus the complex two-dimensional falloff of each bone can be viewed and edited as two independent one-dimensional gradients.