Saída
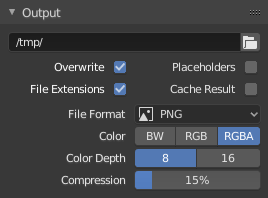
Output panel.
This panel defines where rendered images and animations are saved, along with their output format and quality settings.
By default, animation renders are saved automatically, while still renders are not. Still images must be saved manually from the Image Editor or written using a Saída de arquivo.
The automatic saving of renders can be toggled using the checkbox in the panel header.
When enabled, Blender behaves in the standard way: still renders (F12) are not saved automatically, while animation renders (Ctrl-F12) are written to the configured output path.
When disabled, Blender does not write render output from this panel and instead relies on other systems. For animation renders, if the Editor de sequências de vídeo is active and no alternative output is available, an error is raised. Otherwise, if compositing is enabled, active Saída de arquivo nodes are used to save the result. If no such nodes exist, an error is reported.
Playblast operations also require an active output method. Both Render Playblast and Render Playblast on Keyframes will raise an error when render output is disabled in this panel.
- File Path
Choose the location to save rendered frames.
When rendering an animation, the frame number is appended at the end of the file name with four padded zeros (e.g.
image0001.png). You can set a custom padding size by adding the appropriate number of#anywhere in the file name (e.g.image_##_test.pngtranslates toimage_01_test.png).This setting expands Relative Paths where a
//prefix represents the directory of the current blend-file.
- Saving – File Extensions
Adds the correct file extensions per file type to the output files.
- Saving – Cache Result
Saves the rendered view layers and their passes to a multi-layer OpenEXR image. The Compositor can then use this file to improve performance, especially for heavy compositing.
The image is stored in the Render Cache folder as specified in the File Paths Preferences. You can also load it back into the Image Editor’s Render Result, even after closing and reopening Blender; see Open Cached Render.
- Media Type
The type of media to save.
- Imagem:
Saves each input as a separate image file. Each input can use its own image format settings.
- Multi-Layer EXR:
Saves all inputs together in a single multi-layer OpenEXR file.
- Video:
Encodes each frame into a video container. Encoding options can be found in the Encoding panel.
- File Format Image
Choose the image file format to save to. Based on which format is used, other options such as channels, bit depth and compression level are available. See saving images for list of image encoding options.
- Color Image Multi-Layer EXR
The color format to save the image or video to. This setting is used by some formats to optimize how much data is written to the file. Note, RGBA is not available for all image formats, check the list above for details.
- BW:
Saves the image using grayscale colors.
- RGB:
Saves red, green and blue channels
- RGBA:
Saves red, green, blue and alpha channels.
- Image Sequence – Overwrite Image Multi-Layer EXR
Overwrite existing files when rendering.
- Image Sequence – Overwrite Image Multi-Layer EXR
Create empty placeholder frames while rendering.
Dica
Primitive Render Farm
An easy way to get multiple machines to share the rendering workload is to:
Set up a shared directory over a network file system.
Disable Overwrite, enable Placeholders in the Render Output panel.
Start as many machines as you wish rendering to that directory.
Gerenciamento de cores
This panel controls how Gerenciamento de cores is applied when saving images.
- Follow Scene:
Uses the same color management settings defined by the active Scene. These properties are defined in the Render Settings
- Override:
Uses custom color management settings defined by the properties below in the panel; disregarding any color management settings set at the Scene level.
For a detailed description of color management properties, see the Color Management page.
Pixel Density
The pixel density (often called PPI or DPI) controls the intended physical size for an image. This is often used for printing or the physical size when loaded into desktop publishing software.
The X/Y density is calculated using the render X/Y aspect, making these values useful for storing the aspect ratio of non-square pixels.
The pixel-density is meta-data which doesn’t impact the quality of the image.
Veja também
Encoding
Referência
- Panel:
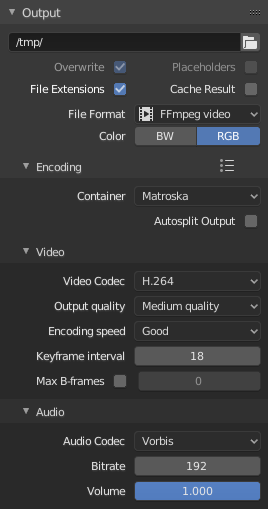
Encoding panel.
Here you choose which video container, codec, and compression settings you want to use. With all of these compression choices, there is a trade-off between file size, compatibility across platforms, and playback quality. In the header, you can use the presets, which choose optimum settings for you for that type of output.
Dica
When you view the System Console,
you can see some of the output of the encoding process.
You will see even more output if you execute Blender as blender -d.
- Container
Video container or file type. For a list of all available options, see video formats.
- Autosplit Output
If your video is huge and exceeds 2GiB, enable Autosplit Output. This will automatically split the output into multiple files after the first file is 2GiB in size.
Video
- Video Codec
Chooses the method of compression and encoding. For a list of all available options see video formats.
Nota
Standards
Some containers and codecs are not compatible with each other, so if you are getting errors check that your container and codec are compatible. Like containers and codecs are sometimes not compatible with each other, some codecs do not work with arbitrary dimensions. So, try to stick with common dimensions or research the limitations of the codec you are trying to use.
- Profundidade de cores
The exponent value (with base two) for how many colors can be represented within a single color channel. A higher bit depth will allow more possible colors, reducing banding, and increasing precision. Yet a higher bit depth will increase memory usage exponentially.
Note, not all file formats support every color depth configuration.
- 8:
Allows 256 levels per channel, resulting in approximately 16.7 million total colors (RGB). This is the most common format for on-screen graphics and standard video.
- 10:
Allows 1,024 levels per channel, resulting in over 1 billion total colors (RGB).
Available for H.264, H.265, and AV1 codecs.
- 12:
Allows 4,096 levels per channel, resulting in over 68 billion total colors (RGB).
Available for H.265 and AV1 codecs.
- Profile ProRes
Determines the quality, compression, and data rate of the encoded video.
- ProRes 422 Proxy:
Lowest data rate and quality. Useful for offline editing or situations where storage and speed are critical.
- ProRes 422 LT:
Lower data rate than standard ProRes 422 with reasonable quality. Suitable for editing and draft reviews.
- ProRes 422:
Standard quality with good balance between image fidelity and file size. Recommended for general workflows.
- ProRes 422 HQ:
Higher quality and data rate than standard ProRes 422. Preferred for broadcast and high-end post-production.
- ProRes 4444:
Supports full-resolution RGB and alpha channels. Suitable for compositing and visual effects pipelines.
- ProRes 4444 XQ:
Highest quality ProRes format. Maintains maximum color detail and dynamic range, ideal for color grading and VFX.
- Output Quality
These are preset Rate.
- CRF Custom Quality
Constant Rate Factor (CRF). A smaller CRF results in better video quality but larger file size. The range of allowed CRF values is dependent on the codec. They are: 0-51 for AV1, H.264 and H.265/HEVC; 0-63 for WebP/VP9 and 1-31 for MPEG-4/DivX. CRF values outside the allowed range are clamped to the nearest allowed value. A CRF value of 0 results in lossless encoding.
- Encoding Speed
Presets to change between a fast encode (bigger file size) and more compression (smaller file size).
- Keyframe Interval
The number of pictures per Group of Pictures. Set to 0 for «intra_only», which disables inter-frame video. A higher number generally leads to a smaller file but needs a higher-powered device to replay it.
- Max B-frames
Enables the use of B-frames.
- Interval
The maximum number of B-frames between non-B-frames.
Rate
- Bitrate
Sets the average bit rate (quality), which is the count of binary digits per frame. See also: FFmpeg -b:v.
- Minimum / Maximum
Video files can use what is called variable bit rate (VBR). This is used to give some segments of the video less compressing to frames that need more data and less to frames with less data. This can be controlled by the Minimum and Maximum values.
- Buffer
The decoder bitstream buffer size.
- Mux Rate
Maximum bit rate of the multiplexed stream. Multiplexing is the process of combining separate video and audio streams into a single file, similar to packing a video file and MP3 audio file in a zip-file.
- Mux Packet Size
Reduces data fragmentation or muxer overhead depending on the source.
Áudio
These settings change how sound is exported while rendering. To control how sound is played back from within Blender, see the audio settings in the Preferences.
- Audio Codec
Audio format to use. For a list of all available options, see video formats.
- Canais de audio
The number of audio source «locations» to encode.
- Mono:
Output a single audio channel.
- Stereo:
Output two audio channels; typically a left and right channel.
- 4 Channels:
Output a four audio channels.
- 5.1 Surround:
Output a five audio channels with one LFE channel.
- 7.1 Surround:
Output a seven audio channels with one LFE channel.
- Taxa de amostragem
Sets the audio sampling rate.
- Bitrate
For each codec, you can control the bit rate (quality) of the sound in the movie. Higher bit rates are bigger files that stream worse but sound better. Use powers of 2 for compatibility.
- Volume
Sets the output volume of the audio.
Dicas
Dica
The choice of video format depends on what you are planning to do.
It’s not recommended to render directly to a video format in the first instance. If a problem occurs while rendering, the file might become unplayable and you will have to re-render all frames from the beginning. If you first render out a set of static images such as the default PNG format or the higher-quality OpenEXR (which can retain HDR pixel data), you can combine them as an Image Strip in the Video Sequencer. This way, you can easily:
Restart the rendering from the place (the frame) where any problem occurred.
Try out different video encoding options in seconds, rather than minutes or hours as encoding is usually much faster than rendering the 3D scene.
Enjoy the rest of the features of the Video Sequencer, such as adding Image Strips from previous renders, audio, video clips, etc.
Dica
You shouldn’t post-process a lossy-compressed file as the compression artifacts may become visible. Lossy compression should be reserved as a final “delivery format”.