Sidebar Region
Footage
Proxy/Timecode
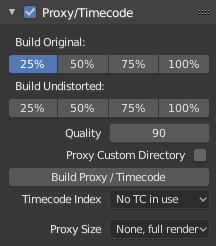
High-resolution video files can impact Blender’s performance, slowing down scrubbing and other operations. To counter this, you can generate one or more proxies, which are copies of the original footage stored at a lower resolution and/or quality. These proxies can then be used as a less resource-heavy stand-in while working on the scene.
- Build Original
The proxy resolution(s) to generate based on the original, distorted footage.
- Build Undistorted
The proxy resolution(s) to generate based on the undistorted footage (that is, with the Lens settings applied to undo the distortion in the recording).
- Qualidade
Controls the level of lossy compression applied to the image, expressed as a percentage. Lossy compression reduces file size by discarding some image data, which may result in a loss of detail.
0%: Maximum compression, producing the smallest file size but the most noticeable quality loss.
100%: No compression, preserving full image quality at the cost of a larger file size.
- Proxy Custom Directory
By default, proxies are stored to a
BL_proxysubfolder next to the original file. Use this option to specify a different location.- Build Proxy/Timecode
Generates proxies based on the settings above, as well as timecode files. Instead of using this button, you can also click .
- Timecode Index
When you are working with footage directly copied from a camera without preprocessing it, there might be numerous artifacts, mostly due to seeking to a given frame in the sequence. This happens because such footage usually does not have correct frame rate values in the file header. This issue can still arise when the source clip has the same frame rate as the scene settings. In order for Blender to correctly calculate the frames and frame rate there are two possible solutions:
Preprocess your video with e.g. MEncoder to repair the file header and insert the correct keyframes.
Use the Timecode Index option in Blender.
- Nenhum:
Ignore generated timecodes, seek in movie stream based on calculated timestamp.
- Record Run:
Seek based on timestamps read from movie stream, giving the best match between scene and movie times.
- Record Run No Gaps:
Effectively convert movie to an image sequence, ignoring incomplete or dropped frames, and changes in frame rate.
Nota
Record Run is the Timecode Index which usually is best to use, but if the source file is totally damaged, Record Run No Gaps will be the only chance of getting an acceptable result.
- Tamanho de renderização da aproximação
Which proxy size to use for display. Depending on the Render Undistorted setting, Blender will use either the Original proxy or the Undistorted proxy.
Footage Settings
Animação
Controls animation data for movie clip properties, including active Actions and their assigned Slot.
See Manually Assigning Actions and Slots for more information.
Track
See Track.
Stabilization
See Estabilização 2D.
Visualização
Cursor 2D
The 2D Cursor is the dashed crosshair in the main region. It can be used as a transformation pivot point by selecting the corresponding option in the editor’s header.
Note that the 2D Cursor is only available in Mask mode, not in Tracking mode.
- Location X, Y
The relative location of the 2D Cursor, going from (0, 0) for the bottom left corner to (1, 1) for the top right corner.
You can also position the 2D Cursor by clicking Shift-RMB in (or around) the video.
Anotações
See Anotações.