Editing
Referência
- Mode:
Edit Mode and Weight Paint Mode
- Menu:

As ferramentas para pesos de influência.
Blender provides a set of helper tools for Weight Painting.
Opções para subconjuntos
Some of the tools also provide a Subset filter to restrict their functionality to only specific vertex groups (in the Adjust Last Operation panel, displayed after the tool is called) with following options:
Grupo ativo
Ossos de pose selecionados
Deform Pose Bones
Todos os grupos
All tools also work with Vertex Selection Masking and Face Selection Masking. In these modes the tools operate only on selected vertices or faces.
Atribuir a partir dos envelopes de ossos
Apply the envelope weight of the selected bone(s) to the selected vertex group.
Atribuir automaticamente a partir do osso
Aplica os pesos de influência a partir dos ossos selecionados para o grupo de vértices os mesmos métodos de aplicação de «pesos de influência automáticos» como os que estão disponíveis no menu de «Definir parente para…» quando uma armação está selecionada.
Normalize All
For each vertex, this tool makes sure that the sum of the weights across all vertex groups is equal to 1. This tool normalizes all of the vertex groups, except for locked groups, which keep their weight values untouched.
- Lock Active
Mantém os valores do grupo ativo enquanto normaliza todos os outros.
Normalizar
This tool only works on the active vertex group. All vertices keep their relative weights, but the entire set of weights is scaled up such that the highest weight value is 1.0.

Normalize example.
Espelhar
The Mirror Vertex Group tool mirrors the weights from one side of a perfectly symmetrical mesh to the opposite side. Those vertices that have no corresponding vertex on the other side will not be affected. But note, the weights are not transferred to the corresponding opposite bone weight group.
Nota
Mirroring only works when the object’s rest pose is perfectly symmetrical across the X axis.

Mirror example.
- Mirror Weights
With this option checked, every selected vertex receives the weight information of its symmetrical counterpart. If both vertices are selected, it will be a weight information exchange; if only one is selected, information from the unselected will overwrite the selected one. Information on weight is passed for the active group only, unless All Groups is checked, in which case it is passed for all groups.
- Inverter os nomes de grupos
Works with selected vertices that belong to vertex groups with «symmetrical names» (with components like «L», «R», «right», «left»). All selected vertices that belong to the active group, or to the symmetrical of the active group, will have their assignation to that group replaced by an assignation to the symmetrical one; however, its weight will be preserved. If All Groups is checked, all assignations to these kind of groups will be replaced by the symmetrical counterpart, also keeping the old weights.
- Todos os grupos
Operate on all vertex groups, instead of the active one.
- Espelhar topologia
Mirror for meshes which are not fully symmetric (approximate mirror). See here for more information.
Dica
Mirror to Opposite Bone
Caso você queira criar um grupo de pesos de influência espelhado para o osso oposto (de um personagem simétrico), então você poderá fazer isto:
Delete the target vertex group (where the mirrored weights will be placed).
Create a copy of the source bone vertex group (the group containing the weights which you want to copy).
Rename the new vertex group to the name of the target vertex group (the group you deleted above).
Select the target vertex group and call the Mirror tool (use only Mirror Weights and optionally Topology Mirror if your mesh is not symmetric).
Invert
Substitua cada um dos pesos de influência dos pesos selecionados pela influẽncia multiplicada por -1.0.
Exemplos:
Original 1.0 converte para 0.0
Original 0.5 permanece 0.5
Original 0.0 converte para 1.0

A inversão.
- Subset
Restrict the tool to a subset. See above The Subset Option about how subsets are defined.
- Add Weights
Adiciona vértices que não têm pesos antes da inversão (todos estes pesos serão definidos para 1.0).
- Remove Weights
Remove vértices do grupo de vértices se eles forem 0.0 depois da inversão.
Nota
Locked vertex groups are not affected.
Limpar
Clean Vertex Group Weights unassigns vertices from Vertex Groups whose weights are below the Limit. Removes weights below a given threshold. This tool is useful for clearing your weight groups of very low (or zero) weights.
In the example shown, a cutoff value of 0.2 is used (see operator options below) so all blue parts are cleaned out.
Note que as imagens utilizam a opção Ativo(a) para Mostrar pesos zero: (na aba opções) de maneira que os pesos de influência não referenciados são mostrados na cor preta.

Clean example.
- Subset
Restrict the tool to a subset. See above The Subset Option for how subsets are defined.
- Limit
This is the minimum weight value that will be kept in the group. Weights below this value will be removed from the group.
- Manter um único
Ensure that the Clean tool will not create completely unreferenced vertices (vertices which are not assigned to any vertex group), so each vertex will keep at least one weight, even if it is below the limit value!
Quantificar
This operator uses a process known as Quantization which takes the input weights and clamps each weight to a number of steps between (0 - 1), so there is no longer a smooth gradient between values.

Quantize example (Steps = 2).
- Passos
The number of steps between 0 and 1 to quantize the weights into. For example 5 would allow the following weights
[0.0, 0.2, 0.4, 0.6, 0.8, 1.0].
Levels
Adds an offset and a scale to all weights of the selected weight groups. with this tool you can raise or lower the overall «heat» of the weight group.
Nota
Nenhum peso de influência qualquer será definido para valores que estiverem acima de 1.0 ou abaixo de 0.0, independentemente das configurações e / ou definições.

Levels example.
- Subset
Restrict the tool to a subset. See above The Subset Option for how subsets are defined.
- Deslocamento
A value from the range (-1.0 - 1.0) to be added to all weights in the vertex group.
- Ganho
Todos os pesos de influẽncia dentro do subconjunto serão multiplicados com o ganho.
Nota
Quaisquer que sejam os valores de Ganho e Deslocamento que você escolher, e para todos os casos, o valor final dos pesos de influência serão limitados (truncados) dentro do intervalo de amplitude de (0.0 a 1.0). Portanto, você jamais terá como resultado pesos de influência negativos (congelamento ou pesos < 0.0 ) ou pesos de influência acima de 1.0 (superaquecimento ou pesos > 1.0) através da utilização desta ferramenta.
Suavizar
The Smooth operator blends the weights of selected vertices based on the average of adjacent vertices, creating smoother transitions in weight painting. This operator is useful for refining weight distributions, improving deformation in rigging, and eliminating abrupt transitions between vertex weights.
Nota
This operator requires vertex selection to be enabled; otherwise, it will be unavailable.
- Subset
Restrict the tool to a subset. See above The Subset Option about how subsets are defined.
- Fator
Controls the amount of blending toward the average weight of connected vertices.
A Factor of 0.0 preserves the original weights.
A Factor of 1.0 fully adopts the calculated average weight.
Values between 0.0 and 1.0 blend the weights proportionally.
- Iterations
Sets how many times the smoothing operation is repeated. Higher values produce smoother results but may introduce unwanted artifacts in fine details.
- Expandir ou Contrair
Adjusts the smoothing influence by expanding or contracting the selection:
Positive values expand the selection to include neighboring vertices.
Negative values contract the selection to focus on a smaller subset of vertices.
Examples
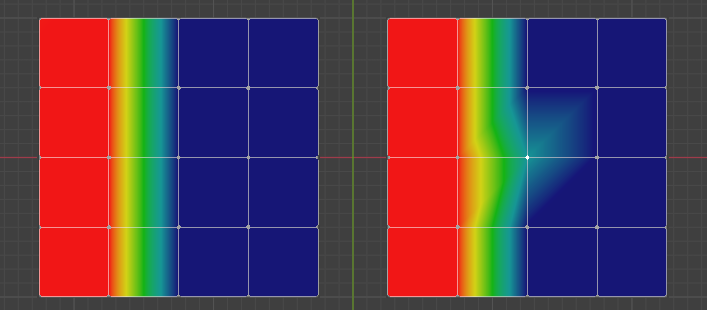
Example: Single Selected Vertex
Consider a single selected vertex connected to four unselected vertices.
The unselected vertices have weights: 1, 0, 0, and 0.
The average weight of the unselected vertices is:
If the Factor is:
0.0: The selected vertex retains its original weight.
1.0: The selected vertex adopts the calculated average weight (0.25).
Between 0 and 1: The vertex’s weight gradually shifts toward 0.25, blending proportionally.

Single vertex select with a Factor of 1.0.
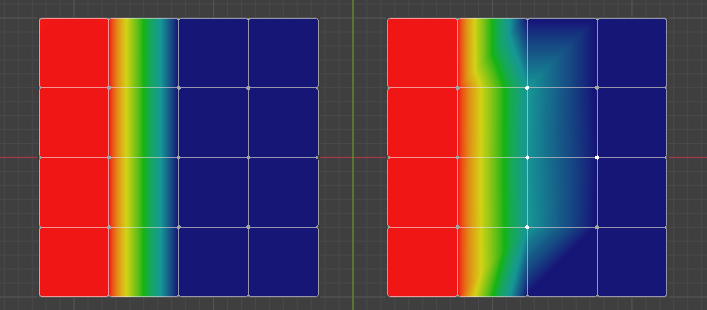
Example: Multiple Selected Vertices
When multiple vertices are selected, the Smooth operator applies calculations to each vertex based on its adjacent unselected vertices.
Por exemplo:
A vertex connected to three unselected vertices with weights
A vertex connected to one unselected vertex with weight 1 averages to
A vertex connected only to unselected vertices with weights
These blended results depend on the Factor value.

Three selected vertices with a Factor of 1.0.
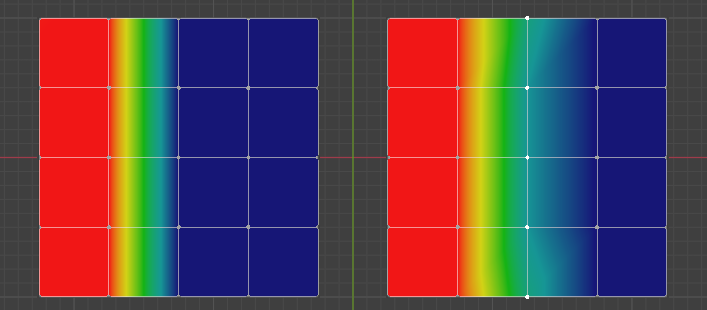
Example: Edge Loop Smoothing
In a practical use case, selecting a middle edge loop allows the operator to blend weights between adjacent areas. For example:
The edge loop has two unselected adjacent vertices on either side, with weights
The average weight is
Applying the Smooth operator with Factor set to 1.0 will turn the edge loop green, creating a smooth blend between the «hot» (left) and «cold» (right) sides.

Center edge loop of vertices selected with a Factor of 1.0.
Transferência de pesos de influência
Copy weights from other objects to the vertex groups of the active object.
By default this tool copies only the active (selected) vertex group of the source object to the active vertex group of target object or creates a new one if the group does not exist. However, you can change the tool’s behavior in the Adjust Last Operation panel.
For example, to transfer all existing vertex groups from the source objects to the target, change the Source Layers Selection option to By Name.
Nota
This tool uses the generic «data transfer», but transfers from all selected objects to active one. Please refer to the Data Transfer docs for options details and explanations.
Preparando cópias
Você deverá selecionar primeiramente todos os objetos de fonte, e finalmente o objeto alvo (o objeto alvo deverá ser o objeto ativo).
It is important that the source objects and the target object are at the same location. If they are placed side-by-side, then the weight transfer will not work. (See the Vertex Mapping option.) You can place the objects on different layers, but you have to ensure that all objects are visible when you call the tool.
Now ensure that the target object is in Weight Paint Mode. Open the Toolbar and call the Transfer Weights tool in the Weight Tools panel.
Adjust Last Operation Panel Confusion
You may notice that the Adjust Last Operation panel stays available after the weight transfer is done. The panel only disappears when you call another Operator that has its own Adjust Last Operation panel. This can lead to confusion when you use Transfer weights repeatedly after you changed your vertex groups. If you then use the still-visible Adjust Last Operation panel, then Blender will reset your work to its state right before you initially called the Transfer Weights tool.
So when you want to call the Transfer Weights tool again after you made some changes to your vertex groups, then always use the Transfer Weights button, even if the Adjust Last Operation panel is still available. Unless you really want to reset your changes to the initial call of the tool.
Limitar total
Reduz o número de grupos de pesos por vértices ao limite especificado. A ferramenta remove os pesos de influência mais baixos inicialmente e antes que o limite tenha sido atingido.
Dica
A ferramenta somente poderá funcionar de maneira razoável quando um ou mais grupos de pesos estiverem selecionados.
- Subset
Restrict the tool to a subset. See above The Subset Option for how subsets are defined.
- Limit
O número máximo de pesos de influência permitidos por cada vértice.
Set Weight
Referência
- Mode:
Modo Weight Paint
- Menu:
- Atalho:
Ctrl-X
Fill the active vertex group with the current paint weight.
Sample Weight
Referência
- Mode:
Modo Weight Paint
- Menu:
- Atalho:
Shift-X
Adjust the Weight of the Draw tool to the weight of the vertex under the mouse cursor.
Sample Group
Referência
- Mode:
Modo Weight Paint
- Menu:
- Atalho:
Shift-Ctrl-X
Select one of the vertex groups available under current mouse position.
Gradient (Linear)
Referência
- Mode:
Modo Weight Paint
- Menu:
- Atalho:
Shift-A
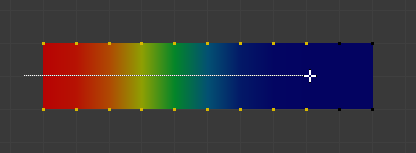
Applies a linear weight gradient; this is useful at times when painting gradual changes in weight becomes difficult. Blends the weights of selected vertices with unselected vertices.

Exemplo da ferramenta de gradiente sendo usada com os vértices selecionados.
- Weight
A gradiente é iniciada no valor dos pesos de influência atualmente selecionados, e inicia a sua mesclagem até valores de pesos zerados.
- Strength
Valores mais baixos podem ser usados de maneira que a gradiente seja misturada (mesclada) em conjunto com os pesos previamente existentes (bem como com os pincéis).
- Tipo
The shape of the gradient.
- Linear:
Create gradient that forms a straight line.
- Radial:
Create gradient that forms a circle.
Gradient (Radial)
Referência
- Mode:
Modo Weight Paint
- Menu:
- Atalho:
Shift-Alt-A
Applies a radial weight gradient; this is useful at times when painting gradual changes in weight becomes difficult. Blends the weights of selected vertices with unselected vertices.
- Weight
A gradiente é iniciada no valor dos pesos de influência atualmente selecionados, e inicia a sua mesclagem até valores de pesos zerados.
- Strength
Valores mais baixos podem ser usados de maneira que a gradiente seja misturada (mesclada) em conjunto com os pesos previamente existentes (bem como com os pincéis).
- Tipo
The shape of the gradient.
- Linear:
Create gradient that forms a straight line.
- Radial:
Create gradient that forms a circle.
Locks
Referência
- Mode:
Edit Mode and Weight Paint Mode
- Menu:
- Atalho:
K
Vertex groups can be locked to prevent undesired edits to a particular vertex group.
Dica
Bones that belong to a locked vertex group are displayed in red the 3D Viewport.
- Lock All
Locks all vertex groups.
- Lock Selected
Locks selected vertex groups.
- Lock Unselected
Locks unselected vertex groups.
- Lock Only Selected
Lock selected and unlock selected vertex groups.
- Lock Only Unselected
Unlock selected and lock unselected vertex groups.
- Unlock All
Unlocks all vertex groups.
- Unlock Selected
Unlocks selected vertex groups.
- Unlock Unselected
Unlocks Unselected vertex groups.
- Invert Locks
Inverts the locks on all vertex groups.