World Settings
Passo de névoa
Referência
- Panel:
Nota
The mist pass must be enabled in the View Layer tab of the Properties Editor before the settings below are available in the World tab.
Mist can greatly enhance the illusion of depth in your rendering. To create mist, Blender generates a render layer with a depth map ranging between 0.0 and 1.0 that can be used in the Compositor to generate a mist effect.
- Início
The distance from the camera at which the mist starts to fade in.
- Profundidade
The distance from Start of the mist, that it fades in over. Objects further from the camera than Start + Depth are completely hidden by the mist.
- Decaimento
The curve function that controls the rate of change of the mist’s strength further and further into the distance.
- Quadrático(a):
Use o mesmo cálculo como decaimento de luz (\(1\over{x^2}\)) e fornece a transição mais suave do transparente (0.0) ao opaco (1.0).
- Linear:
Início mais íngreme que quadrático (\(1\over{x}\)).
- Quadrático(a) inverso(a):
Início mais íngreme (\(1\over{\sqrt{x}}\)) e aproxima-se de 1.0 mais rápido que as outras duas funções.
Dica
A visualization can be activated in the panel.
Mist example (blend-file).
Ray Visibility
Referência
- Panel:
Como outros objetos, Visibilidade dos raios projetados permite você controlar qual outro sombreador pode «ver» o ambiente.
Truques
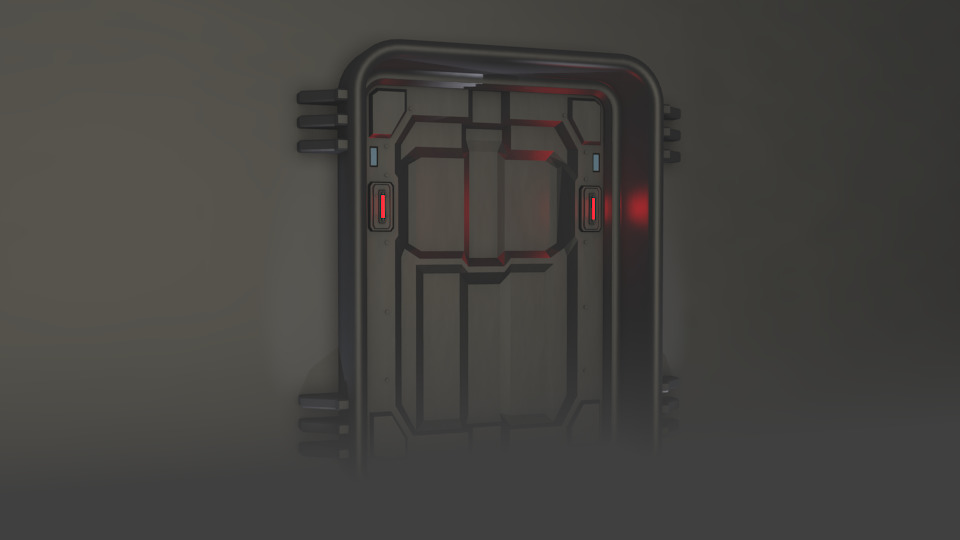
Sometimes it may be useful to have a different background that is directly visible versus one that is indirectly lighting the objects. A simple solution to this is to add a Mix node, with the Blend Factor set to Is Camera Ray. The first input color is then the indirect color, and the second the directly visible color. This is useful when using a high-res image for the background and a low-res image for the actual lighting.
Similarmente, adicionando os raios São raios para a câmera e São raios para o polimento significa que a imagem de alta resolução também será visível nas reflexões.
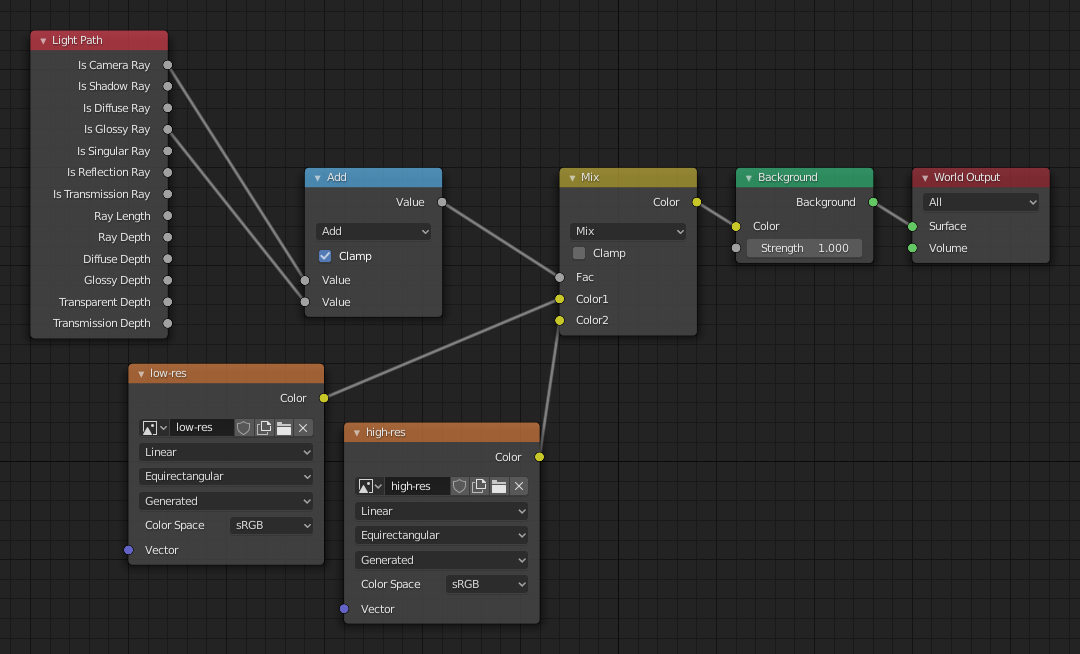
Nós para o truque acima.
Configurações
Referência
- Panel:
Superfície
- Amostragem
Controls the sampling method for the world material. Selecting Auto or Manual enables Multiple Importance Sampling while None disables it. Multiple Importance Sampling is a method to sample the background texture such that lighter parts are favored, creating an importance map. It will produce less noise in the render in trade of artifacts (Fireflies). Enable this when using an image texture with small area lights (like the sun), otherwise noise can take a long time to converge.
Below is a comparison between Multiple Importance Sample off and on. Both images are rendered for 25 seconds (Off: 1,500 samples, On: 1,000 samples).

- Resolução de mapa
Sets the resolution of the importance map. A higher resolution will better detect small features in the map and give more accurate sampling but conversely will take up more memory and render slightly slower. Higher values also may produce less noise when using high-res images.
- Máximo de rebatimentos
Número máximo de rebatimentos que a luz do plano de fundo contribuirá para a renderização.
Veja também
Veja Reducing Noise para mais informações em como reduzir o ruído.
- Shadow Caustics
Mark the World Shader as a refractive caustic caster. This setting can be used in conjunction with the Cast and Receive caustics object settings to selectively speed up refractive caustic rendering of select objects.
- Projetar sombras
Allows the world background to cast shadows in the scene.
When enabled, objects can block light coming from the world environment. Disabling this prevents the world from contributing shadowing, which can be useful for artistic control or reducing overly dark indirect lighting.
Volume
- Método de amostragem
- Distância:
For dense volumes lit from far away Distance sampling is more efficient in most cases. Usually this shouldn’t be used for World volumes.
- Equiangular:
Se você tem uma luz dentro ou perto do volume então amostragem equiangular é melhor
- Múltipla importância:
Se você tem uma combinação de ambas, então a amostragem de importância múltipla será melhor.
- Interpolation
Método de interpolação a ser utilizado para volumes.
- Linear:
Simple interpolation which gives good results for thin volumes.
- Cubic:
Smoothed high-quality interpolation needed for more dense volumes, but slower.
- Step Size Biased
Distance between volume shader samples for world volume shaders. Only enabled when is enabled. See Volume Render Settings for more information.
Light Group
- Light Group Cycles only
Select the Light Group to add the current World Surface Shader too.
- Add Light Group
If the name input into the Light Group field does not align with an existing Light Group, then pressing this button will create a Light Group with that name and assign this World Shader to it.