Introdução
A UV texture is a picture (image, sequence or movie) that is used to color the surface of a mesh. The UV texture is mapped to the mesh through one or more UV maps. There are three ways to establish the image used by the UV texture:
Use any image editing program to create an image. In the Image Editor, select the UV texture and load the image. Blender will then use that texture’s UV map to transfer the colors to the faces of the mesh.
Paint a flat image in the Image Editor onto the currently selected UV texture, using its UV map to transfer the colors to the faces of the mesh.
Paint the mesh in the 3D Viewport, and let Blender use the currently selected UV map to update the UV texture (as discussed below).
Blender features a built-in paint mode called Texture Paint which is designed specifically to help you edit your UV textures and images quickly and easily in either the Image Editor or the 3D Viewport. Since a UV texture is just a special-purpose image, you can also use any external paint program, like GIMP or Krita.
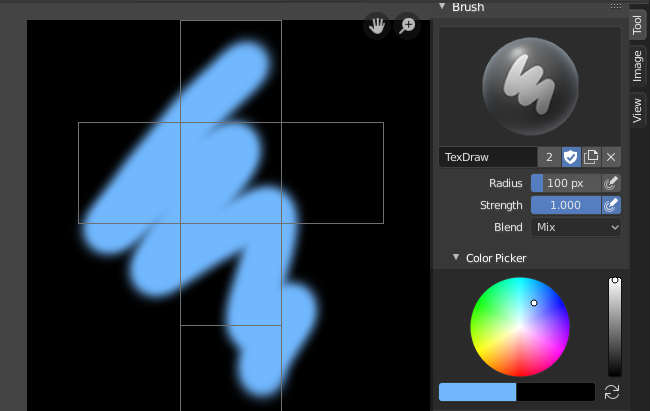
A pintura de texturas no Blender.
Since a mesh can have layers of UV textures, there may be many images that color the mesh. However, each UV texture only has one image.
Texture Paint works in both a 3D Viewport and the Image Editor. In the 3D Viewport in Texture Paint Mode, you paint directly on the mesh by projecting onto the UVs.
Dica
Memory Optimization
Texture Paint is fast and responsive when working in the 3D Viewport and when your image is sized as a square where the side lengths are a power of two, e.g. 256×256, 512×512, 1024×1024, etc.
Getting Started
The object to be painted on must first be unwrapped. UVs can be added traditionally, with standard Unwrapping Tools, or by adding Simple UVs in Texture Paint mode.
Nota
When no UV layers can be detected, Blender will display a warning message.
Once you have unwrapped your model to a UV map, you can begin the texturing process. To use texture paint you may do any of the following:
Activate the Texture Paint workspace. Here the 3D Viewport has the Texture Paint Mode enabled and the Image Editor is already switched to Paint mode.
In the 3D Viewport, select Texture Paint Mode from the mode selector in the header, and you can paint directly onto the mesh.
In the Image Editor, switch the mode to Paint (shown in the image to the right).
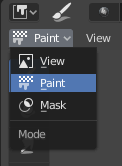
Enabling Paint mode.
Once you enable Texture Painting, your mouse becomes a brush. As soon as you enable Texture Painting or switch to Texture Paint Mode, different tools become available in the Toolbar.
In the Image Editor, you paint on a flat canvas that is wrapped around the mesh using UV coordinates. Any changes made in the Image Editor show up immediately in the 3D Viewport, and vice versa.
To work with the UV layout (for example, to move coordinates) you must use the UV Editor.
A full complement of brushes and colors can be selected from the Sidebar region in the Image Editor. Brush changes made in either panel are immediately reflected in the other panel. However, the modified texture will not be saved automatically; you must explicitly do so with Save Image.
Previsão de textura
Caso a sua textura já esteja sendo utilizada para cores, mapas de relevo, deslocamento, transparências alfa, etc, você poderá ver os efeitos da sua pintura dentro do contexto de sua cena conforme você faz a pintura. (Em outras palavras mais técnicas, significa que as camadas de textura de suas malhas estão mapeadas para algum aspecto específico de acabamento para as mesmas, através de um canal de textura específico que utiliza um mapa UV como entrada).
To do this, set up side-by-side areas, one Area in 3D Viewport set to Texture shading option, and in the second Area the Image Editor loaded with your image. Position the 3D Viewport to show the object that is UV-mapped to the loaded image. In the image to the right, the texture being painted is mapped to the «Normal» attribute, and is called «bump mapping», where the grayscale image is used to make the flat surface appear bumpy. See Texture Mapping Output for more information on bump mapping.
Salvando
If the header menu item Image has an asterisk next to it means that the image has been changed, but not saved. Use Save Image or Save Image As to save your work with a different name or overwrite the original image.
Nota
Texturas UV
Since images used as UV textures are functionally different from other images, you should keep them in a directory separate from other images.
The image format for saving is independent of the format for rendering.
The format for saving a UV image is selected in the header of the File Browser,
and defaults to PNG (.png).
If Packing is enabled in the File Browser’s header, or if you manually pack, saving your images to a separate file is not necessary.
Usando um editor de imagens externo
If you use an external program to edit your UV texture, you must:
Run that paint program (GIMP, Krita, etc.).
Carregar a imagem ou criar uma nova.
Alterar a imagem.
Salvá-la novamente utilizando este programa.
Back in Blender, you reload the image in the Image Editor.
Você irá querer utilizar um programa externo caso você tenha equipes de pessoas utilizando diferentes programas que estão desenvolvendo as texturas UV, ou caso você queira aplicar quaisquer efeitos especiais que a Pintura de textura não tenha suporte ou não possua a finalidade desejada, ou caso você seja muito mais familiarizado com o seu programa de pintura.
Known Limitations
Sobreposição ou interposição de UVs
Em geral, a sobreposição ou interposição de UVs não é suportada (bem como ocorre com a geração e gravação de texturas).
Contudo, isto somente é um problema quando uma único traço de pincel pinta sobre múltiplas faces que compartilham uma textura.
Visualização em perspectiva e as faces que estão atrás da visualização
When painting onto a face which is partially behind the view (in perspective mode), the face cannot be painted on. To avoid this, zoom out or use an orthographic viewport.
Visualização em perspectiva e baixa contagem de polígonos
When painting onto a face in perspective mode onto a low-poly object with normals pointing away from the view, painting may fail; to workaround disable the Normal Falloff option in the stroke settings.
Typically this happens when painting onto the side of a cube (see Blender bug #34665).