Desfocar (via efeito)

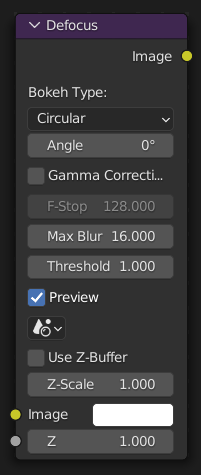
The Defocus Node blurs areas of an image based on a Z depth map or mask input.
É tipicamente usado para emular a profundidade de campo (DOF) usando um método de pós processamento através de uma entrada de Buffer-Z, mas também pode ser usado para desfocar imagens que não são embasadas em profundidade Z.
Inputs
- Imagem
Standard color input.
- Z
A entrada de Buffer-Z, mas também pode ser uma imagem (em escala de cinza) usada como máscara, ou um valor único de entrada.
Properties
- Tipo de flocagem
O número de lâminas de íris usadas pra o diafragma da câmera virtual.
Disk (to emulate a perfect circle), Triangle (3 blades), Square (4 blades), Pentagon (5 blades), Hexagon (6 blades), Heptagon (7 blades) or Octagon (8 blades).
- Ângulo
This slider is deactivated, if the Bokeh Type is set to Disk. It can be used to add a rotation offset to the Bokeh shape. The value is the angle in degrees.
- Correção de gama
Aplica uma correção de gama na imagem antes e após a sua desfocagem.
- Intervalos fracionais
This option controls the amount of focal blur in the same way as a real camera. It simulates the aperture f of a real lens” iris, without modifying the luminosity of the picture. The default value 128 is assumed to be infinity: everything is in perfect focus. Half the value will double the amount of blur. This slider is deactivated, if No Z-buffer is enabled.
- Desfocagem máxima
This value limits the amount of blur by setting a maximum blur radius. Can be used to optimize the performance. The default value of 0 means no limit.
- Threshold CPU Compositor Only
Alguns artefatos, como sangramento de arestas, podem ocorrer, caso a diferença de desfocagem entre os pixeis seja grande. Este valor controla quão grande a diferença de desfocagem ainda será considerada como segura.
Dica
Somente altere este valor, caso haja um problema recorrente com um objeto que esteja dentro do foco.
- Preview CPU Compositor Only
Caso habilitado, uma quantidade limitada de amostras semi-aleatórias serão usadas para renderizar a pré-visualização. Esta maneira de tomar amostras introduz um ruído adicional, o qual não será mostrado ou estará aparente na renderização final.
- Cena
Para selecionar a cena vinculada.
- Usar buffer Z
Should be activated for a non Z-buffer in the Z input. No Z-buffer will be enabled automatically whenever a node that is not image based is connected to the Z input.
- Escala Z
Only active when No Z-buffer is enabled. When No Z-buffer is used, the input is used directly to control the blur radius (similar to F-Stop when using the Z-buffer). This parameter can be used to scale the range of the Z input.
Saídas
- Imagem
Standard color output.
Examples

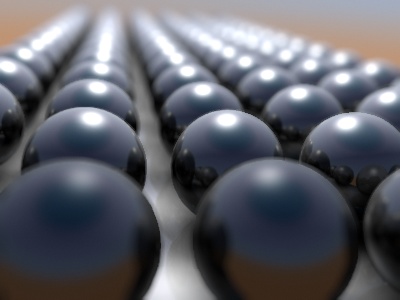
In this blend-file example, the ball array image is blurred as if it was taken by a camera with an f-stop of 2.8 resulting in a fairly narrow depth of field centered on 7.5 units from the camera. As the balls recede into the distance, they get blurrier.
Exemplos sem uso do buffer-Z
Sometimes might want to have more control to blur the image. For instance, you may want to only blur one object while leaving everything else alone (or the other way around), or you want to blur the whole image uniformly all at once. The node, therefore, allows you to use something other than an actual Z-buffer as the Z input. For instance, you could connect an Image node and use a grayscale image where the color designates how much to blur the image at that point, where white is the maximum blur and black is no blur. Or, you could use a Time node to uniformly blur the image, where the time value controls the maximum blur for that frame. It may also be used to obtain a possibly slightly better DoF blur, by using a fake depth-shaded image instead of a Z-buffer. (A typical method to create the fake depth-shaded image is by using a linear blend texture for all objects in the scene or by using the «fog/mist» fake depth shading method.) This also has the advantage that the fake depth image can have Anti-Aliasing, which is not possible with a real Z-buffer.
O parâmetro Usar buffer-Z, então se tornará o principal controle do desfoque. A entrada deverá ser escalonada, pois comumente o valor de uma textura está somente dentro da amplitude numérica entre 0.0 a 1.0.
Definições de câmera

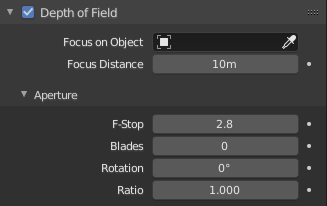
A definição de distância dentro do painel de Profundidade de campo no contexto de dados de objeto, com a câmera selecionada.
O nó do tipo Desfocar (via efeito) usa os dados da câmera atual dentro de sua cena caso sejam fornecidos por um nó do tipo Camadas de renderização.
Para a definição do ponto focal, a câmera agora possui um parâmetro chamado Distância, que é uma abreviatura de Distância de profundidade de campo Use este parâmetro de câmera para definir o plano focal da câmera (os objetos que estiverem mais afastados do que a distância de profundidade de campo da câmera estarão em foco). Defina a Distância no painel da Câmera principal; o deslizador numérico estará logo abaixo do deslizador de Profundidade de campo.
Para tornar o ponto focal visível, habilite a opção Limites para a câmera, o ponto focal então estará visível como uma cruz amarela ao longo da direção da visualização da câmera.
Dicas
- Preview
In general, use preview mode, change parameters to your liking, only then disable preview mode for the final render.
- Artefatos em arestas e contornos
Para minimizar a aparição de artefatos, tente configurar a sua cena de maneira que as diferenças nas distâncias entre dois objetos que visivelmente se sobrepõem ou entrelaçam em algum ponto, não seja muito grande.
- «Extensão de foco»
Keep in mind that this is not real DoF, only a post-processing simulation. Some things cannot be done which would be no problem for real DoF at all. A typical example is a scene with some object very close to the camera, and the camera focusing on some point far behind it. In the real world, using shallow depth of field, it is not impossible for nearby objects to become completely invisible, in effect allowing the camera to see behind them. Hollywood cinematographers use this visual characteristic to achieve the popular «focus pull» effect, where the focus shifts from a nearby to a distant object, such that the «other» object all but disappears. Well, this is simply not possible to do with the current post-processing method in a single pass. If you really want to achieve this effect, quite satisfactorily, here is how:
Divida a sua cena em objetos «próximos» e «distantes», e os renderize em dois passos.
Now, combine the two results, each with their own «defocus» nodes driven by the same Time node, but with one of them inverted (e.g. using a Map Value node with a Size of -1). As the defocus of one increases, the defocus on the other decreases at the same rate, creating a smooth transition.
- Serrilhamento em valores baixos de intervalos fracionais
Em valores muito baixos (menores que 5), o nó começará a remover quaisquer Sobre-amostragens (usadas para antisserrilhamento) e colocará os objetos na distância da profundidade de campo muito nitidamente em foco. Caso o objeto esteja colocado contra um plano de fundo contrastante, isto poderá levar a estrias visíveis na imagem (serrilhamentos) os quais a Sobre-amostragem é projetada para remover ou evitar. Caso você incorra neste problema:
Faça sua própria Sobre-amostragem renderizando em duas vezes o tamanho requerido e então escalonando novamente ao tamanho natural, de maneira que os pixeis adjacentes sejam desfocados em conjunto.
Use the Blur node with a setting of 2 for X and Y.
Defina a distância de Profundidade de campo em um valor bem baixo, de maneira que o objeto no foco seja desfocado pelo menor valor possível.
Use a higher f-stop, which will start the blur, and then use the Z socket to a Map Value to a Blur node to enhance the blur effect.
Reorganize os objetos dentro de sua cena para utilizarem um plano de fundo com um baixo contraste.
- Usar buffer-Z
A final word of warning, since there is no way to detect if an actual Z-buffer is connected to the node, be very careful with the No Z-buffer switch. If the Z scale value happens to be large, and you forget to set it back to some low value, the values may suddenly be interpreted as huge blur radius values that will cause processing times to explode.