侧栏区块
镜头
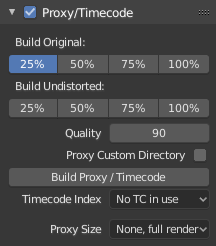
代理/时间码

High-resolution video files can impact Blender's performance, slowing down scrubbing and other operations. To counter this, you can generate one or more proxies, which are copies of the original footage stored at a lower resolution and/or quality. These proxies can then be used as a less resource-heavy standin while working on the scene.
- 建立原始项
The proxy resolution(s) to generate based on the original, distorted footage.
- 建立移除畸变项
The proxy resolution(s) to generate based on the undistorted footage (that is, with the Lens settings applied to undo the distortion in the recording).
- 品质
代理的图像品质。
- 代理自定目录
By default, proxies are stored to a
BL_proxysubfolder next to the original file. Use this option to specify a different location.- 建立代理/时间码
Generates proxies based on the settings above, as well as timecode files. Instead of using this button, you can also click Clip ‣ Proxy ‣ Rebuild Proxy and Timecode Indices.
- 时间码 编号
When you are working with footage directly copied from a camera without preprocessing it, there might be numerous artifacts, mostly due to seeking to a given frame in the sequence. This happens because such footage usually does not have correct frame rate values in the file header. This issue can still arise when the source clip has the same frame rate as the scene settings. In order for Blender to correctly calculate the frames and frame rate there are two possible solutions:
使用例如MEncoder的软件对视频进行预处理,修复文件头并插入正确的关键帧。
Use the Timecode Index option in Blender.
- 无:
忽略生成的时间码,根据计算的时间戳在电影流中请求。
- 记录运行:
根据从电影流中读取的时间戳进行搜索,以获得场景和电影时间之间的最佳匹配。
- 无空隙录制运行:
有效地将影片转换为图像序列,忽略不完整或丢失的帧以及帧速率的变更。
Note
Record Run is the Timecode Index which usually is best to use, but if the source file is totally damaged, Record Run No Gaps will be the only chance of getting an acceptable result.
- 代理渲染尺寸
Which proxy size to use for display. Depending on the Render Undistorted setting, Blender will use either the Original proxy or the Undistorted proxy.
素材设置
见图像设置。
追踪
另见 追踪。
稳定
另见 2D稳像。
视图
2D 游标
The 2D Cursor is the dashed crosshair in the main region. It can be used as a transformation pivot point by selecting the corresponding option in the editor's header.
Note that the 2D Cursor is only available in Mask mode, not in Tracking mode.
- 位置 X,Y
The relative location of the 2D Cursor, going from (0, 0) for the bottom left corner to (1, 1) for the top right corner.
You can also position the 2D Cursor by clicking Shift-RMB in (or around) the video.
标注
详见标注。