笔刷设置
Each mode and brush has unique brush settings. But there is also a lot of overlap or similar settings. This page explains general and mode specific settings that are used across various brushes in more detail.
通用
- 半径
This option controls the size of the brush, measured in pixels. F allows you to change the brush size interactively by dragging the mouse from left to right and then LMB to accept. Meanwhile the texture of the brush will be visible inside the circle. You can also enter the size numerically with the number keys.
The size can be decreased/increased using [ and ] respectfully.
- (压感区大小)
使用图形输入板时,根据触控笔压力调整半径。
- (使用统一半径)
在所有笔刷上使用相同的画笔 半径。
- 半径单位 雕刻模式
笔刷 半径 的计量单位。
- 视图:
半径 是根据光标在屏幕上的显示方式(即 “屏幕空间”)进行计量的。
- 场景:
The Radius is measured based on real world units. This means that the brush radius stays consistent, independently from zooming in and out in the viewport. The unit type and scaling can be configured in the Scene Units.
- 强度
For painting brushes the Strength defines the maximum effect of each brush stroke. For example, higher values cause a Paint brush to give each stroke a higher opacity. The opacity is never stronger than the set Strength, no matter how often the same surface is painted during the same stroke.
For sculpting brushes on the other hand the Strength relates to how strong each step of the stroke is, resulting in a slower/faster buildup towards the full brush effect during the stroke.
You can change the brush strength interactively by pressing Shift-F and then moving the brush and then LMB. You can also enter the strength numerically with the number keys.
- (力度压感)
Adjusts the strength based on the stylus pressure when using a Graphics Tablet.
- (使用统一力度)
所有笔刷使用相同的笔刷 强度。
- 混合
Set the way the color or value is applied over the targeted Color Attribute, Vertex Group or Image Texture. See Color Blend Modes.
添加Alpha:使绘制处的图像更加不透明。
Erase Alpha: makes the image transparent where painted, allowing background colors and lower-level textures to show through. As you "paint", the false checkerboard background will be revealed. Using a tablet pen's eraser end will toggle on this mode.
Tip
为了能在图像编辑器中见到橡皮擦和添加Alpha混合模式的效果,显示通道 必须设置为 颜色 和 Alpha 或 Alpha。透明(无alpha)区域将显示为方格背景。
- 权重 权重绘制
应用于顶点组的权重值。
Use Shift-X to sample the weight value of clicked vertex. Shift-Ctrl-X lets you select the group from which to sample from.
- 方向 Ctrl 雕刻模式
笔刷方向切换,添加 向画笔提升几何体,减法 将几何体从画笔中降低。在雕刻时,可以使用 Ctrl 切换此设置。
- 法向半径 法向半径
Determines the ratio of how much the brush radius is used to sample the normal direction of the sculpt plane of the brush. For example, a smaller Normal Radius will lead to drastic changes in the brush orientation, like for following the contours of hard surface meshes more closely. A large Normal Radius will lead to smoother changes in orientation, like for building overall forms on organic sculptures.
- 区域半径
The ratio between the brush radius and the radius that is going to be used to sample the area plane depth.
- 硬度 雕刻模式
画笔脱落的距离从画笔的边缘开始。
- 头部圆度
The factor to control how round the brush is. A value of zero will make the brush square. Note, the Brush Falloff is only applied to the rounded portions of the brush.
- 自动光滑 雕刻模式
设置要应用于每个笔刷的平滑量。
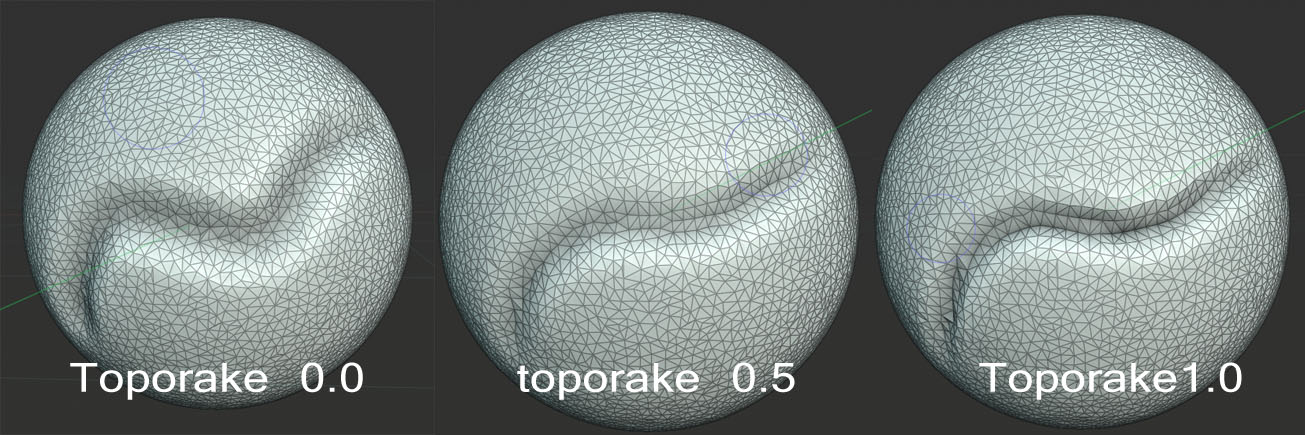
- 拓扑耙 雕刻模式
The higher this setting is set, the more Dyntopo aligns mesh edges to the brush direction while tessellating the surface. This generates cleaner edge flow to help define sharp features. Topology Rake can have a severe performance impact so it works best on low-poly meshes.

- 法线权重 Ctrl 雕刻模式
沿着表面法线限制笔刷运动。特别适用于 抓起 笔刷,可以通过按住 Ctrl 暂时启用。例如当设置 法线权重 时,抓起笔刷可以使用推动将凹陷(孔)推入网格。
适用于 Grab 和 Snake Hook 笔刷。
- 平面偏移 雕刻模式
平面笔刷的偏移(黏塑、填充、平化、刮削)通过均化上方或下方的面来移动找到的平面。
- 平面修剪 雕刻模式
能够限制平面笔刷作用的距离。如果启用了修剪,则在雕刻过程中忽略距离偏移平面更远的顶点。
- 夹捏/扩张 雕刻模式
Pushes the mesh towards/away from the brush center during the stroke.
- 变形目标
画笔的变形将如何影响物体。
- 几何数据:
直接变形几何体。
- 布料模拟:
Deform the mesh while a cloth simulation is applied to it at the same time.
高级
- 笔刷类型
Defines the basic behavior and the available settings. Through the settings of a brush type, brushes can be created that produce vastly different effects.
The Essentials asset library contains brushes for each of the brush types. Their preview image and description should give a good idea of the effect the brush produces, with the particular combination of brush type and settings. Because of this, they are usually the more useful starting point for custom brushes than the mere brush type is, which is why the brush type is part of the Advanced brush settings.
Brushes and Brush Types of each mode:
- 累积
导致笔触在顶部彼此累积。
- 仅前面的面
启用时,画笔只影响面向视图的顶点。
- 影响 Alpha 仅限二维绘制
When this is disabled, it prevents changes to the alpha channel while painting (Only in 3D Viewport).
- 抗锯齿 仅限平面绘制
在画笔周围切换抗锯齿,如果您正在使用像素图案或低分辨率纹理,这非常有用。
- 自动遮罩 雕刻模式
The auto-masking toggles in the brush settings are the same as the sculpt mode auto-masking settings. The difference is that these toggles can be customized per brush to create specific brush behaviors.
See also
更多有关自动遮罩切换的信息请参阅 自动遮罩。
- 雕刻平面 雕刻模式
使用此菜单可以设置进行雕刻的平面。换句话说,顶点将移动的主方向。
- 区域面:
运动发生在以笔刷区域内所有活动顶点的平均法线方向。从本质上讲,这意味着方向取决于笔刷下方的表面。
- 视图面:
在当前 3D 视口的平面上进行雕刻。
- X, Y, Z 平面:
运动发生在全局轴之一的正方向上。
- 原始的 雕刻模式
- 法向
锁定后,它继续使用笔画动笔的表面的法线,而不是光标下方当前表面法线。
- 平面
锁定后,它继续使用笔画动笔的表面的法线,而非游标下方当前表面法线。
拾色器
颜色
笔刷的颜色,见 拾色器。
Press Shift-X on any part of the image to sample that color and set it as the brush color. Hold Ctrl while painting to temporally paint with the secondary color.
- 交换颜色(循环图标)X
切换颜色和背景色。
- (使用统一颜色)
在所有画笔上使用相同的画笔颜色。
Note
请注意,在 sRGB 工作 空间 中的顶点绘制,相同颜色的 RGB 表示形式在绘制工具和线性空间中的材质之间会有所不同。
渐变
可将渐变用作色源。
- 渐变颜色
用颜色渐变部件来定义渐变的颜色。
- 模式
- 压力:
将根据数位笔压力从颜色渐变中选取颜色。
- 钳制:
将根据 渐变间隔 沿着笔画改变颜色,指定颜色渐变的最后一种颜色为钳制色。
- 重复:
与 钳制 类似。在最后一个渐变色后,颜色将重置为第一个渐变色。
调色板
调色板可以存储画笔颜色以便再次使用。这在使用多种颜色绘制时很有用。
- 调色板
从数据块菜单选择调色板。
- 新建
+ 将当前画笔的主要 颜色 添加到调色板。
- 删除
- 从调色板中删除当前选定颜色。
- 移动(上/下箭头图标)
将选中颜色向上/下移一位。
- 排序
按色相、饱和度、明度、亮度对颜色进行排序。
- 颜色列表
调色板的每个颜色都显示在列表中。单击颜色会将画笔的主要 颜色 更改为该颜色。