Chế Độ Biên Soạn Hạt (Particle Edit Mode)
Using "Chế Độ Biên Soạn Hạt" you can edit the keyed points (keyframes) and paths of Tóc/Lông (Hair), Hạt (Particle), Vải Vóc (Cloth), and Thân Mềm (Soft Body) simulations. (You can also edit and style hair before baking.)
Since working in Particle Edit Mode is pretty easy and very similar to working with vertices in the 3D Viewport, we will show how to set up a particle system and then give a reference of the various functions.
Quan trọng
Particle Edit Mode, specifically for hair is deprecated; please use the new Tóc Trống Rỗng (Empty Hair) object with its associated Sculpt Mode instead.
Quan trọng
Editing a cached cloth simulation is not currently working, see: blender/blender#77114 for details.
Cách Dùng [Usage]
Mẹo
Only Frames Baked to Memory are Editable!
If you cannot edit the particles, check that you are not baking to a Disk Cache.
Cấu Hình hệ thống Hạt cho Tóc (Setup for Hair Particles)
Create a Hair particle system.
Give it an initial velocity in the Normal direction.
Kiến tạo một địa ranh.
Check the "Động Lực Học của Tóc" box.
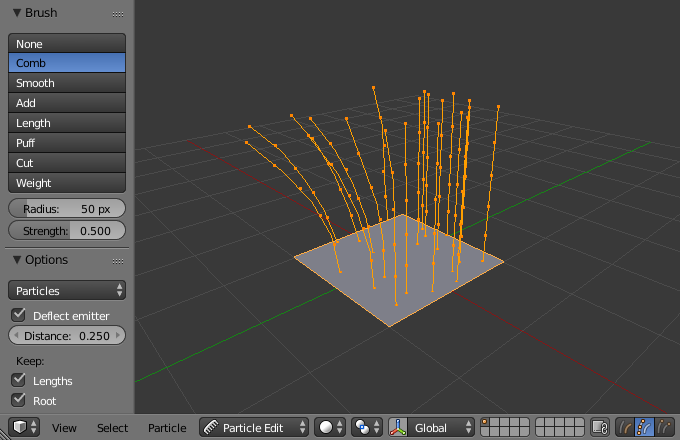
Editing hair strands in Particle Edit Mode.
Cấu Hình hệ thống Hạt, mô phỏng Vải Vóc và Thân Mềm (Setup for Particle, Cloth, and Soft Body Simulations)
Use Emitter particles, or a cloth/soft body simulation.
Create a simulation by setting up objects and/or emitters, set your time range (use a small range if you are just starting out and experimenting), set up the simulation how you want it, play the animation to preview it.
Nướng mô phỏng (Bake the Simulation)
Once you are happy with the general simulation, bake the simulation from Object Mode. The simulation must be baked to enable editing.
Biên soạn mô phỏng (Edit the Simulation)
Switch to Particle Edit from the Mode select menu in the header of the 3D Viewport to edit the particle's paths/Keyframes. You may need to press T from within the 3D Viewport to see the Particle Edit toolbox. Move to the frame you want to edit and use the various tools to edit your simulation.
Lựa Chọn (Selecting)
Mẹo
Switch to the Point select mode (see below) in the header of the 3D Viewport to be able to see and select the keypoints.
Lựa Chọn đơn/một: NCT (LMB).
Thêm loại bỏ khỏi lựa chọn: Shift-NCT (LMB).
Nguyên/trọn vẹn/toàn bộ các/Toàn Bộ/Hoàn Toàn/hầu hết các/những các: A.
Không Có: Alt-A.
Đảo Nghịch: Ctrl-I.
Lựa Chọn A.
Lựa Chọn Bằng Vòng Tròn: C.
Lựa Chọn Bằng Dây Thòng Lọng: Ctrl-Alt-NCT (LMB).
Select Linked: Move the mouse over a path and press L to add all its points to the selection.
Unselect Linked: Move the mouse over a path and press Shift-L to remove all its points from the selection.
Root/Tips: .
Chọn Ngẫu Nhiên (Select Random)
Randomly selects particles.
- Phần Trăm (Percent)
Percent of particles to randomly select.
- Random Seed (Mầm Ngẫu Nhiên)
Seed value to use for the selection.
- Hành Động (Action)
Select random can be either used to select or deselect particles.
- Thể Loại (Type)
Selects either hair or points. Here these terms can be confusing because hair/point does not refer to the particle type but the path/points of the hair/particle.
Chế Độ Lựa Chọn (Select Modes)

Chế độ lựa chọn.
- Đường Đi/Dẫn (Path):
No keypoints are visible, you can select/deselect only all particles.
- Điểm (Point):
You see all of the keypoints.
- Đỉnh (Tip):
You can see and edit (including the brushes) only the tip of the particles, i.e. the last keypoint.
Công Cụ (Tools)
Tham Chiếu [Reference]
- Chế Độ [Mode]:
Chế Độ Biên Soạn Hạt (Particle Edit Mode)
- Công Cụ (Tool):
Chải bằng Lược (Comb)
Moves the keypoints (similar to the Proportional Editing tool).
- Làm Lệch Hướng Vật Phát (Deflect Emitter)
Hair particles only -- Do not move keypoints through the emitting mesh.
- Khoảng Cách (Distance)
The distance to keep from the Emitter.
Làm/Mịn Màng (Smooth)
Parallels visually adjacent segments.
Thêm (Add)
Adds new particles.
- Số Lượng (Count)
The number of new particles per step.
- Nội Suy (Interpolate)
Interpolate the shape of new hairs from existing ones.
- Số Phân/Bước (Steps)
Amount of brush steps.
- Các Phím/Số Điểm Điều Khiển [Keys]
Số lượng điểm điều khiển sử dụng để tạo các hạt mới.
Chiều Dài (Length)
Scales the segments, so it makes the hair longer with Grow or shorter with Shrink.
- Kéo Dài/Thu Ngắn/Phình ra/Thu Lại (Grow/Shrink)
Sets the brush to add the effect or reverse it.
Làm Bồng Lên (Puff)
Rotates the hair around its first keypoint (root). So it makes the hair stand up with Add or lay down with Sub.
- Thể Tích Làm Bồng Lên (Puff Volume)
Apply puff to unselected end points, (Helps to maintain the hair volume when puffing the root.)
Cắt (Cut)
Scales the segments until the last keypoint reaches the brush.
Trọng Lượng (Weight)
This is especially useful for soft body animations, because the weight defines the soft body Goal. A keypoint with a weight of 1 will not move at all, a keypoint with a weight of 0 subjects fully to soft body animation. This value is scaled by the Strength Min to Max range of soft body goals...
Tùy Chọn Chung (Common Options)
Below the brush types, their settings appear:
- Bán Kính (Radius) F
Đặt bán kính của đầu bút vẽ.
- Độ Đậm/Sức Mạnh/Cường Độ (Strength) Shift-F
Set the strength of the brush effect (not for Add brush).
Các Tùy Chọn (Options)
Tham Chiếu [Reference]
- Chế Độ [Mode]:
Chế Độ Biên Soạn Hạt (Particle Edit Mode)
- Panel (Bảng):
- Tự Động Vận Tốc Vật Phát Sinh (Emitter)
Recalculate velocities of particles according to their edited paths. Otherwise, the original velocities values remains unchanged regardless of the actual distance that the particles moves.
- Phản Chiếu Đối Xứng X (Mirror X)
Enable mirror editing across the local X axis.
- Bảo Tồn (Preserve)
- Chiều Dài Sợi (Strand Length)
Keep the length of the segments between the keypoints when combing or smoothing the hair. This is done by moving all the other keypoints.
- Vị Trí Gốc (Root Positions)
Keep first key unmodified, so you cannot transplant hair.
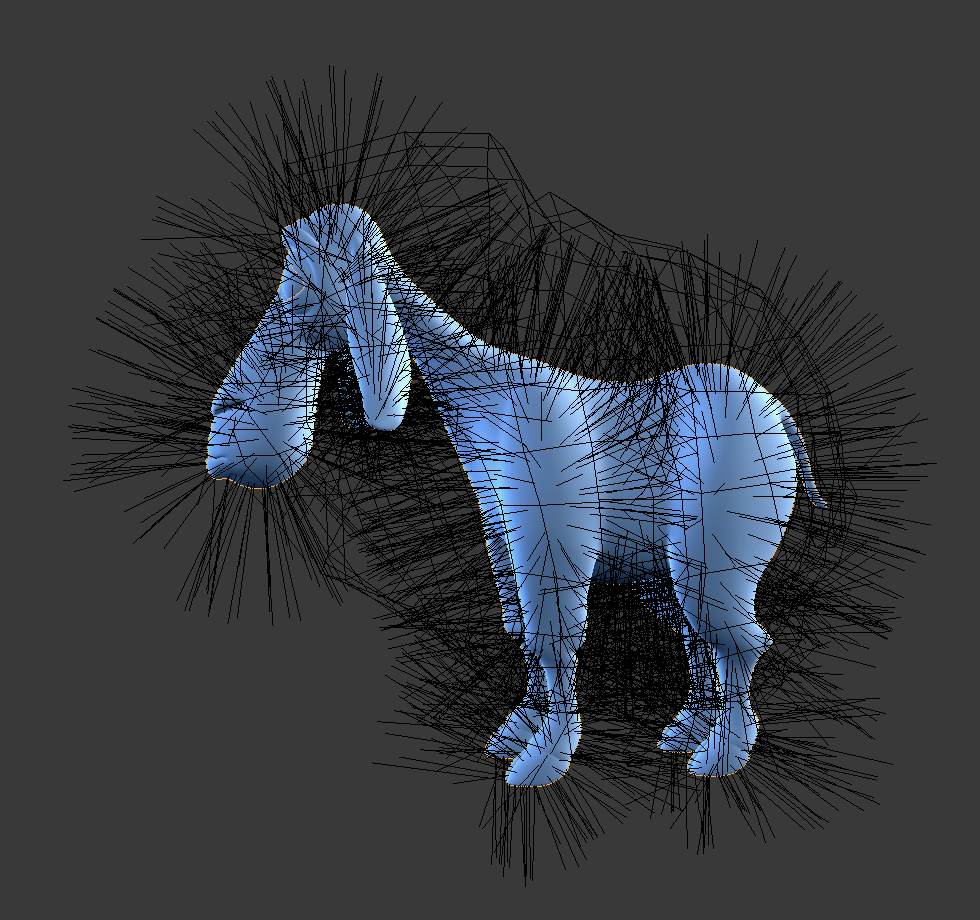
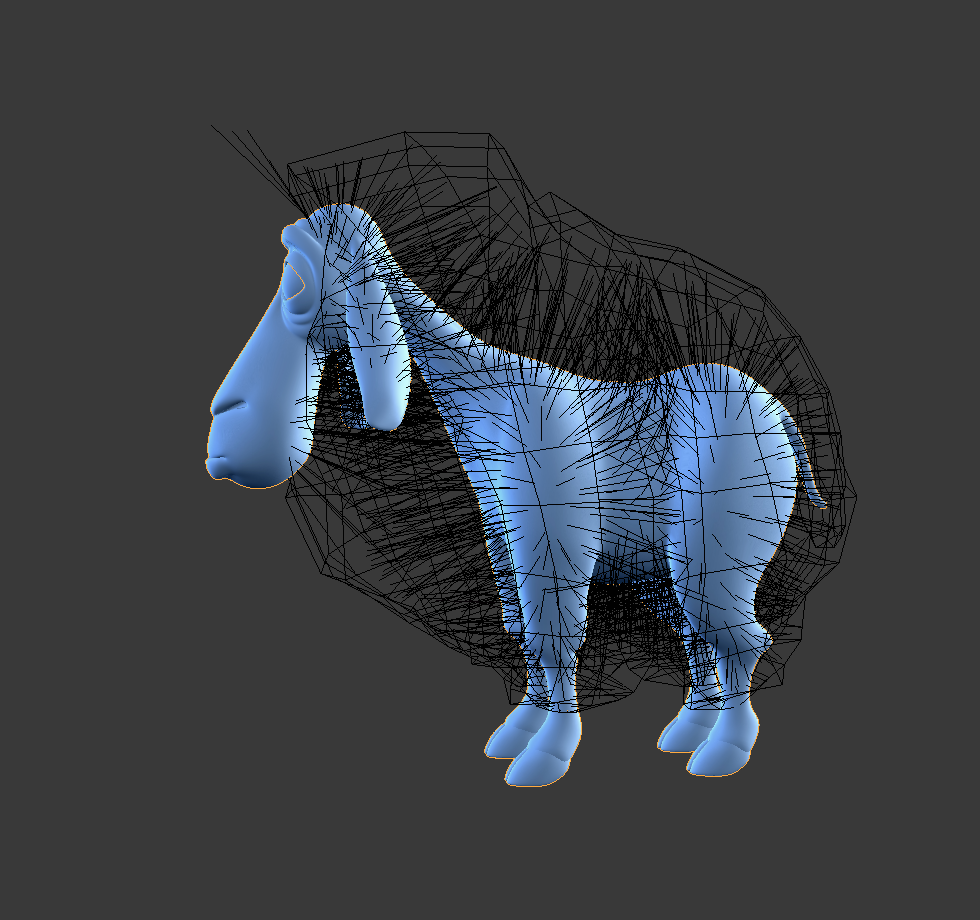
Cắt Hạt thành Hình Dạng (Cut Particles to Shape)
- Đối Tượng Chỉnh Hình (Shape Object)
A mesh object which boundary is used by the Shape Cut tool.
- Cắt (Cut)
This grooming tool trims hairs to a shape defined by the Shape Object. This is a quicker way of avoiding protruding hair sections from lengthening than using the Cutting tool. It works especially well for characters with extensive fur, where working in a single plane with the Cutting tool becomes tedious.
Hiển Thị Cổng Nhìn (Viewport Display)
- Bước Đi của Đường Dẫn (Path Steps)
The number of steps used to draw the path; improves the smoothness of the particle path.
- Con Cái Tóc/Lông (Hair)
Displays the children of the particles too. This allows to fine-tune the particles and see their effects on the result, but it may slow down your system if you have many children.
- Hạt Vật Phát Sinh (Emitter)
Displays the actual particles on top of the paths.
- Thời Gian Phai Mờ (Fade Time)
Fade out paths and keys further away from current time.
- Số/Khung Hình (Frames)
Số lượng khung hình để phai mờ.
Biên Soạn (Editing)
Di Chuyển các Điểm Điều Khiển hoặc các Hạt (Moving Keypoints or Particles)
To move selected keypoints press G, or use one of the various other methods to move vertices.
To move a particle root you have to turn off Keep Root in the Toolbar.
You can do many of the things like with vertices, including scaling, rotating and removing (complete particles or single keys).
You may not duplicate or extrude keys or particles, but you can subdivide particles which adds new keypoints .
Alternatively you can re-key a particle .
How smoothly the hair and particle paths are displayed depends on the Path Steps setting in the Toolbar. Low settings produce blocky interpolation between points, while high settings produce a smooth curve.
Phản Chiếu Đối Xứng (Mirror)
Tham Chiếu [Reference]
- Chế Độ [Mode]:
Chế Độ Biên Soạn Hạt (Particle Edit Mode)
- Trình Đơn [Menu]:
If you want to create an X axis symmetrical haircut you have to do following steps:
Lựa Chọn A.
Mirror the particles with .
Turn on "Phản Chiếu Đối Xứng X" in .
It may happen that after mirroring two particles occupy nearly the same place. Since this would be a waste of memory and render time, you can use Merge by Distance from the Particle menu.
Đồng Bộ Hóa Độ Dài (Unify Length)
Tham Chiếu [Reference]
- Chế Độ [Mode]:
Chế Độ Biên Soạn Hạt (Particle Edit Mode)
- Trình Đơn [Menu]:
This tool is used to make all selected hair uniform length by finding the average length.
Hiện/Ẩn Giấu (Show/Hide)
Tham Chiếu [Reference]
- Chế Độ [Mode]:
Chế Độ Biên Soạn Hạt (Particle Edit Mode)
- Trình Đơn [Menu]:
Hiding and unhiding of particles works similar as with vertices in the 3D Viewport. Select one or more keypoints of the particle you want to hide and press H. The particle in fact does not vanish, only the key points.
Hidden particles (i.e. particles whose keypoints are hidden) do not react on the various brushes. But:
If you use Mirror Editing even particles with hidden keypoints may be moved, if their mirrored counterpart is moved.
To unhide all hidden particles press Alt-H.