Đầu Bút (Brushes)
This is a list of all provided 'Essentials' brush assets that come with Blender. These are based on various Brush Types which are mentioned for each brush..
Các Đầu Bút Thêm, Khấu Trừ (Add/Subtract Brushes)
These brushes generally push vertices outwards and inwards and are the most customizable to achieve a wide variety of effects. They typically don'y use a color in their thumbnail.

- Vẽ (Draw)
- Brush Type: Vẽ (Draw)Shortcut: V
The standard brush for pushing vertices inwards and outwards from the surface direction.
- Vẽ Sắc Nét (Draw Sharp)
- Brush Type: Vẽ Sắc Nét (Draw Sharp)Shortcut: Shift V
Same as Draw but with a much sharper Falloff. Useful for creating creases and sharp angles.
- Đất Sét (Clay)
Brush Type: Đất Sét (Clay)
Similar to the Draw brush but with a flattening effect and subtle smoothing. Useful for polishing and building volumes.
- Thỏi Đất Sét (Clay Strips)
- Brush Type: Thỏi Đất Sét (Clay Strips)Shortcut: C
The same as the Clay brush, but more aggressive with a square falloff. A common standard for building rough volumes.
- Dí Ngón Cái trên Đất Sét (Clay Thumb)
- Brush Type: Dí Ngón Cái trên Đất Sét (Clay Thumb)
The same as the Clay brush, but specifically for emulating the effect of running your thumb over surfaces. Pushes geometry in and sideways.
- Tầng Lớp (Layer)
Brush Type: Tầng Lớp (Layer)
Draw with a fixed height. Useful for adding flat layers to a surface.
- Inflate/Deflate
- Brush Type: Bơm Phồng (Inflate)Shortcut: I
Moves the mesh in multiple direction. Useful for inflating or shrinking surfaces and volumes.
- Viên Tròn (Blob)
Brush Type: Viên Tròn (Blob)
Magnifies the mesh as you draw. Useful for an additional inflation effect on the stroke.
- Crease Polish
- Brush Type: Crease (Nếp Gấp)Shortcut: Shift C
A Draw brush with a pinching effect. Useful for polishing existing creases or carefully creating new ones.
- Crease Sharp
Brush Type: Crease (Nếp Gấp)
Much sharper and stronger Crease brush. Great for creating thin and deep pinches.
Những Đầu Bút về Độ Tương Phản (Contrast Brushes)

Recognizable by their red thumbnail and cursor. These brushes generally flatten or heighten the contrast of the surface.
- Làm/Mịn Màng (Smooth)
- Brush Type: Làm/Mịn Màng (Smooth)Shortcut: S
Smooths out irregularities in the surface and shrinks volumes by averaging the vertices positions. An essential brush that is frequently used.
- Flatten/Contrast
Brush Type: Dát Phẳng (Flatten)
Pushes vertices to an average height to create a flat surfaces. Alternatively pushes them away from the center for more contrast.
- Plateau
Brush Type: Dát Phẳng (Flatten)
Similar to Flatten but with a locked orientation and depth to create a consistently flat surface.
- Fill/Deepen
Brush Type: Phủ Kín (Fill)
Pushes surfaces upwards towards a flat plane. Useful for filling in holes and crevices. Alternatively deepens existing holes when holding 'Ctrl'.
- Scrape/Fill
- Brush Type: Cạo (Scrape)Shortcut: Shift T
Pushes surfaces inwards. Alternatively fills surfaces while holding 'Ctrl'. This is the most common brush for flattening meshes.
- Xén (Trim)
Brush Type: Cạo (Scrape)
Pushes surfaces inwards toward a locked direction. The depth can be defined by going deeper towards surfaces along the stroke.
- Scrape Multiplane
Brush Type: Scrape Multiplane
Cạo khung lưới bằng hai bình diện nghiêng góc cùng lúc, tạo ra một cạnh sắc giữa chúng.
Các Đầu Bút Biến Hóa (Transform Brushes)

Recognizable by their yellow icon and cursor. These brushes generally move, pinch and magnify the mesh.
- Pinch/Magnify
- Brush Type: Nhúm (Pinch)Shortcut: P
Pulls vertices towards the center of the brush. Useful for polishing angles and creases. Alternatively pushes them away from the center.
- Túm Nắm (Grab)
- Brush Type: Túm Nắm (Grab)Shortcut: G
Moves vertices along with the mouse. An essential brush for building shapes and adjusting proportions.
- Grab 2D
Brush Type: Túm Nắm (Grab)
Similar to Grab but with an infinitely projected falloff. Useful for grabbing broader shapes and giving a similar feel to using Liquify tools in image painting applications.
- Túm Nắm Hình Bóng (Grab Silhouette)
Brush Type: Túm Nắm (Grab)
Similar to Grab but only affects vertices with the normal facing sideways away from the view. Very useful for adjusting outer silhouettes of thin objects.
- Elastic Grab
Brush Type: Biến Dạng Đàn Hồi (Elastic Deform)
Used to simulate realistic deformations from grabbing of Elastic objects.
- Elastic Snake Hook
Brush Type: Móc Hình Rắn (Snake Hook)
Similar to Elastic Grab but rotates affected geometry based on the stroke direction.
- Móc Hình Rắn (Snake Hook)
- Brush Type: Móc Hình Rắn (Snake Hook)Shortcut: K
Pulls vertices along with the stroke to create long, snake-like forms. Geometry is rotated and magnified to allow continuous pulling. Much more useful while having Dyntopo enabled.
- Kéo (Pull)
Brush Type: Móc Hình Rắn (Snake Hook)
Iteratively picks up and lets go of geometry like the Snake Hook, but much softer. Useful for subtle small scale deforming over longer strokes.
- Dí/Ngón Cái (Thumb)
Brush Type: Dí/Ngón Cái (Thumb)
Same as Grab but moves vertices along the surface direction. Useful for preserving specific surfaces.
- Tư Thế (Pose)
Brush Type: Tư Thế (Pose)
Simulating an armature-like deformations. Useful for quick posing and transformations.
- Nhích (Nudge)
Brush Type: Nhích (Nudge)
Similar as Thumb but dynamically picks up vertices like the Snake Hook. Useful for nudging something along the mesh surface.
- Xoắn Vặn (Twist)
Brush Type: Xoay Chiều (Rotate)
Rotates vertices within the brush in the direction mouse.
- Relax Slide
Brush Type: Relax Slide
Slides the topology of the mesh in the direction of the stroke while preserving the geometrical shape of the mesh. Alternatively smoothes the mesh on 'Shift'. Also useful for redistributing topology where it is needed.
- Relax Pinch
Brush Type: Relax Slide
Similar to the Relax Slide brush but pinches/relaxes geometry instead.
- Ranh Giới (Boundary)
Brush Type: Ranh Giới (Boundary)
Transform specifically mesh boundaries with various deformations.
Utility Brushes

No clear color assignment. These brushes are general purpose brushes or specific.
- Tỷ Trọng/Mật Độ (Density)
Brush Type: Tỷ Trọng/Mật Độ (Density)
Cleans up geometry by collapsing short edges. Specifically for use with Dyntopo.
- Mask (Màn Chắn Lọc)
- Brush Type: Mask (Màn Chắn Lọc)Shortcut: M
Vẽ một vùng chọn trên các phần của khung lưới để không bị ảnh hưởng bởi các đầu bút vẽ khác.
- Vẽ Mặt Ấn Định (Draw Face Sets)
Brush Type: Vẽ Mặt Ấn Định (Draw Face Sets)
Paint new, smooth or extend existing Face Sets.
- Erase Multires Displacement
Brush Type: Erase Multires Displacement
Remove displacement information on a Multiresolution modifier.
- Smear Multires Displacement
Brush Type: Smear Multires Displacement
Smear displacement information on a Multiresolution modifier.
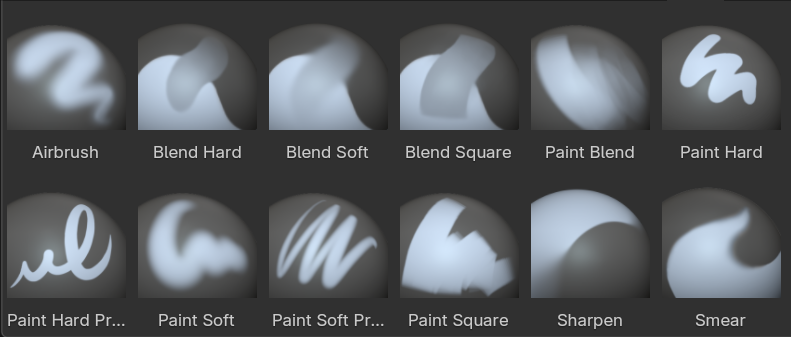
Các Đầu Bút Sơn (Painting Brushes)

Recognizable by their blue thumbnails. These brushes are used for painting color attributes within sculpt mode.
- Paint Hard
Brush Type: Sơn (Paint)
A simple hard round falloff.
- Paint Soft
Brush Type: Sơn (Paint)
A soft round falloff with pressure sensitivity for only the strength.
- Paint Hard Pressure
Brush Type: Sơn (Paint)
A hard round falloff with pressure sensitivity for the brush radius.
- Paint Soft Pressure
Brush Type: Sơn (Paint)
A soft round falloff with pressure sensitivity for both radius and strength.
- Paint Square
Brush Type: Sơn (Paint)
A hard square brush falloff.
- Đầu Phun Sơn (Airbrush)
Brush Type: Sơn (Paint)
A soft round brush that builds up over time instead of stroke distance.
- Blend Hard
Brush Type: Sơn (Paint)
Similar to Average brushes in other modes with a hard round falloff. Used to blend colors along the stroke.
- Blend Soft
Brush Type: Sơn (Paint)
Same as Blend Hard but with a soft round falloff.
- Blend Square
Brush Type: Sơn (Paint)
Same as Blend Hard but with a hard square falloff.
- Paint Blend
Brush Type: Sơn (Paint)
A mix of a Paint and Blend brush. On low pen pressure the brush averages colors and with high pen pressure it paints colors.
- Bôi Nhòe (Smear)
Brush Type: Bôi Nhòe (Smear)
Smears colors along the stroke.
- Làm Sắc Nét (Sharpen)
Brush Type: Bôi Nhòe (Smear)
Pinches the colors inwards to create sharp edges or points.
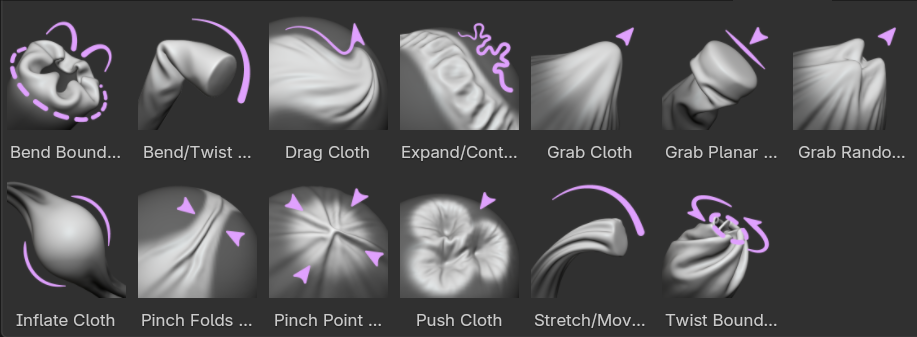
Simulation Brushes
These brushes are similar to regular brushes but with an additional cloth simulation applied. These are ideally used on a relatively low resolution, since the mesh density defines the size of cloth dynamics.

- Drag Cloth
Brush Type: Vải Vóc (Cloth)
Nudges the geometry along the surface while minimally affecting the overall shape of the object.
- Push Cloth
Brush Type: Vải Vóc (Cloth)
Pushes geometry inwards or outwards.
- Grab Cloth
Brush Type: Vải Vóc (Cloth)
Grabs geometry within the brush radius firmly, while surrounding geometry is being simulated to follow.
- Grab Planar Cloth
Brush Type: Vải Vóc (Cloth)
Similar to Grab Cloth but with a line as the brush radius instead of a circle.
- Grab Random Cloth
Brush Type: Vải Vóc (Cloth)
Similar to Grab Cloth but with a noise texture applied to create more random variation.
- Inflate Cloth
Brush Type: Vải Vóc (Cloth)
Inflates the geometry outwards or inwards.
- Expand/Contract Cloth
Brush Type: Vải Vóc (Cloth)
Creates compression or stretching on geometry.
- Pinch Point Cloth
Brush Type: Vải Vóc (Cloth)
Pinches geometry to the center point of the radius, creating folds from all sides.
- Pinch Folds Cloth
Brush Type: Vải Vóc (Cloth)
Pinches only from two perpendicular sides along the stroke direction, creating parallel folds along the stroke.
- Bend/Twist Cloth
Brush Type: Tư Thế (Pose)
A pose brush that rotates geometry.
- Stretch/Move Cloth
Brush Type: Tư Thế (Pose)
A pose brush that translates and scales geometry.
- Bend Boundary Cloth
Brush Type: Ranh Giới (Boundary)
Bend only open boundaries of the mesh, folding the surrounding geometry in the process.
- Twist Boundary Cloth
Brush Type: Ranh Giới (Boundary)
Twist open boundaries of the mesh, creating twisting folds.