Introducción#
A strip is a container which carries frames provided by one or more sources (input). It is defined by a Start Frame and a Length, and is displayed as a colored horizontal rectangle.

Strip schematic.#
Adding Strips#
Referencia
- Menú:
- Atajo:
Mayús-A
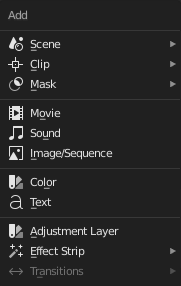
El Menú Agregar.#
The Add menu is the main menu you will be using to add content to the Video Sequencer. In general, you load up your strips, create strips of special transition effects, and then animate out your sequence by selecting «Do Sequence» and clicking the Animation button. You can use the Add menu in the header, or hover your mouse cursor over the Sequence workspace and press Shift-A.
Blender does not care which of these you use; you can freely mix and match any of them. When you choose to add one of these, it lets you either choose a data-block or the editor area will switch to a File Browser for you to select what you want to add. Supported files are filtered by default.
The start frame of the newly created strips will be placed at the position of the frame indicator. When loading multiple files (movie and sound) at the same time each will be added one after the other.
Adding Effects & Transitions#
Blender offers a set of effects that can be added to your sequence.
To add an effect strip, select one base strip (image, movie, or scene) by LMB clicking on it. For some effects, like the Cross transition effect, you will need to Shift-LMB a second overlapping strip (it depends on the effect you want). From Add menu pick the effect you want. When you do, the Effect strip will be shown above the source strips. If it is an independent effect, like the Color Generator, it will be placed at the position of the frame indicator.
Nota
Since most Effects strips depend on one or two source strips, their frame location and duration depends on their source strips. Thus, you may not be able to move it; you have to move the source strips in order to affect the effect strip.
With some effects, like the Alpha Over, the order in which you select the strips is important. You can also use one effect strip as the input or source strip with another strip, thus layering effects on top of one another.
If you picked the wrong effect from the menu, you can always exchange it using Effect Strip.
Visualización#
They all become a color-coded strip in the Video Sequencer:
Scene strip: Light green.
Clip strip: Dark blue.
Mask strip: Red.
Clip de video: Aquamarine.
Image strip: Purple.
Sound strip: Turquoise.
Each of the effect strips has its own color.
Besides each of these default colors you can also assign individual strips an alternative color in the Strip Properties.
Nota
These colors are dependent on the user interface Theme. The colors described above are in reference to Blender’s default theme.