Colecciones de huesos
Nota
Bone Collections were introduced in Blender 4.0 as replacement of Armature Layers and Bone Groups. Bone colors are now managed directly on the bone.
Referencia
- Modo:
Modo Pose y modo Edición del esqueleto
- Panel:
- Menú:

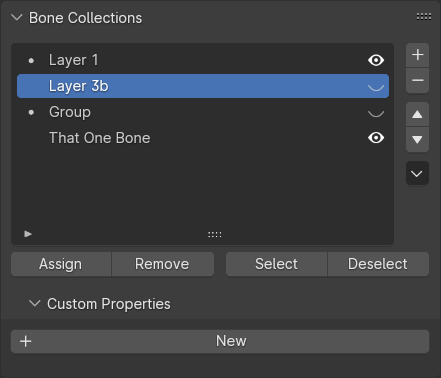
El panel Colecciones de huesos en las propiedades del Esqueleto.
This panel contains a Tree View to manage Bone Collection From this panel, Bone Collections can be created, deleted, re-arranged, and more.
Collections can be renamed by double clicking on the name, or right clinking and selecting Rename. To nest a collection inside an existing collection, click and drag the name onto another collection’s name. Child collection can also be made by RMB and selecting «Add Child Collection».
To the right of the name gives a few controls of the collection:
- Visible (ícono de ojo)
Los huesos de esta colección serán visibles en la Vista 3D.
- Solo (ícono de estrella)
Show only this bone collection, and others also marked as «solo».
Further more, collection that are not empty will have a dot to indicate the collection has bones assigned to it.
Truco
The Bone Properties panel gives a slightly different view on the bone’s collections. See Bone Relations.
Especiales
- Mostrar todo
Vuelve a mostrar cualquier colección de huesos oculta.
- Quitar solo a todas
Clear the “solo” setting on all bone collections
- Eliminar no usadas
Remove all bone collections that have neither bones nor children. This is done recursively, so bone collections that only have unused children are also removed.
Asignación y selección
- Asignar
Asignará los huesos seleccionados a la colección de huesos activa.
- Eliminar
Quitará los huesos seleccionados de la colección de huesos activa.
- Seleccionar
Seleccionará los huesos en la colección de huesos activa.
- Deseleccionar
Deseleccionará los huesos en la colección de huesos activa.
Nota
Individual bones can also be unassigned from their collections via the Bone Relations panel.
Truco
For setting up custom selection sets of bones, take a look at the Selection Sets add-on. It is bundled with Blender.
Mover huesos de una colección a otra
Blender should be in Edit Mode or Pose Mode to move bones between collections. Note that as with objects, bones can be assigned to in several collections at once.
- Mover a colección de huesos
Shows a list of the Armature’s editable bone collections. Choosing a bone collection unassign the selected bones from all other bone collections, then assigns them to the chosen one.
Available as (Pose Mode) (Edit Mode), and M (either mode).
- Colecciones de huesos
Shows a list of the Armature’s editable bone collections. The collections that the active bone is assigned to are prefixed with a
-, and choosing those will unassign all selected bones from that collection. Similarly, choosing a bone collection prefixed with a+will assign all selected bones to that collection.Available as (Pose Mode) (Edit Mode), and Shift-M (either mode).
Nota
The above operators will only show the editable bone collections. When the Armature is linked, its bone collections will be read-only. New bone collections can still be added via library overrides; only those will be editable.
Propiedades personalizadas
Será posible crear y administrar propiedades personalizadas para almacenar datos en el bloque de datos de la colección. Ver la página Propiedades Personalizadas para obtener más información.