Capas
Referencia
- Modo:
Todos los modos
- Panel:
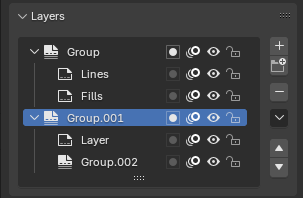
Panel Capas de Grease Pencil.
Grease Pencil objects can be organized into a tree known as the layer tree for grouping and arranging strokes.
Any stroke can only belong to a single 2D layer. The selected layer is the active layer. Only one layer or group can be active at a time. When you draw, the new strokes are added to the active layer. By default the view order of the layers in the viewport is top to bottom.
Layers can be grouped using Layer Groups. A layer can only be in one group at a time. Layers can be moved into groups using drag-and-drop. Groups can be color coded with a color tag.
Every layer correspond to a channel in the Dope Sheet editor (in Grease Pencil mode). See Dope Sheet for more information.
Layers can also be used together with Modifiers to only affects part of your drawing. See Modifiers for more information.
Layers can mask other layers by enabling Use Mask (mask icon) or using the checkbox in the Masks panel header. See Máscaras for more information.
Truco
Sometimes the layers you are not working on can be a distraction in the 3D Viewport. Activate the Fade Inactive Layers overlay to control the opacity of the non-active layers.
- Jerarquía de capas
Una vista jerárquica de todas las capas y grupos del objeto de Grease Pencil.
Next to the layer name there are four icons buttons that control common properties of the layer:
- Usar máscara (ícono de máscara)
Toggle the affect of Masks on the layer.
- Piel de cebolla (ícono de piel de cebolla)
Toggle using the layer for Onion Skinning.
- Ocultar (ícono de ojo)
Alterna la capa de visibilidad en la Vista y el procesado.
- Bloquear (ícono de candado)
Alterna la capa para no ser editable.
- Agregar nueva capa
Adds a new layer to the active object.
- Agregar nuevo grupo de capas
Adds a new layer group to the active object. Note, layer groups cannot be added from the Dopesheet; they must be added from the Properties editor.
- Eliminar grupo de capas
Removes the active layer or layer group.
- Especiales de capas
Operators for working with layers.
- Duplicar
Makes an exact copy of the selected layer appending a number to differentiate its name.
- Duplicar claves vacíos
Makes a copy of the selected layer but with empty keyframes. Useful to easily have empty keyframes preset to work on the cleanup or filling process.
- Mostrar todo
Turns on the visibility of every layer in the list.
- Ocultar otras
Turns off the visibility of every layer in the list except the active one.
- Bloquear todo
Locks edition of all the layers in the list.
- Desbloquear todo
Unlocks edition of all the layers in the list.
- Autobloquear capas inactivas
Locks automatically the edition of every layer in the list except the active one. This way you avoid to make unwanted changes in other layers without the need to lock them every time.
- Ignorar bloqueo de materiales
Avoids editing locked materials in the layer. When disabled, any material can be edited even if they are locked in the material list.
- Fusionar Mayús-Ctrl-M
Combine the selected layer with the layer below, the new layer keeps the name of the lower layer.
- Fusionar grupo
Combine layers in the active layer group into a single layer.
- Fusionar todo
Combinará todas las capas en la activa.
- Copiar capa a seleccionados
Copiará la capa activa al objeto de Grease Pencil seleccionado.
- Copiar todas las capas a seleccionados
Copiará todas las capas al objeto de Grease Pencil seleccionado.
- Reordenar capa
Moves the active layer or layer group up/down in the tree.
Below the layers list there are additional settings:
- Modo de fundido
La operación de fundido de capas a ser realizada. Ver Modos de fundido de color.
- Opacidad
Used to set the opacity of the layer.
- Luces
When enabled, the layer is affected by lights.
Máscaras
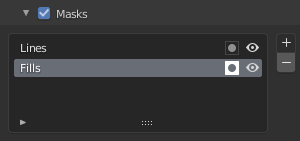
El panel Máscaras.
In Grease Pencil there are no special mask layers, any layer can act as a mask for other layers. The mask system is flexible enough to allow top-bottom and bottom-top masking.
Layers used as masks can use all the blend modes and different opacity values like any other layer.
Truco
If you want to make a full transparent masking you will have to set the mask layer’s opacity to 0.
The layer/s that will act as mask of the current layer could be added to the Mask list view.
In the Masks list next to the layers name there are two icons buttons that control common properties of the layer mask:
- Invertir (ícono de máscara)
Inverts the mask.
- Visibilidad en vistas/procesamiento (ícono de ojo)
Alterna la capa de visibilidad en la Vista y el procesado.
Transformación
Allows per-layer location, rotation and scale transformations.
Ajustes
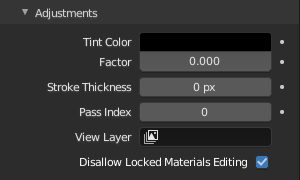
Panel Ajustes de las capas.
- Tinte: Color
Color that tint any material colors used in the layer.
- Factor
Controls the amount of tint color to apply.
- Grosor del trazo
Thickness value that override the strokes thickness in the layer.
Relaciones
- Superior
Select a Parent object to manipulate the layer. The layer will inherit the transformations of the parent, this is especially useful when rigging for cut-out animation.
- Identificador en pasada
The layer index number can be used with some modifiers to restrict changes to only certain areas.
See Modifiers for more information.
- Capa de visualización
Defines the View Layer to use for the Grease Pencil layer. If empty, the layer will be included in all View Layers. This is useful to separate drawings parts for compositing.
- Usar máscaras al procesar
If disabled, no masks on the layer are included in the view layer render.
