glTF 2.0
Referencia
- Categoría:
Importación-Exportación
- Menú:
Habilitación del complemento
Este complemento se encontrará activo de forma predefinida, en caso de que no fuera así:
Abrir Blender e ir a la sección Complementos de las Preferencias.
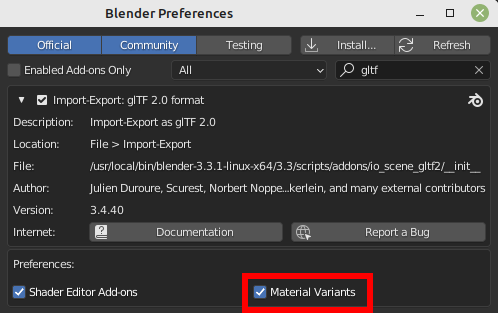
Buscar «glTF 2.0» y marcar la casilla de verificación Habilitar extensión.
Uso
glTF™ (GL Transmission Format) es utilizado para la transmisión y la carga de modelos 3D en aplicaciones web y nativas. glTF reduce el tamaño de los modelos 3D y el procesamiento del runtime necesario para desempaquetar y representar aquellos modelos. Este formato es comúnmente usado en la web, y tiene soporte en varios motores 3D tales como Unity3D, Unreal Engine 4 y Godot.
Este importador/exportador soporta las siguientes características glTF 2.0:
Mallas
Materiales (Principled BSDF) and Shadeless (Unlit)
Texturas
Cámaras
Luces puntuales (punto, focal, y direccional)
Extensiones (listadas abajo)
Extras (propiedades personalizadas)
Animación (claves, formas clave y deformación con esqueletos)
Mallas
La estructura interna de glTF imita los buffers de memoria comúnmente utilizados por chips gráficos durante el procesamiento en tiempo real, de modo que los recursos puedan ser entregados a clientes de escritorio, web o móviles y ser mostrados rápidamente con un cálculo mínimo. Como resultado, los cuadriláteros y los enégonos serán convertidos automáticamente en triángulos, cuando sean exportados a glTF. Los UV discontinuos y los bordes con sombreado definido podrán dar como resultado una cantidad de vértices moderadamente más alta en glTF en comparación con Blender, ya que dichos vértices se separarán para la exportación. Del mismo modo, las curvas y otros datos que no sean mallas no serán conservados y deberán ser convertidos en mallas antes de la exportación.
Instancias mediante GPU
Cuando la opción se encuentre activa en el Exportador, las instancias serán exportadas usando la extensión EXT_mesh_gpu_instancing. Existen algunas limitaciones en el momento de la exportación:
Las instancias deberán ser mallas y no tener ningún subordinado ellas mismas.
Las instancias deberá estar todas subordinadas al mismo objeto.
La extensión no es capaz de manipular variaciones de materiales. Eso significa que el archivo generado podrá incluir todas las instancias con los mismos materiales.
Las instancias detectadas serán objetos que compartan los mismos datos de malla.
En el momento de la importación, las instancias serán creadas creando objetos que compartan los mismos datos de malla.
Materiales
El sistema central de materiales en glTF soporta un flujo de trabajo metal/rugoso PBR con los siguientes canales de información:
Color base
Metálico
Rugosidad
Oclusión ambiental capturada
Mapa Normal (espacio tangencial, +Y arriba)
Emisivo
Será posible expresar algunas propiedades o tipos adicionales de materiales mediante el uso de extensiones glTF. La lista completa de éstas podrá ser encontrada en la sección Extensiones de este documento.
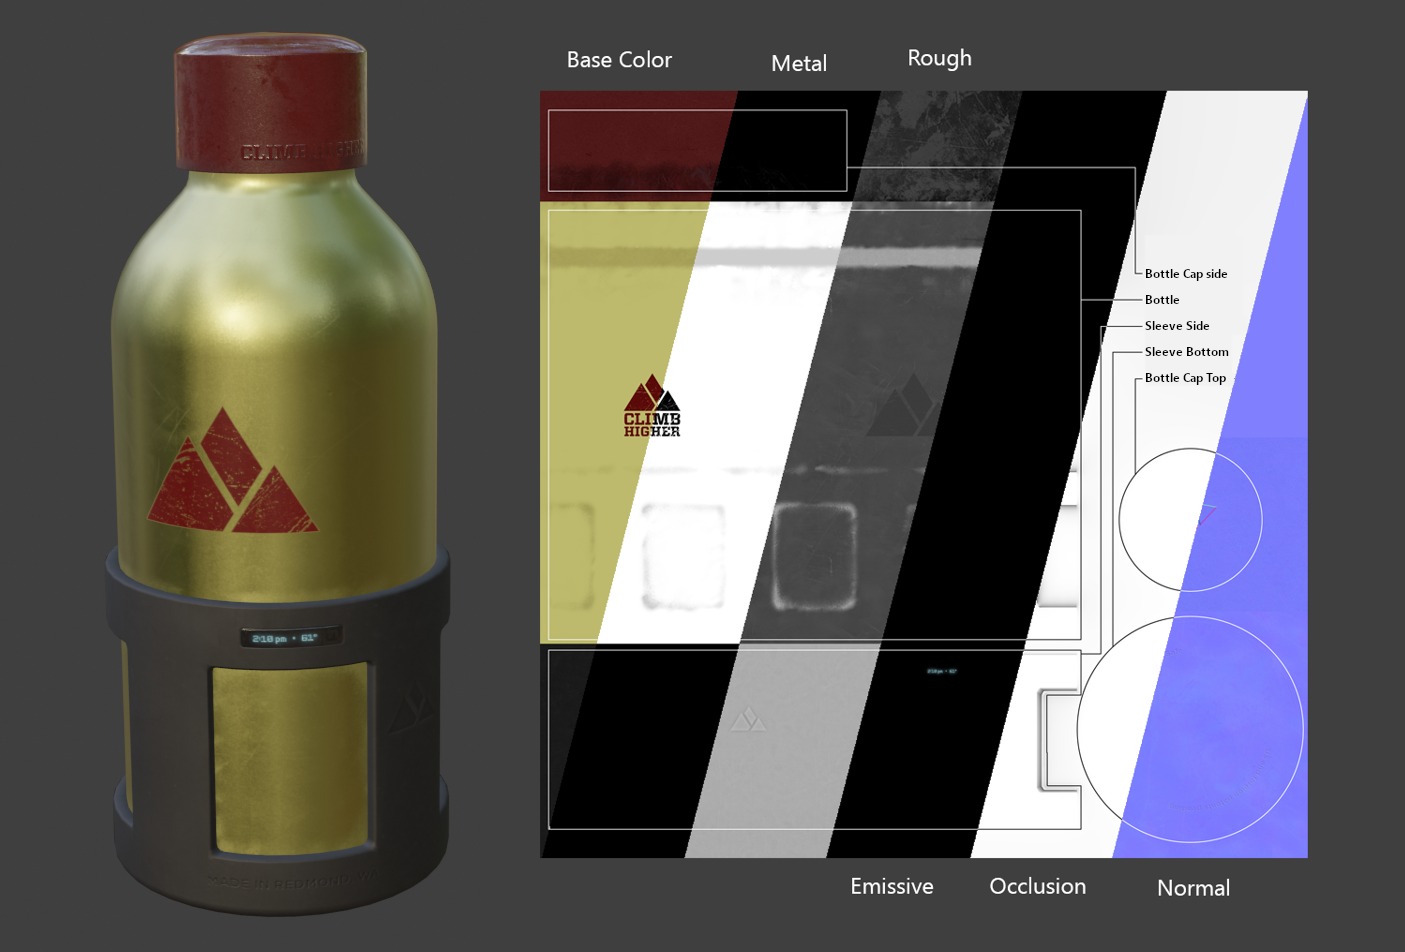
Un ejemplo de los varios mapas de imágenes disponibles en el formato central glTF 2.0. Este es el modelo de ejemplo de la botella para agua mostrado junto con las partes de sus varios mapas de imágenes.
Materiales importados
El sistema de materiales de glTF es diferente de los propios materiales de Blender. Cuando un archivo glTF es importado, el complemento construirá un conjunto de nodos de Blender para intentar replicar cada material de glTF, de forma tan parecida como sea posible.
El importador soporta materiales PBR de tipo Metal/Rugoso (core glTF), Especular/Difuminado (KHR_materials_pbrSpecularGlossiness) y algunos de extensiones. La lista completa podrá ser encontrada en la sección Extensiones de este documento.
Truco
Examinar el resultado del proceso de importación de los materiales es una buena forma de ver ejemplos de los tipos de nodos de materiales y los ajustes que pueden ser exportados a glTF.
Materiales exportados
El exportador soporta materiales Metal/Rough PBR (core glTF) y Shadeless (KHR_materials_unlit). Construirá un material glTF basándose en los nodos que reconozca en el material Blender. El proceso de exportación de materiales maneja los ajustes descritos debajo.
Nota
Cuando los materiales utilicen texturas de imágenes, glTF requerirá que las imágenes se encuentren en formato PNG o JPEG. El complemento convertirá las imágenes automáticamente desde los otros formatos, incrementando el tiempo de exportación.
Color base
El color base del glTF será determinado al buscar una entrada Color base en un nodo BSDF Principista. Si dicha entrada no estuviera conectada, su color predefinido (el campo de color al lado del conector libre) será utilizado como Color base para el material glTF.

Puede ser especificado un color base sólido directamente en el nodo.
Si el nodo Image Texture resulta estar conectado a la entrada Base Color, la imagen será utilizada como el color base del glTF.
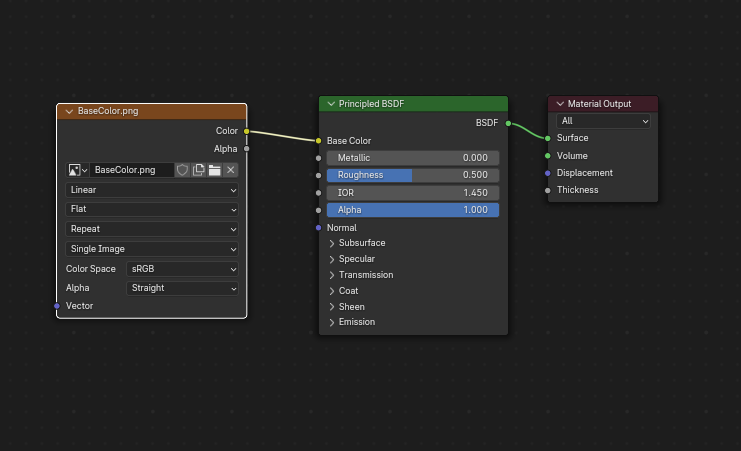
Una imagen es utilizada como el color base del glTF.
Metálico y Rugosidad
Estos valores serán leídos desde el nodo BSDF Principista. Cuando ambas entradas se encontraran desconectadas, el nodo mostrará deslizadores para controlar sus respectivos valores entre 0.0 y 1.0, y éstos serán copiados en el glTF.
Cuando se use una imagen, glTF esperará que el valor Metálico se encuentre codificado en el canal azul (A) y el valor de rugosidad se encuentre codificado en el canal verde (V) de la misma imagen. Si las imágenes estuvieran conectadas al nodo de Blender de una forma que no siga esta convención, el complemento puede intentar adaptar la imagen a la forma correcta durante la exportación (incrementando el tiempo de exportación).
En el árbol de nodos de Blender, se recomienda usar un nodo Separar RVA para separar los canales de un nodo Image Texture, y conectar el canal verde (G) a Roughness, y el azul (B) a Metallic. El exportador glTF reconocerá esta disposición como la correspondiente al estándar de glTF, y eso le permitirá básicamente copiar la textura de la imagen en el archivo glTF durante la exportación.
Para esto, el nodo de textura de Imagen debería tener su «Espacio de color» establecido en Datos.
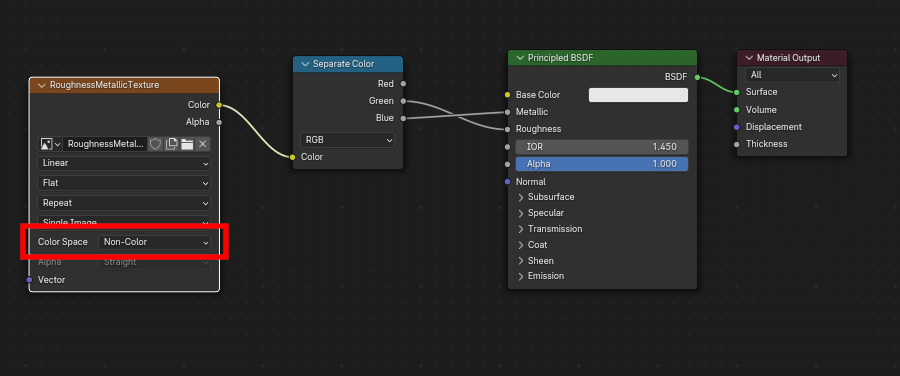
Una imagen metallic/roughness conectada de forma consistente con el estándar glTF, permitiéndole ser usada textualmente dentro de un archivo glTF exportado.
Oclusión ambiental capturada
glTF es capaz de almacenar un mapa de oclusión ambiental capturado. Actualmente, no existe una configuración de nodos que hagan que Blender utilice tal mapa exactamente de la misma forma en la que es usado en glTF. Sin embargo, si el exportador encontrara un grupo de nodos personalizado con el nombre glTF Material Output, y encontrara una entrada llamada``Occlusion`` en ese grupo de nodos, buscará una textura de imagen conectada allí para utilizarla como mapa de oclusión en glTF. El efecto no necesitará ser visualizado en Blender, dado que Blender tiene otras formas de mostrar la oclusión ambiental, pero este método permitirá al exportador guardar una imagen de oclusión en el archivo glTF. Esto podrá resultar útil para visores glTF de tiempo real, particularmente en plataformas en las que podría no sobrar potencia como para calcular tales cosas en tiempo real.
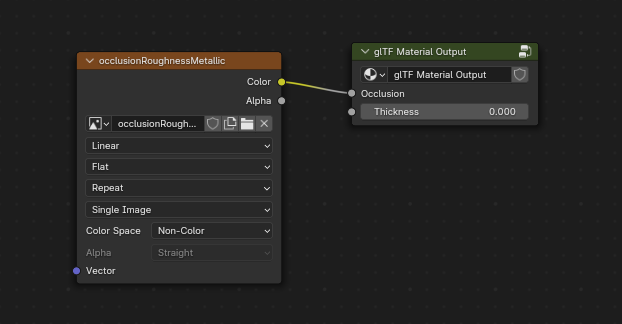
Un mapa de oclusión ambiental previamente capturado, conectado a un nodo que no será mostrado durante el procesamiento, pero que será exportado al archivo glTF.
Truco
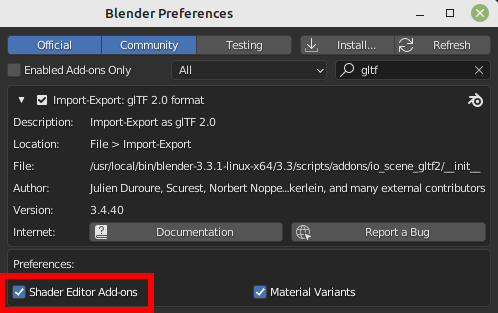
En caso de que se activara la opción Shader Editor Add-ons en las preferencias del complemento, será posible será posible agregar este grupo de nodos personalizado mediante el menú: Agregar > Salida > glTF Material Output.
glTF almacena la oclusión en el canal rojo (R), permitiéndole, de forma opcional, compartir la misma imagen con los canales roughness y metallic.
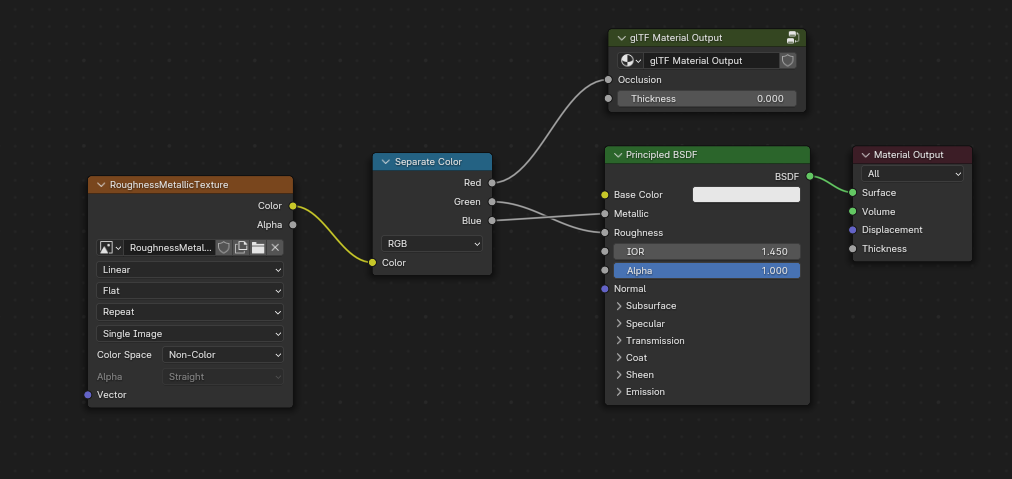
Esta combinación de nodos imita la forma en que glTF empaqueta los valores de oclusión, roughness y metallic, en una imagen simple.
Truco
El motor de procesamiento Cycles, contiene una panel Capturar que podrá ser utilizado para capturar los mapas de oclusión ambiental. La imagen resultante podrá ser guardada y conectada directamente al nodo glTF Material Output.
Mapa de normales
Para usar un mapa de normales en glTF, habrá que conectar la salida Color del nodo de textura de Imagen con la entrada Color del nodo Mapa de normales y luego conectar la salida Normal del nodo Mapa de normales con la entrada Normal del nodo BSDF Principista. Para esto, el nodo de textura de Imagen debería tener su «Espacio de color» establecido en Datos.
El nodo Mapa de normales deberá permanecer con su propiedad predefinida Espacio tangencial, puesto que este es el único tipo de mapa de normales actualmente soportado por glTF. La Intensidad del mapa de normales podrá ser ajustada en dicho nodo. El exportador no exportará este nodo de forma directa, aunque lo utilizará para encontrar la imagen correcta y copiará su opción de Intensidad en el glTF.
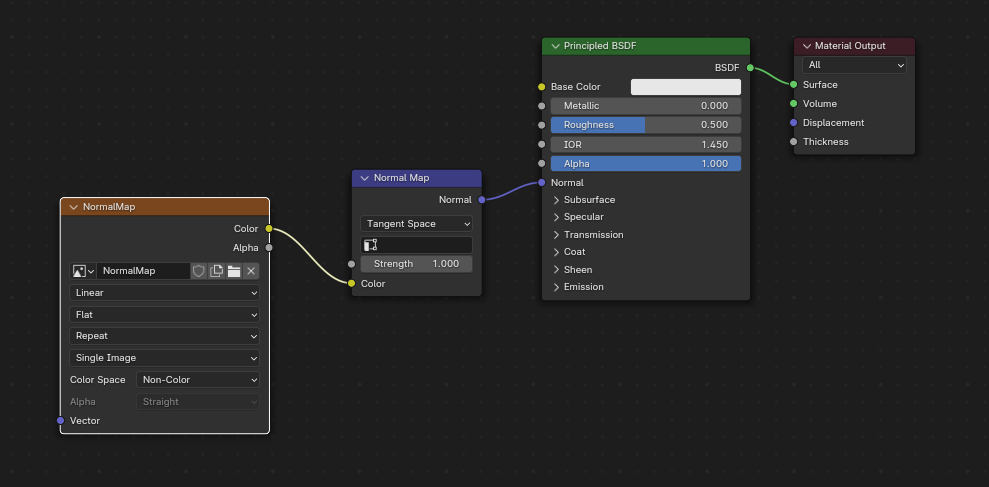
Una imagen de un mapa de normales conectado de tal forma que el exportador lo encontrará y lo copiará en el archivo glTF.
Truco
El motor de procesamiento Cycles, contiene un panel Capturar que podrá ser utilizado para capturar los mapas de normales en espacio tangencial, a partir de prácticamente cualquier otra disposición de nodos de vectores de normales. Cambiar el tipo de captura a Normal. Mantener las opciones de espacio predefinidas (espacio: Tangente, R: +X, V: +Y, A: +Z) cuando se use este panel de captura para glTF. La imagen resultante de la captura podrá ser guardada y conectada a un nuevo material, utilizando el nodo Mapa de normales, tal como se describió anteriormente, permitiendo exportar de forma correcta.
Emisivo
Podrá conectarse un nodo de textura de Imagen a la entrada Emisión del nodo BSDF Principista para incluir un mapa emisivo con el material glTF. Alternativamente, el nodo de textura de Imagen podrá ser conectado a un nodo de sombreado Emisión y, opcionalmente, combinado con las propiedades de un nodo BSDF Principista, pasando por un nodo Sumar sombreadores.
En caso de que el mapa emisivo fuera el único material, lo mejor será establecer el Color base a negro y la Rugosidad a 1.0. Esto minimizará la influencia de otros canales, en caso de que no fueran necesarios.

Esta disposición soporta la compatibilidad hacia atrás. Es más simple utilizar directamente al nodo Principled BSDF.
En caso de que cualquier componente de emissiveFactor fuera > 1.0, se usará la extensión KHR_materials_emissive_strength.
Barniz
When the Clearcoat input on the Principled BSDF node has a nonzero default value or
Image Texture node connected, the KHR_materials_clearcoat glTF extension will be
included in the export. This extension will also include a value or Image Texture
from the Clearcoat Roughness input if available.
If Image Textures are used, glTF requires that the clearcoat values be written to
the red (R) channel, and Clearcoat Roughness to the green (G) channel.
If monochrome images are connected, the exporter will remap them to these color channels.
The Clearcoat Normal input accepts the same kinds of inputs as the base Normal input, specifically a tangent-space normal map with +Y up, and a user-defined strength. This input can reuse the same normal map that the base material is using, or can be assigned its own normal map, or can be left disconnected for a smooth coating.
Todos los nodos de textura de Imagen usados para el barniz del sombreado deberían tener su «Espacio de Color» establecido en Datos.
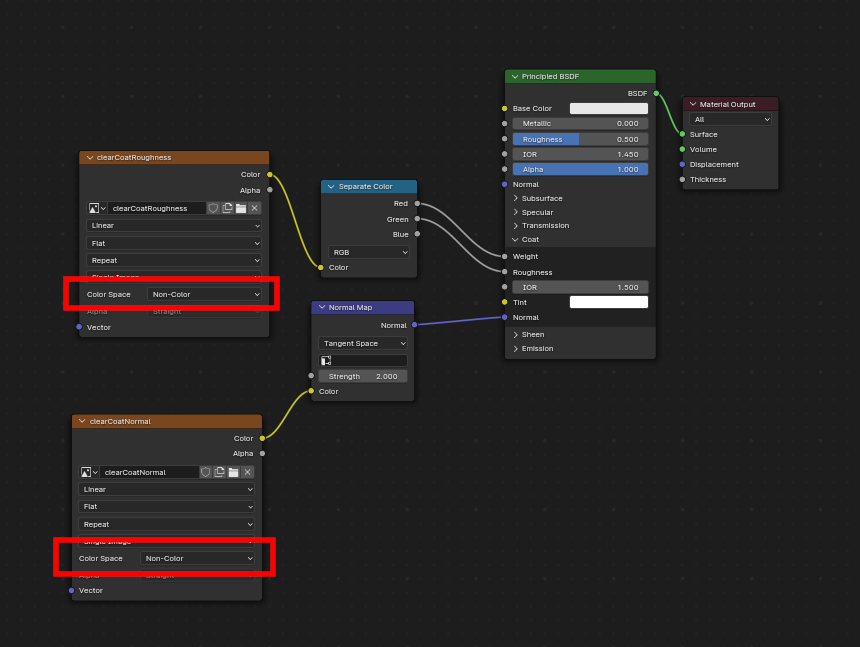
An example of a complex clearcoat application that will export correctly to glTF. A much simpler, smooth coating can be applied from just the Principled BSDF node alone.
Brillo tangencial
Cuando se use una textura de Rugosidad del Brillo tangencial, glTF necesitará que los valores sean escritos en el canal alfa (α).
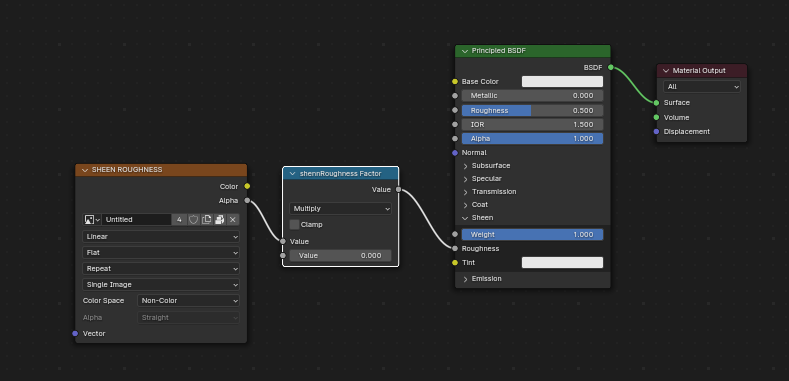
Truco
El nodo BSDF Brillo tangencial sólo se encuentra disponible en el motor de procesamiento Cycles. Es posible que sea necesario cambiar temporalmente a Cycles para agregar este nodo, para luego regresar a EEVEE.
Especularidad
When the Specular IOR Level or Specular Tint input of Principled BSDF node have a non default value or
Image Texture node connected, the KHR_materials_specular glTF extension will be
included in the export.
Anisotropía
Las texturas y datos de anisotropía deberán ser convertidos al ser exportados e importados.
Al importar, algunos nodos serán creados para administrar esta conversión

Al exportar, estos mismos nodos serán detectados y usados para exportar los datos.
Al exportar, será posible conectar algunas texturas en escala de grises en los conectores Anisotropía y Rotación de anisotropía. Luego, el exportador convertirá esas texturas en texturas compatibles de glTF.
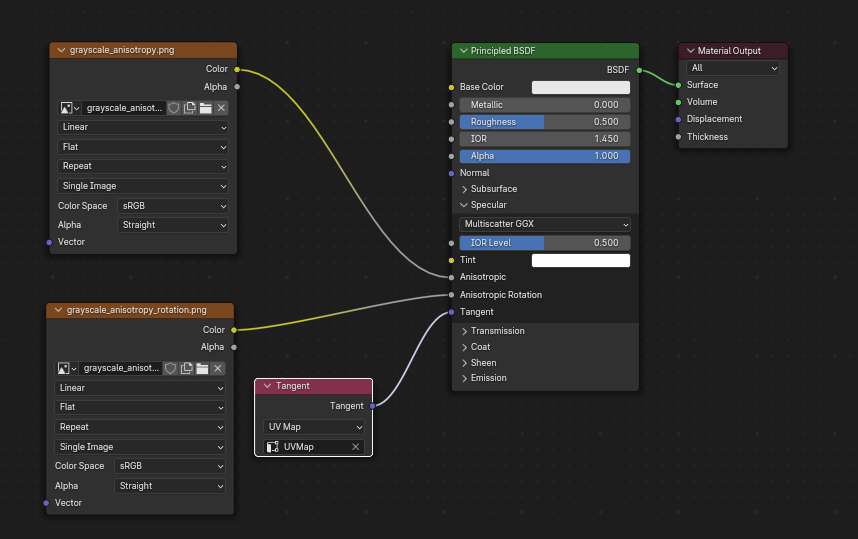
Nótese que el conector Tangente deberá estar conectado a un nodo Tangente, usando su modo Mapa UV. El mapa UV escogido deberá el mismo usado en el nodo Mapa de normales.
Transmisión
Cuando la entrada «Intensidad de transmisión» del nodo BSDF Principista tenga un valor distinto a cero o un nodo de textura de Imagen conectado, la extensión de glTF KHR_materials_transmission se incluirá en la exportación. Cuando se use una textura, glTF guardará los valores en el canal rojo (R). El «Espacio de color» deberá ser establecido en Datos.
Transmission is different from alpha blending, because transmission allows full-strength specular reflections. In glTF, alpha blending is intended to represent physical materials that are partially missing from the specified geometry, such as medical gauze wrap. Transmission is intended to represent physical materials that are solid but allow non-specularly-reflected light to transmit through the material, like glass.
Truco
The material’s base roughness can be used to blur the transmission, like frosted glass.
Truco
Typically the alpha blend mode of a transmissive material should remain «Opaque», the default setting, unless the material only partially covers the specified geometry.
Nota
In real-time engines where transmission is supported, various technical limitations in the engine may determine which parts of the scene are visible through the transmissive surface. In particular, transmissive materials may not be visible behind other transmissive materials. These limitations affect physically-based transmission, but not alpha-blended non-transmissive materials.
Nota
If you want to enable refraction on your model, KHR_materials_transmission must also
be used in addition with KHR_materials_volume. See the dedicated Volume part of
the documentation.
Advertencia
Transmission is complex for real-time rendering engines to implement,
and support for the KHR_materials_transmission glTF extension is not yet widespread.
IR
At import, there are two different situation:
if
KHR_materials_ioris not set, IOR value of Principled BSDF node is set to 1.5, that is the glTF default value of IOR.If set, the
KHR_materials_ioris used to set the IOR value of Principled BSDF.
At export, IOR is included in the export only if one of these extensions are also used:
KHR_materials_transmissionKHR_materials_volumeKHR_materials_specular
IOR of 1.5 are not included in the export, because this is the default glTF IOR value.
Volumen
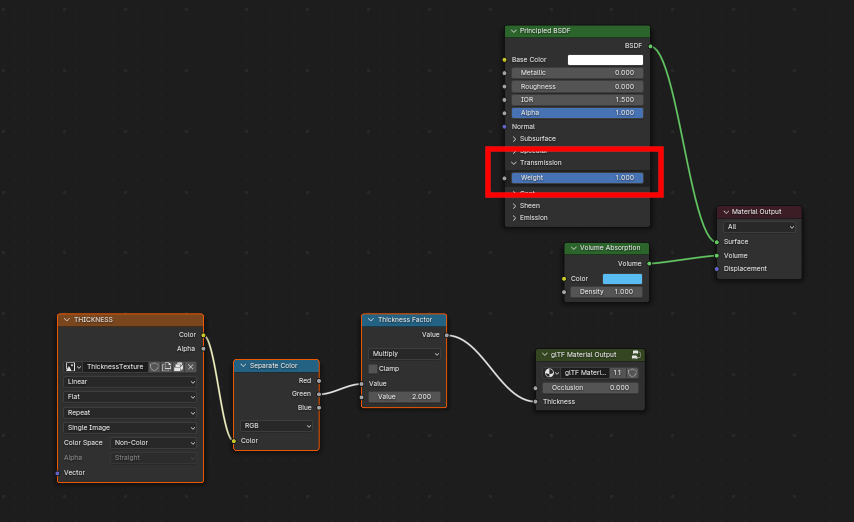
Volume can be exported using a Volume Absorption node, linked to Volume socket of Output node.
Data will be exported using the KHR_materials_volume extension.
For volume to be exported, some transmission must be set on Principled BSDF node.
Color of Volume Absorption node is used as glTF attenuation color. No texture is allowed for this property.
Density of Volume Absorption node is used as inverse of glTF attenuation distance.
Thickness can be plugged into the Thickness socket of custom group node
glTF Material Output.If a texture is used for thickness, it must be plugged on (
G) Green channel of the image.
Variantes de glTF
Nota
For a full Variants experience, you have to enable UI in Add-on preferences
There are two location to manage glTF Variants in Blender
In 3D View, on
glTF VariantstabFor advanced settings, in Mesh Material Properties (see Advanced glTF Variant checks)
The main concept to understand for using Variants, is that each material slot will be used as equivalent of a glTF primitive.
Intercambio de variantes de glTF
After importing a glTF file including KHR_materials_variants extension, all variants can be displayed.
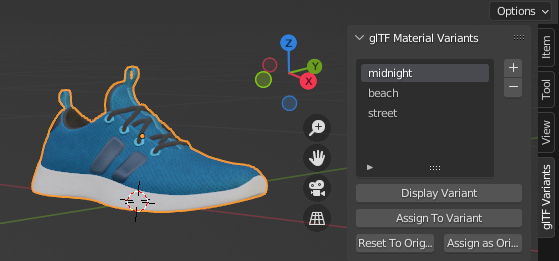
You can switch Variant, by selecting the variant you want to display, then clicking on Display Variant.
You can switch to default materials (when no Variant are used), by clicking on Reset to default.
Creación de variantes de glTF
You can add a new Variant by clicking the + at right of the Variant list.
Then you can change the name by double-clicking.
After changing Materials in Material Slots, you can assign current materials to the active Variant using Assign to Variant.
You can also set default materials using Assign as Original.
These materials will be exported as default material in glTF.
This are materials that will be displayed by any viewer that don’t manage KHR_materials_variants extension.
Comprobaciones avanzadas de variantes de glTF
If you want to check primitive by primitive, what are Variants used, you can go to Mesh Material Properties.
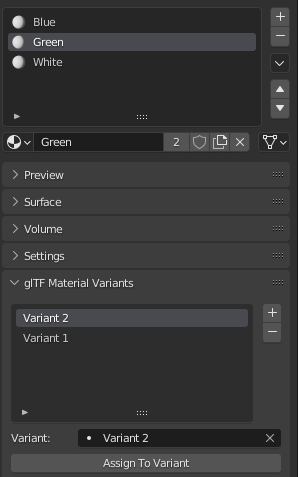
The glTF Material Variants tab refers to the active material Slot and Material used by this slot. You can see every Variants that are using this material for the given Slot/Primitive.
You can also assign material to Variants from this tab, but recommendation is to perform it from 3D View tab.
Doble lado / Descartar caras traseras
En materiales en donde sólo las caras frontales se encuentren visibles, se podrá activar la opción Descartar caras traseras en el panel de Opciones del material de EEVEE. Cuando se usen otros motores (como Cycles o Workbench), será posible cambiar temporalmente a EEVEE para configurar esta opción y luego regresar.
Deja esta caja sin seleccionar para los materiales de lados dobles.
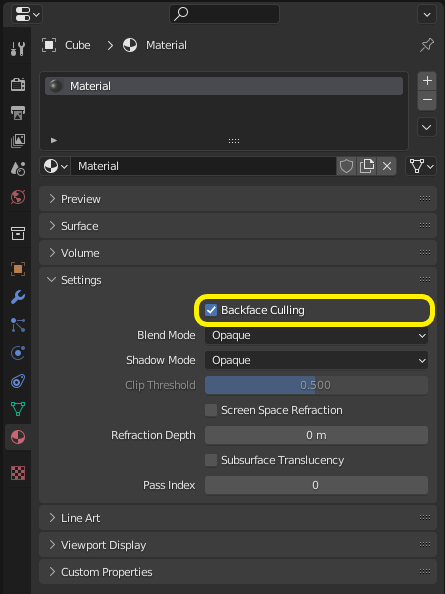
La inversa de este ajuste lo controla la bandera DoubleSided de glTF.
Modo de alfa
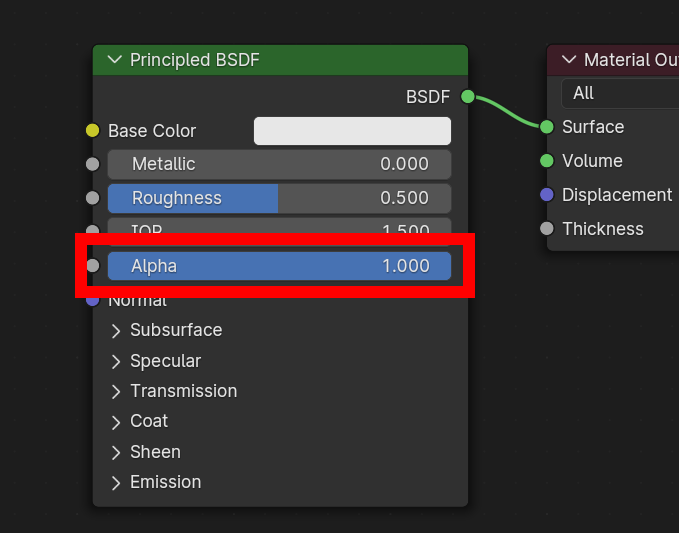
glTF has three alpha modes, depending on whether the alpha value is always 1, always 0 or 1, or can be between 0 and 1. The exporter determines the alpha mode automatically from the nodes connected to the Alpha socket.
- Opaco
In opaque mode, the material alpha is always 1.
- Máscara
In mask mode, the material alpha is always 0 or 1. This creates «cutout» transparency, where there is a hard edge between opaque and transparent regions, and can be used for things like leaves or cloth with holes. To enable this mode, use a Math node to round the alpha value to either 0 or 1.
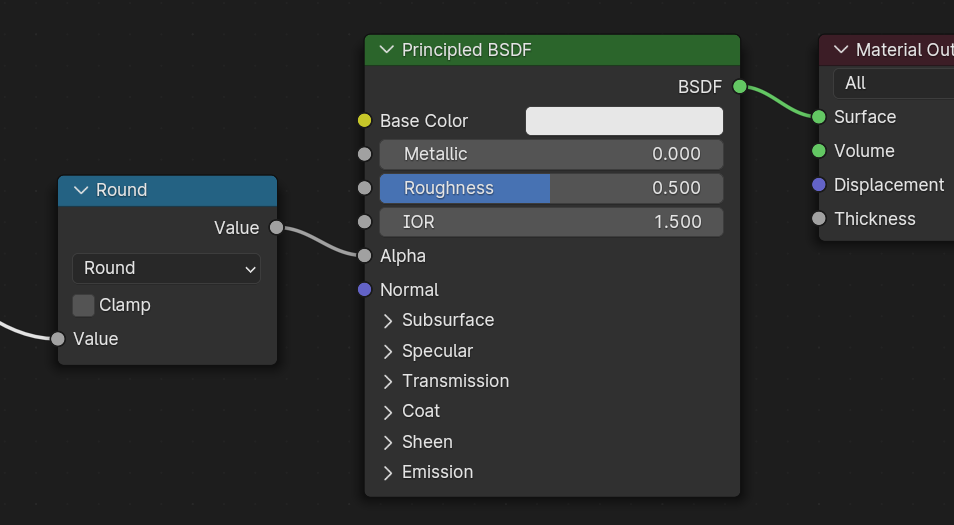
Rounding snaps alpha values that are 0.5 or greater up to 1, and ones below 0.5 down to 1. It is also possible to use a cutoff value different than 0.5 by using Math nodes to do
1 - (alpha < cutoff).Mask mode is essentially the same as EEVEE’s «Alpha Clip» blend mode, but is done with shader nodes so it works in other render engines.
- Fundido
Materials that use neither of these will use blend mode. Blend mode allows partially transparent surfaces that tint the objects seen through them, like layers of colored film. However, partial transparency is complex to render, and glTF viewers may show visual artifacts in non-trivial scenes that use blend mode.
To avoid artifacts, it may be a good idea to separate out parts of a model that can use opaque or mask mode, and use blend mode only on the parts where it is necessary, or to use only a single layer of transparent polygons in front of opaque objects.
Mapeo UV
Será posible controlar la selección y transformación de mapas UV mediante la conexión de un nodo Mapa UV y un nodo Mapeo a cualquier nodo de textura de Imagen.
Los ajustes del nodo Mapeo serán exportados utilizando una extensión glTF llamada KHR_texture_transform. Existe un selector del tipo de mapeo en su parte superior. Punto es el tipo de mapeo recomendado para la exportación. Textura y Vector también son soportados. Los desplazamientos soportados son:
Posición (X e Y)
Rotación (sólo Z)
Escala (X e Y)
Para el tipo Textura, los valores de Escala X e Y deberán ser iguales (escala uniforme).
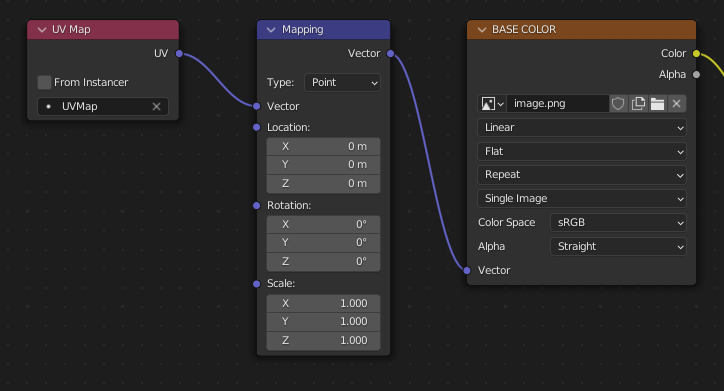
Una elección intencional del mapeo UV.
Truco
Estos nodos son opcionales. No todos los lectores de gITF soportan múltiples mapas UV o transformaciones de texturas.
Factores
Cualquier nodo Image Texture opcionalmente puede ser multiplicado por un color constante o un escalar. Estos serán escritos como factores en el archivo glTF, que son números que son multiplicados por las texturas de las imágenes especificadas. Éstos no son comunes.
Use Math node (multiply) for scalar factors. Use second value as factor
Use Mix node (color / multiply) for color factors. Set Factor to 1, and use Color2 (B) as factors
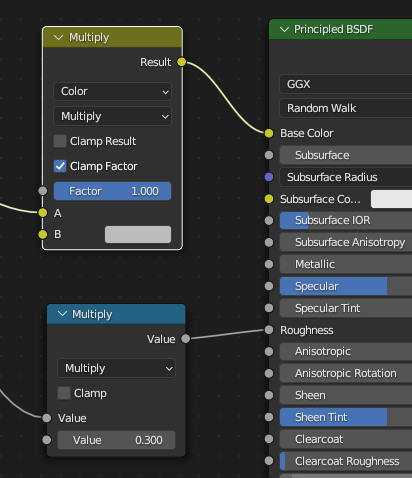
Ejemplo
Un material simple puede utilizar todo lo anterior al mismo tiempo, si se desea. Esta figura muestra una estructura de nodos típica cuando varias de las opciones anteriores son aplicadas a la vez:
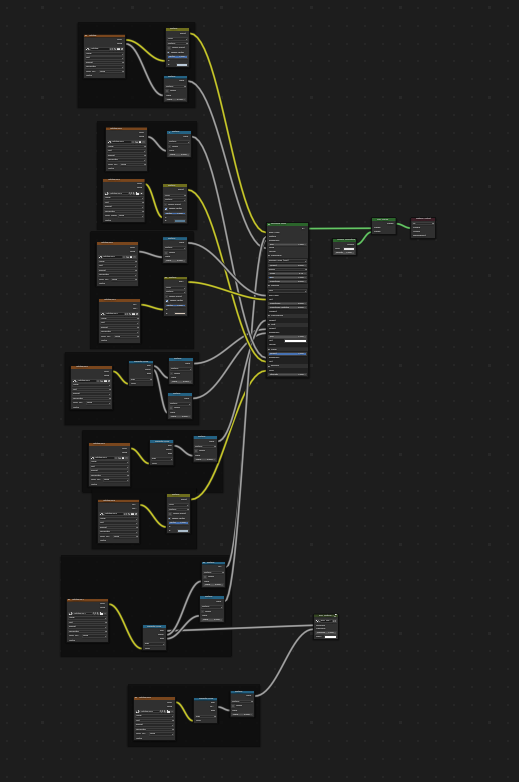
Un material Principled BSDF con una textura emisiva.
UDIM
UDIM is a way to store multiple textures in a single image file. The UDIM system is supported by Blender, but is not supported by glTF. When exporting a model that uses UDIM, the add-on will automatically split the image into multiple images, one for each tile, and will update the material nodes to use the new images. All UDIM texture must use the same UV map to be exported.
Exportación de un material sin sombreado (no iluminado)
To export an unlit material, mix in a camera ray, and avoid using the Principled BSDF node.
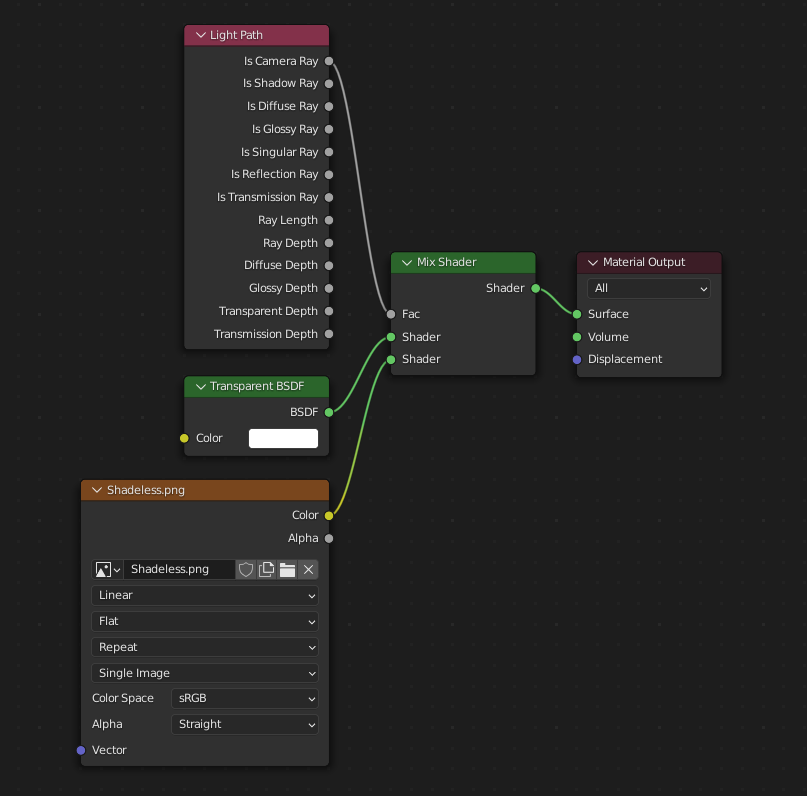
One of several similar node arrangements that will export
KHR_materials_unlit and render shadeless in Blender.
Extensiones
El formato central glTF 2.0 puede ser extendido con información extra, utilizando extensiones glTF. Esto permite que el formato del archivo mantenga detalles que no eran considerados universales en el momento de la primera publicación. No todos los lectores glTF soportan todas las extensiones, pero algunas son bastante comunes.
Ciertas características de Blender sólo pueden ser exportadas a glTF a través de estas extensiones. Las siguientes extensiones de glTF 2.0 son soportadas directamente por este complemento:
Importar
KHR_materials_pbrSpecularGlossinessKHR_materials_clearcoatKHR_materials_transmissionKHR_materials_unlitKHR_materials_emissive_strengthKHR_materials_volumeKHR_materials_sheenKHR_materials_specularKHR_materials_anisotropyKHR_materials_iorKHR_materials_variantsKHR_lights_punctualKHR_texture_transformKHR_mesh_quantizationEXT_mesh_gpu_instancing
Exportar
KHR_draco_mesh_compressionKHR_lights_punctualKHR_materials_clearcoatKHR_materials_transmissionKHR_materials_unlitKHR_materials_emissive_strengthKHR_materials_volumeKHR_materials_sheenKHR_materials_specularKHR_materials_anisotropyKHR_materials_iorKHR_materials_variantsKHR_texture_transformEXT_mesh_gpu_instancing
Extensiones glTF de terceros
Es posible que los desarrolladores de Python agreguen compatibilidad con Blender para extensiones glTF adicionales al escribir su propio complemento de terceros, sin modificar este complemento glTF. Para más información, ver el ejemplo en GitHub y si es necesario, registrar un prefijo de extensión.
Propiedades personalizadas
Custom properties are always imported, and will be exported from most objects
if the option is selected before export.
These are stored in the extras field on the corresponding object in the glTF file.
Unlike glTF extensions, custom properties (extras) have no defined namespace, and may be used for any user-specific or application-specific purposes.
Animaciones
A glTF animation changes the transforms of objects or pose bones, or the values of shape keys. One animation can affect multiple objects, and there can be multiple animations in a glTF file.
Importar
Imported models are set up so that the first animation in the file is playing automatically. Scrub the Timeline to see it play.
When the file contains multiple animations, the rest will be organized using the Nonlinear Animation editor. Each animation becomes an action stashed to an NLA track. The track name is the name of the glTF animation. To make the animation within that track visible, click Solo (star icon) next to the track you want to play.
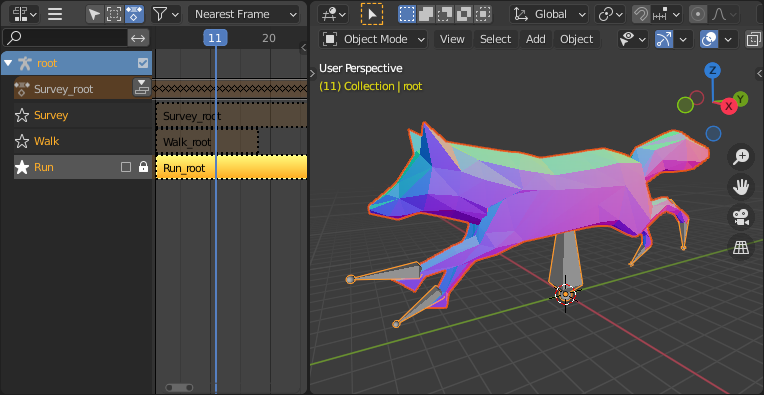
This is the fox sample model showing its «Run» animation.
If an animation affects multiple objects, it will be broken up into multiple parts. The part of the animation that affects one object becomes an action stashed on that object. Use the track names to tell which actions are part of the same animation. To play the whole animation, you need to enable Solo (star icon) for all its tracks.
Each animation will be imported as a single action, with multiple slots if the animation affects multiple objects. One slot will be created for TRS, one for shape keys, etc…
You can find more information about action slots in Animation.
Nota
There is currently no way to see the non-animated pose of a model that had animations.
You can also use the animation switcher that can be found in Dope Sheet editor.
Nota
You have to enable UI in Add-on preferences for seeing the animation switcher
You can switch all animation imported. It automatically enables Solo (star icon) for all needed tracks. It also reset non animated object to Rest transformation.
Exportar
You can export animations using different ways. How glTF animations are made from actions / NLA is controlled by the export option.
Acciones (predefinido)
An action will be exported if it is the active action on an object, or it is stashed to an NLA track (e.g. with the Stash or Push Down buttons in the Action Editor). Actions which are not associated with an object in one of these ways are not exported. If you have multiple actions you want to export, make sure they are stashed!
A glTF animation can have a name, which is the action name by default. You can override it
by renaming its NLA track from NLATrack/[Action Stash] to the name you want to use.
For example, the Fig. fox model will export with three animations,
«Survey», «Walk», and «Run».
If you rename two tracks on two different objects to the same name, they will become part
of the same glTF animation and will play together.
The importer organizes actions so they will be exported correctly with this mode.
This mode is useful if you are exporting for game engine, with an animation library of a character. Each action must be on its own NLA track.
Before Blender 4.4, tracks was merged regarding their name. With Blender 4.4, and the introduction of slotted actions, this default behavior has been changed. Now, tracks are merged by the action they are using, and not by their name. You can find more information about action slots in Animation.
Acciones activas fusionadas
In this mode, the NLA organization is not used, and only one animation is exported using the active actions on all objects.
Pistas de ANL
En este modo, cada pista de NLA será exportada como un animación de glTF independiente. Este modo es útil si se usa los modificadores de clips, o si se obtiene multiple acciones en una misma pista.
If you rename two tracks on two different objects to the same name, they will become part of the same glTF animation and will play together.
Escena
Using Scene option, animations will be exported as you can see them in viewport. You can choose to export a single glTF animation, or each object separately.
Nota
Recordar que sólo se soportan ciertos tipos de animación:
Transformación de objetos (posición, rotación, escala)
Huesos de pose
Valores de Formas clave
La animación de otras propiedades, tales como dinámicas, luces o materiales, será ignorada.
Nota
In order to sample shape key animations controlled by drivers using bone transformations, they must be on a mesh object that is a direct child of the bones” armature.
Nota
Only Actions (default) and Active Actions merged mode can handle not sampled animations.
Variantes de formato de archivo
La especificación glTF identifica diferentes formas en que los datos pueden ser almacenados. El importador es capaz de manejarlas a todas. El exportador pedirá al usuario que seleccione una de las siguientes formas:
glTF binario (.glb)
Esto produce un archivo .glb simple, con todos los datos de las mallas, las texturas de las imágenes y la información relacionada, empaquetada en un archivo binario simple.
Truco
Usar un archivo simple facilita el compartir o copiar el modelo en otros sistemas o servicios.
glTF separado (.gltf + .bin + texturas)
Esto produce una archivo basado en texto JSON .gltf que describe la estructura completa, conjuntamente con un archivo .bin que contiene los datos de las mallas y los vectores y, opcionalmente, un número de archivos .png o .jpg que contienen las texturas de las imágenes referenciadas por el archivo .gltf.
Truco
Tener una diversidad de archivos separados, hace mucho más fácil que un usuario vuelva y edite cualquier JSON o imagen después de que la exportación se haya completado.
Nota
Sé consciente de que compartir este formato requiere compartir todos estos archivos separados como un grupo.
glTF incorporado (.gltf)
This produces a JSON text-based .gltf file, with all mesh data and
image data encoded (using Base64) within the file. This form is useful if
the asset must be shared over a plain-text-only connection.
Advertencia
This is the least efficient of the available forms, and should only be used when required. Available only when you activated it in addon preferences.
Propiedades
Importar
- Fusionar vértices
The glTF format requires discontinuous normals, UVs, and other vertex attributes to be stored as separate vertices, as required for rendering on typical graphics hardware. This option attempts to combine co-located vertices where possible. Currently cannot combine verts with different normals.
- Sombreado
Cómo las normales son computadas durante la importación.
- Modo de iluminación
Optional backwards compatibility for non-standard render engines. Applies to lights. Standard: Physically-based glTF lighting units (cd, lx, nt). Unitless: Non-physical, unitless lighting. Useful when exposure controls are not available Raw (Deprecated): Blender lighting strengths with no conversion
Textura
- Empacar imágenes
Empaqueta todas las imágenes en un archivo blend.
- Importar texturas WebP
If a texture exists in WebP format, loads the WebP texture instead of the fallback png/jpg one.
Huesos y deformación
- Dirección de huesos
Changes the heuristic the importer uses to decide where to place bone tips. Note that the Fortune setting may cause inaccuracies in models that use non-uniform scaling. Otherwise this is purely aesthetic. The default value will not change axis, and is best for re-exporting from Blender. This default option will change display mode (adding shape and changing relationship line) to have a better view, even if original bones axis are not the most accurate (estheticaly speaking)
- Adivinar pose original de enlace
Determina la pose para los huesos (y, consecuentemente, para la deformación con esqueletos) en modo Edición. Cuando la opción esté activa, intentará adivinar la pose que fue utilizada para calcular las matrices inversas de enlace.
- Deshabilitar forma de huesos
No se mostrará la forma de los huesos en le Vista 3D.
- Escalar forma de huesos
Escala de la forma de los huesos en la Vista 3D.
Canalización
- Seleccionar objetos importados
Seleccionará los objetos creados luego de la importación.
- Importar adicionales de escena
Import glTF extras as custom properties, at scene level.
Exportar
- Formato
Ver: File Format Variations.
- Mantener originales
For glTF Separate file format only. Keep original textures files if possible. Warning: if you use more than one texture, where PBR standard requires only one, only one texture will be used. This can lead to unexpected results
- Texturas
Sólo para el formato glTF separado. Carpeta en donde colocar los archivos de texturas. Relativa a la ubicación del archivo .gltf.
- Derechos de autor
Derechos legales y condiciones para el modelo.
- Recordar opciones de exportación
Almacena ajustes de exportación en un archivo blend, para que sean recordados la próxima vez que el archivo sea abierto.
Incluir (o Incluyendo)
- Objetos seleccionados
Sólo exporta objetos seleccionados.
- Objetos visibles
Sólo exporta objetos visibles.
- Objetos procesables
Sólo exporta objetos procesables.
- Colección activa
Sólo exporta los objetos de la colección activa.
- Incluir colecciones anidadas
Only when Active Collection is On. When On, export recursively objects on nested active collections.
- Escena activa
Sólo exporta la escena activa.
- Propiedades personalizadas
Export custom properties as glTF extras.
- Cámaras
Export cameras.
- Luces puntuales
Exporta luces direccionales, de punto y focales. Utiliza la extensión glTF
KHR_lights_punctual.
Transformación
- +Y hacia arriba
Exporta usando la conversión de glTF, +Y up.
Datos - Gráfica de la escena
- Instancias en nodos de geometría
Export Geometry nodes instances. This feature is experimental.
- Instancias mediante GPU
Export using
EXT_mesh_gpu_instancingextensions.- Aplanar jerarquía de objetos
Useful in case of non-decomposable TRS matrix. Only skined meshes will stay children of armature.
- Jerarquía completa de colecciones
Export collections as empty, keeping full hierarchy. If an object is in multiple collections, it will be exported it only once, in the first collection it is found.
Datos - Malla
- Aplicar modificadores
Exportará los objetos usando su malla evaluada, que es la malla resultante luego de que todos sus Modificadores hubieran sido calculados.
- UV
Exporta las UV (coordenadas de texturizado) junto con las mallas.
- Normales
Exporta las normales de los vértices junto con las mallas.
- Tangentes
Exporta las tangentes de los vértices junto con las mallas.
- Atributos
Export Attributes with meshes, when the name starts with underscore.
- Bordes sueltos
Export loose edges as lines, using the material from the first material slot.
- Puntos sueltos
Export loose points as glTF points, using the material from the first material slot.
- Accesores compartidos
For triangles, use shared accessor for indices. This is more efficient (smaller files when you have lots of materials).
Datos - Malla - Colores de vértices
- Usar color de vértices
- Material:
Export vertex color when used in material node tree as Base Color multiplier. This is the default, and the most accurate regarding glTF specification.
- Activo:
Export active vertex colors, even if not used in material node tree. A fully compliant glTF viewer should display this VC as Base Color multiplier.
- Ninguno:
No exportar los colores de los vértices.
- Exportar todos
Export all vertex colors, additional VC will be COLOR_1, COLOR_2, etc.
- Exportar activo cuando no haya material
Export active vertex color when no material is assigned to the object.
Datos - Material
- Materiales
Export full materials, only placeholders (all primitives but without materials), or does not export materials. (In that last case, primitives are merged, losing material slot information).
- Imágenes
Output format for images. PNG is lossless and generally preferred, but JPEG might be preferable for web applications due to the smaller file size. If WebP is chosen, all textures will be saved as WebP, without any png/jpg fallback. If None is chosen, materials are exported without textures.
- Calidad de imagen
When exporting jpeg or WebP files, the quality of the exported file.
- Crear WebP
Creates WebP textures for every textures, in addition to the existing texture. For already WebP textures, nothing happen.
- Alternativa a WebP
For all WebP textures, create a png fallback texture.
- Imágenes no usadas
Exportar imágenes que no se han usado en ningún material.
- Texturas no usadas
Export texture info (sampler, image, texcoord) that are not used in any material.
Datos - Formas clave
Exporta formas clave (objetivos de metamorfosis).
- Normales
Exporta las normales de los vértices con las claves de forma (objetivos de transformación).
- Tangentes
Exporta las tangentes de los vértices con las claves de forma (objetivos de transformación).
Datos - Formas clave - Optimizar Formas clave
- Usar Sparse Accessor cuando sea mejor
Sparse Accessor will be used if it save space (if the exported file is smaller)
- Omitir Sparse Accessor con datos vacíos
If data is empty, omit to export SParce Accessor. Not all viewer managed it correctly, so this option is Off by default
Datos - Esqueleto
- Usar posición reposo esqueleto
Export Armatures using rest position as joint rest pose. When Off, the current frame pose is used as rest pose.
- Sólo huesos deformantes
Export Deformation bones only, not other bones. Animation for deformation bones are baked.
- Eliminar esqueleto
Remove Armature Objects if possible. If some armature(s) have multiple root bones, we can’t remove them.
- Aplanar jerarquía de huesos
Useful in case of non-decomposable TRS matrix.
Datos - Deformación con esqueletos
Exporta los datos de deformación con esqueletos
- Influencias de huesos
Cuántas influencias de vértices de articulaciones serán exportadas. Los modelos podrían no ser correctamente mostrados en muchos visores, al usar valores distintos a 4 u 8.
- Influencias de todos los huesos
Exportará todas las influencias de vértices de articulaciones. Los modelos podrían no ser correctamente mostrados en muchos visores.
Datos - Iluminación
- Modo de iluminación
Optional backwards compatibility for non-standard render engines. Applies to lights. Standard: Physically-based glTF lighting units (cd, lx, nt). Unitless: Non-physical, unitless lighting. Useful when exposure controls are not available Raw (Deprecated): Blender lighting strengths with no conversion
Datos - Compresión
Comprime mallas usando Google Draco.
- Nivel de compresión
Mayor compresión produce menor codificación y decodificación.
- Cuantizar Posición
Los valores mayores producen mejores tasas de compresión.
- Normal
Los valores mayores producen mejores tasas de compresión.
- Coord text
Los valores mayores producen mejores tasas de compresión.
- Color
Los valores mayores producen mejores tasas de compresión.
- Genérico
Los valores mayores producen mejores tasas de compresión.
Animación
- Modo de animación
Modo de animación usado al exportar (Ver Animaciones
Animación - Captura y fusión
- Capturar animaciones de todos los objetos
Useful when some objects are constrained without being animated themselves.
- Fusionar animación
Merge animation mode. Can be by Action (using slot), by NLA Track Name, or no merge. When merging by NLA Track Name, all animation with the same NLA Track name will be merged. When merging by Action, all animations with the same action will be merged. When no merge, all animations will be exported as separate animations.
Animación - Reposo y rangos
- Fotograma actual como reposo de transformaciones de objetos
Export the scene in the current animation frame. When off, frame 0 is used as rest transformation for objects.
- Limitar a rango de reproducción
Recorta las animaciones al rango de reproducción seleccionado.
- Definir todas las animaciones glTF para que comiencen en 0
Set all glTF Animation starting at 0. Can be useful for looping animation
- Fotogramas negativos
When some frames are in negative range, slide or crop the animation.
Animación - Esqueleto
- Todas las acciones del esqueleto
Export all actions, bound to a single armature. Warning: Option does not support exports including multiple armatures.
- Restablecer huesos de pose entre acciones
Reset pose bones between each action exported. This is needed when some bones are not keyed on some animations.
Animación - Formas clave
- Animación de Formas clave
Export Shape Keys Animation. Need Shape Keys to be exported (See Data - Shape Keys)
- Restablecer Formas clave entre acciones
Reset Shape Keys between each action exported. This is needed when some shape keys are not keyed on some animations.
Animación - Muestrear animaciones
Apply sampling to all animations. Do not sample animation can lead to wrong animation export.
- Frecuencia de muestreo
Cuán a menudo se evalúan los valores animados (en frames).
- Decaimiento de interpolación alternativo
Interpolation choosen for properties that are not keyed (LINEAR or STEP/CONSTANT)
Animación - Optimizar animaciones
- Optimizar tamaño de animación
Reduce exported file size by removing duplicate keyframes when all identical.
- Preservar canales de huesos
if all keyframes are identical in a rig, force keeping the minimal animation.
- Preservar canales de objetos
if all keyframes are identical for object transformations, force keeping the minimal animation.
- Desactivar vista para otros objetos
When exporting animations, disable viewport for other objects, for performance reasons, when possible.
Animación - Filtrar acciones
Restrict actions to be exported to the ones matching the filter.
Exportadores de colecciones
This exporter can be used as a collection exporter. See Colecciones for more information about collections and their exporters.
Here are the options & specificity for collection export:
Include part of options are not available for collection exporter (like every other exporter).
Option to export at collection center (at center of mass of all root objects of the collection).
Contribuir
El importador/exportador está desarrollado a través del repositorio glTF-Blender-IO, donde puedes presentar reportes de errores, emitir solicitudes de características, o contribuir con código.
La discusión y el desarrollo del formato glTF 2.0 mismo tiene lugar en el Khronos Group glTF GitHub repository, y allí los comentarios son bienvenidos.
