Multicam Selector Strip
The Multicam Selector strip is used for multi-camera editing. Multi-camera editing is when a scene is recorded using multiple cameras from different angles and then edited together afterwards.
ワークフロー
The process of multi camera editing can be rather easy in the Video Sequencer if properly setup. The following guide shows the basic steps to setup a basic multi camera editing workflow.
First you are going to want to add in each of your video strips.
Next, you will want to sync all your cameras by either using Audio Waveforms or by the movement of objects.
Tip
To make syncing strips easier you can group cameras, their audio, and their effects together using Meta Strips.
Split the editor into many Previews, one for each input track. Then change the Display Channel of each of the previews to the channel number of the input track.
Add a Multicam Selector strip above all the video channel tracks.
After completing these steps you should get something similar to the following image:
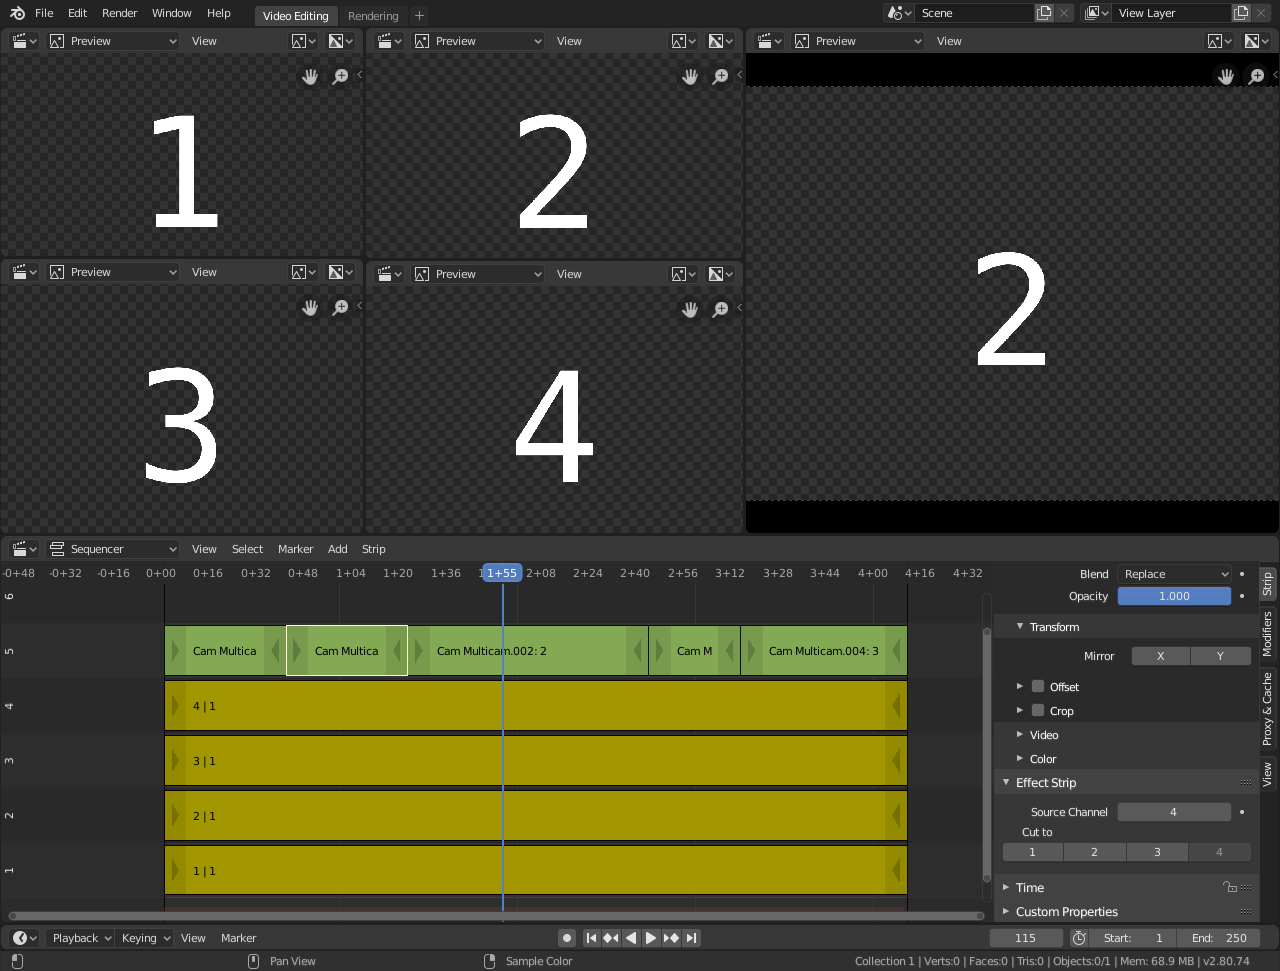
Multi-camera editing setup.
Now select the Multicam strip, if you take a look at the strip options (in the Sidebar), you will notice, that Multicam is a rather simple effect strip: It just takes a selected channel as its input. That is all. The magic comes with the convenient keyboard layout.
When you select the Multicam strip, the keys 1 to 9 are mapped to the cut buttons. So, select the Multicam strip and start playback and press the keys for the correct input while watching the individual cameras.
You will end up with a small Multicam Selector strip for every cut.
In reality, it boils down to: watch a few seconds to see, what is coming, watch it again and do a rough cut using the number keys. Then fine-tune the placement by selecting the outer handles of two neighboring Multicam for A/B rolling.
Tip
To improve playback performance enable Proxies.
Options(オプション)
- Source Channel
The channel which the Multicam Selector gets its input from.
- Cut To
Cuts the Multicam strip at the current frame and changes the Source Channel automatically to the selected channels.
ワークフロー
First you are going to want to add in each of your video strips.
Next, you will want to sync all your cameras by either using Audio Waveforms or by the movement of objects.
Tip
To make syncing strips easier you can group cameras, their audio, and their effects together using Meta Strips.
Split the editor into many Previews, one for each input track. Then change the Display Channel of each of the previews to the channel number of the input track.
Add a Multicam Selector strip above all the video channel tracks.
After completing these steps you should get something similar to the following image:
Multi-camera editing setup.
Now select the Multicam strip, if you take a look at the strip options (in the Sidebar), you will notice, that Multicam is a rather simple effect strip: It just takes a selected channel as its input. That is all. The magic comes with the convenient keyboard layout.
When you select the Multicam strip, the keys 1 to 9 are mapped to the cut buttons. So, select the Multicam strip and start playback and press the keys for the correct input while watching the individual cameras.
You will end up with a small Multicam Selector strip for every cut.
In reality, it boils down to: watch a few seconds to see, what is coming, watch it again and do a rough cut using the number keys. Then fine-tune the placement by selecting the outer handles of two neighboring Multicam for A/B rolling.
Tip
To improve playback performance enable Proxies.