Editing Weight Paint
参照
- Mode(モード):
Edit Mode and Weight Paint Mode
- Menu(メニュー):
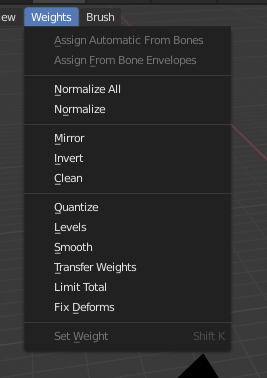
Weight Paint Tools.
Blender provides a set of helper tools for Weight Painting.
The Subset Option
Some of the tools also provide a Subset filter to restrict their functionality to only specific vertex groups (in the Adjust Last Operation(最後の操作を調整) panel, displayed after the tool is called) with following options:
アクティブなグループ
Selected Pose Bones
Deform Pose Bones
All Groups
All tools also work with Vertex Selection Masking and Face Selection Masking. In these modes the tools operate only on selected vertices or faces.
Assign from Bone Envelopes
Apply the envelope weight of the selected bone(s) to the selected vertex group.
Assign Automatic from Bone
Apply from the selected bone(s) to the vertex group the same "auto-weighting" methods as available in the Parent armature menu.
Normalize All
For each vertex, this tool makes sure that the sum of the weights across all vertex groups is equal to 1. This tool normalizes all of the vertex groups, except for locked groups, which keep their weight values untouched.
- Lock Active
Keep the values of the active group while normalizing all the others.
Normalize(正規化)
This tool only works on the active vertex group. All vertices keep their relative weights, but the entire set of weights is scaled up such that the highest weight value is 1.0.
Normalize example.
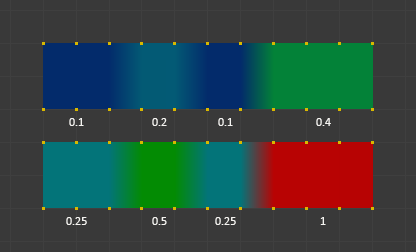
Mirror(ミラー)
The Mirror Vertex Group tool mirrors the weights from one side of a perfectly symmetrical mesh to the opposite side. Those vertices that have no corresponding vertex on the other side will not be affected. But note, the weights are not transferred to the corresponding opposite bone weight group.
注釈
Mirroring only works when the object's rest pose is perfectly symmetrical across the X axis.
Mirror example.
- Mirror Weights
With this option checked, every selected vertex receives the weight information of its symmetrical counterpart. If both vertices are selected, it will be a weight information exchange; if only one is selected, information from the unselected will overwrite the selected one. Information on weight is passed for the active group only, unless All Groups is checked, in which case it is passed for all groups.
- Flip Group Names
Works with selected vertices that belong to vertex groups with "symmetrical names" (with components like "L", "R", "right", "left"). All selected vertices that belong to the active group, or to the symmetrical of the active group, will have their assignation to that group replaced by an assignation to the symmetrical one; however, its weight will be preserved. If All Groups is checked, all assignations to these kind of groups will be replaced by the symmetrical counterpart, also keeping the old weights.
- All Groups
Operate on all vertex groups, instead of the active one.
- Topology Mirror(トポロジーによるミラー反転)
Mirror for meshes which are not fully symmetric (approximate mirror). See here for more information.
Tip
Mirror to Opposite Bone
If you want to create a mirrored weight group for the opposite bone (of a symmetric character), then you can do this:
Delete the target vertex group (where the mirrored weights will be placed).
Create a copy of the source bone vertex group (the group containing the weights which you want to copy).
Rename the new vertex group to the name of the target vertex group (the group you deleted above).
Select the target vertex group and call the Mirror tool (use only Mirror Weights and optionally Topology Mirror if your mesh is not symmetric).
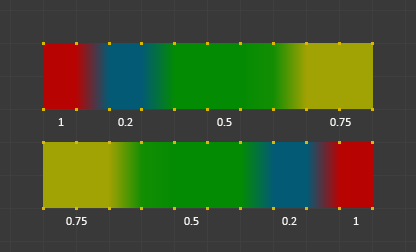
Invert(反転)
Replaces each Weight of the selected weight group by × -1.0 weight.
例:
Original 1.0 converts to 0.0
Original 0.5 remains 0.5
Original 0.0 converts to 1.0
Invert.
- Subset(使用部分)
Restrict the tool to a subset. See above The Subset Option about how subsets are defined.
- Add Weights
Add vertices that have no weight before inverting (these weights will all be set to 1.0).
- Remove Weights
Remove vertices from the vertex group if they are 0.0 after inverting.
注釈
Locked vertex groups are not affected.
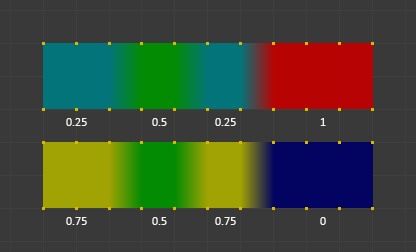
Clean
Clean Vertex Group Weights(頂点グループウェイトを掃除) は、ウェイトが Limit(制限) を下回る 頂点グループ から頂点の割り当てを解除します。指定したしきい値を下回る重みを削除します。このツールは、非常に低い(またはゼロの)ウェイトのウェイトグループをクリーンするのに役立ちます。
ここで示す例では、カットオフ値に0.2を使用しており、(以下のオペレーターオプションを参照)、すべての青い部分がクリーンアップされます。
参照されていないウェイトが黒で表示されるように、画像は Show Zero weights オプションを使用していることに注意してください。

Clean(クリーン)の例。
- Subset(使用部分)
ツールをサブセットに制限します。サブセットの定義方法については、 The Subset Option を参照してください。
- Limit(制限)
これは、グループに保持される最小のウェイト値です。この値を下回るウェイトはグループから削除されます。
- Keep Single(1つだけ残す)
Ensure that the Clean tool will not create completely unreferenced vertices (vertices which are not assigned to any vertex group), so each vertex will keep at least one weight, even if it is below the limit value!
Quantize
This operator uses a process known as Quantization which takes the input weights and clamps each weight to a number of steps between (0 - 1), so there is no longer a smooth gradient between values.

Quantize example (Steps = 2).
- Steps(ステップ)
The number of steps between 0 and 1 to quantize the weights into. For example 5 would allow the following weights
[0.0, 0.2, 0.4, 0.6, 0.8, 1.0].
Levels
Adds an offset and a scale to all weights of the selected weight groups. with this tool you can raise or lower the overall "heat" of the weight group.
注釈
No weight will ever be set to values above 1.0 or below 0.0 regardless of the settings.

Levels example.
- Subset(使用部分)
ツールをサブセットに制限します。サブセットの定義方法については、 The Subset Option を参照してください。
- Offset(オフセット)
A value from the range (-1.0 - 1.0) to be added to all weights in the vertex group.
- Gain(ゲイン)
All weights in the Subset are multiplied with the gain.
注釈
Whichever Gain and Offset you choose, in all cases the final value of each weight will be clamped to the range (0.0 - 1.0). So you will never get negative weights or overheated areas (weight > 1.0) with this tool.
Smooth(スムーズ)
The Smooth operator blends the weights of selected vertices based on the average of adjacent vertices, creating smoother transitions in weight painting. This operator is useful for refining weight distributions, improving deformation in rigging, and eliminating abrupt transitions between vertex weights.
注釈
This operator requires vertex selection to be enabled; otherwise, it will be unavailable.
- Subset(使用部分)
Restrict the tool to a subset. See above The Subset Option about how subsets are defined.
- Factor(係数)
Controls the amount of blending toward the average weight of connected vertices.
A Factor of 0.0 preserves the original weights.
A Factor of 1.0 fully adopts the calculated average weight.
Values between 0.0 and 1.0 blend the weights proportionally.
- Iterations(反復)
Sets how many times the smoothing operation is repeated. Higher values produce smoother results but may introduce unwanted artifacts in fine details.
- Expand/Contract
Adjusts the smoothing influence by expanding or contracting the selection:
Positive values expand the selection to include neighboring vertices.
Negative values contract the selection to focus on a smaller subset of vertices.
例
Example: Single Selected Vertex
Consider a single selected vertex connected to four unselected vertices. The unselected vertices have weights: 1, 0, 0, and 0. The average weight of the unselected vertices is: \((1 + 0 + 0 + 0) / 4 = 0.25\)
If the Factor is:
0.0: The selected vertex retains its original weight.
1.0: The selected vertex adopts the calculated average weight (0.25).
Between 0 and 1: The vertex's weight gradually shifts toward 0.25, blending proportionally.
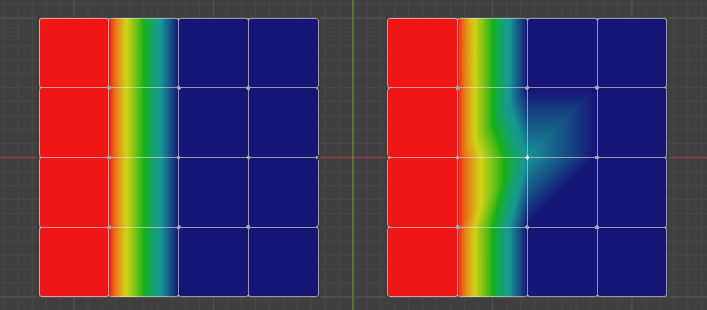
Single vertex select with a Factor of 1.0.
Example: Multiple Selected Vertices
When multiple vertices are selected, the Smooth operator applies calculations to each vertex based on its adjacent unselected vertices.
例:
A vertex connected to three unselected vertices with weights \((1, 0, 0)\) averages to \(0.333\).
A vertex connected to one unselected vertex with weight 1 averages to \(1.0\).
A vertex connected only to unselected vertices with weights \((0, 0, 0)\) remains unchanged with an average weight of \(0.0\).
These blended results depend on the Factor value.
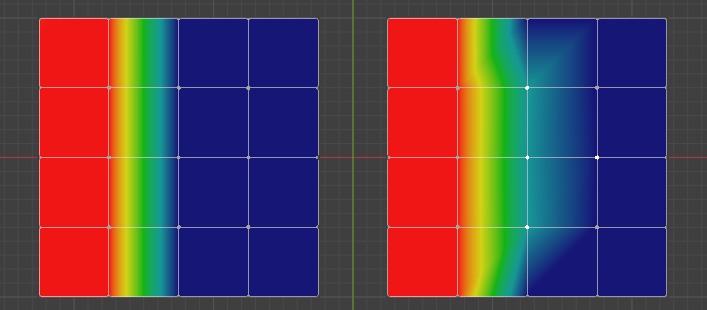
Three selected vertices with a Factor of 1.0.
Example: Edge Loop Smoothing
In a practical use case, selecting a middle edge loop allows the operator to blend weights between adjacent areas. For example:
The edge loop has two unselected adjacent vertices on either side, with weights \(1\) and \(0\).
The average weight is \((1 + 0) / 2 = 0.5\).
Applying the Smooth operator with Factor set to 1.0 will turn the edge loop green, creating a smooth blend between the "hot" (left) and "cold" (right) sides.
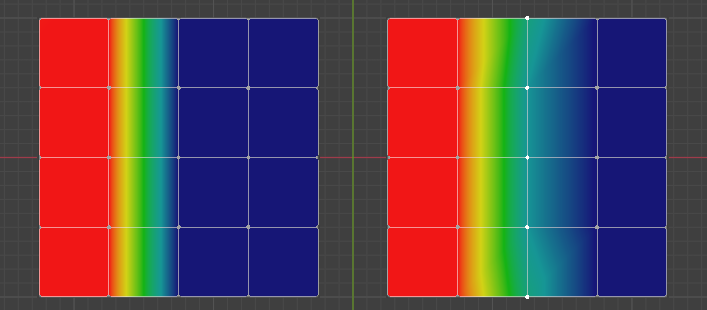
Center edge loop of vertices selected with a Factor of 1.0.
Transfer Weights
Copy weights from other objects to the vertex groups of the active object.
By default this tool copies only the active (selected) vertex group of the source object to the active vertex group of target object or creates a new one if the group does not exist. However, you can change the tool's behavior in the Adjust Last Operation(最後の操作を調整) panel.
For example, to transfer all existing vertex groups from the source objects to the target, change the Source Layers Selection option to By Name.
注釈
This tool uses the generic "data transfer", but transfers from all selected objects to active one. Please refer to the Data Transfer docs for options details and explanations.
Prepare the Copy
You first select all source objects, and finally the target object (the target object must be the active object).
It is important that the source objects and the target object are at the same location. If they are placed side-by-side, then the weight transfer will not work. (See the Vertex Mapping option.) You can place the objects on different layers, but you have to ensure that all objects are visible when you call the tool.
Now ensure that the target object is in Weight Paint Mode. Open the Toolbar and call the Transfer Weights tool in the Weight Tools panel.
Adjust Last Operation Panel Confusion
You may notice that the Adjust Last Operation(最後の操作を調整) panel stays available after the weight transfer is done. The panel only disappears when you call another Operator that has its own Adjust Last Operation(最後の操作を調整) panel. This can lead to confusion when you use Transfer weights repeatedly after you changed your vertex groups. If you then use the still-visible Adjust Last Operation(最後の操作を調整) panel, then Blender will reset your work to its state right before you initially called the Transfer Weights tool.
So when you want to call the Transfer Weights tool again after you made some changes to your vertex groups, then always use the Transfer Weights button, even if the Adjust Last Operation(最後の操作を調整) panel is still available. Unless you really want to reset your changes to the initial call of the tool.
Limit Total
頂点ごとのウェイトグループの数を指定された制限まで減らします。ツールは、制限に到達するまで、最初に最小のウェイトを削除します。
ヒント
このツールは、一つ以上のウェイトグループが選択されている場合にのみ合理的に機能します。
- Subset(使用部分)
ツールをサブセットに制限します。サブセットの定義方法については、 The Subset Option を参照してください。
- Limit(制限)
各頂点で許容されるウェイトの最大値。
Set Weight
参照
- Mode(モード):
Weight Paint Mode
- Menu(メニュー):
- ショートカットキー:
Ctrl-X
Fill the active vertex group with the current paint weight.
Sample Weight
参照
- Mode(モード):
Weight Paint Mode
- Menu(メニュー):
- ショートカットキー:
Shift-X
Adjust the Weight of the Draw tool to the weight of the vertex under the mouse cursor.
Sample Group
参照
- Mode(モード):
Weight Paint Mode
- Menu(メニュー):
- ショートカットキー:
Shift-Ctrl-X
Select one of the vertex groups available under current mouse position.
Gradient (Linear)
参照
- Mode(モード):
Weight Paint Mode
- Menu(メニュー):
- ショートカットキー:
Shift-A
Applies a linear weight gradient; this is useful at times when painting gradual changes in weight becomes difficult. Blends the weights of selected vertices with unselected vertices.
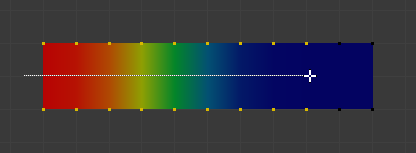
Example of the Gradient tool being used with selected vertices.
- Weight(ウェイト)
The gradient starts at the current selected weight value, blending out to nothing.
- Strength(強さ)
Lower values can be used so the gradient mixes in with the existing weights (just like with the brush).
- Type(タイプ)
The shape of the gradient.
- Linear(リニア):
Create gradient that forms a straight line.
- Radial(放射):
Create gradient that forms a circle.
Gradient (Radial)
参照
- Mode(モード):
Weight Paint Mode
- Menu(メニュー):
- ショートカットキー:
Shift-Alt-A
Applies a radial weight gradient; this is useful at times when painting gradual changes in weight becomes difficult. Blends the weights of selected vertices with unselected vertices.
- Weight(ウェイト)
The gradient starts at the current selected weight value, blending out to nothing.
- Strength(強さ)
Lower values can be used so the gradient mixes in with the existing weights (just like with the brush).
- Type(タイプ)
The shape of the gradient.
- Linear(リニア):
Create gradient that forms a straight line.
- Radial(放射):
Create gradient that forms a circle.
Locks
参照
- Mode(モード):
Edit Mode and Weight Paint Mode
- Menu(メニュー):
- ショートカットキー:
K
Vertex groups can be locked to prevent undesired edits to a particular vertex group.
Tip
Bones that belong to a locked vertex group are displayed in red the 3D Viewport.
- Lock All(すべてロック)
Locks all vertex groups.
- Lock Selected
Locks selected vertex groups.
- Lock Unselected
Locks unselected vertex groups.
- Lock Only Selected
Lock selected and unlock selected vertex groups.
- Lock Only Unselected
Unlock selected and lock unselected vertex groups.
- Unlock All(すべてロック解除)
Unlocks all vertex groups.
- Unlock Selected
Unlocks selected vertex groups.
- Unlock Unselected
Unlocks Unselected vertex groups.
- Invert Locks
Inverts the locks on all vertex groups.