glTF 2.0
参照
- Category(カテゴリー):
Import-Export
- Menu(メニュー):
Enabling Add-on
This add-on is enabled by default, in case it is not:
Open Blender and go to Add-ons(アドオン) section of the Preferences(プリファレンス).
Search "glTF 2.0" and check the Enable Extension checkbox.
使用方法
glTF™ (GL Transmission Format) は、ウェブやネイティブアプリケーションでの3Dモデルの転送と読み込みに使用されます。 glTFは、3Dモデルの容量や、それらのモデルを解凍してレンダリングするために必要なランタイム処理を削減します。このフォーマットはウェブ上で一般的に使用されており、Unity3D、Unreal Engine 4、Godotなどの様々な3Dエンジンでサポートされています。
このインポーター/エクスポーターは、以下の glTF 2.0 の機能をサポートしています:
Meshes(メッシュ)
Materials (Principled BSDF) and Shadeless (Unlit)
Textures(テクスチャ)
Cameras(カメラ)
Punctual lights (point, spot, and directional)
Extensions (listed below)
Extras (custom properties)
Animation (keyframe, shape key, and skinning)
Meshes(メッシュ)
glTF の内部構造は、リアルタイムでレンダリングする際にグラフィック チップで一般的に使用されるメモリ バッファを模倣しているため、アセットをデスクトップ、ウェブ、モバイル クライアントに配信し、最小限の処理で迅速に表示することができます。その結果、glTFへのエクスポート時に、四角形やn角形は自動的に三角形に変換されます。不連続なUVやフラットシェードのエッジは、エクスポートによって頂点が分離されるため、glTFではBlenderと比較して頂点数がやや多くなることがあります。同様に、曲線やその他の非メッシュデータは保持されず、エクスポートする前にメッシュに変換しなければなりません。
GPU Instances
When the option is enable in Exporter, instances are exported using the EXT_mesh_gpu_instancing extension.
There are some limitations, at export:
Instances must be meshes, and don't have any children themselves
Instances must all be children of the same object.
This extension doesn't manage material variation. That means that the generated file may include all instances with same materials.
Instances detected are objects sharing the same mesh data.
At import, instances are created by creating objects sharing the same mesh data.
Materials(マテリアル)
glTFのコアとなるマテリアルシステムは、以下の情報チャネルで metal/rough なPBRワークフローをサポートしています:
Base Color
Metallic
Roughness
Baked Ambient Occlusion
Normal Map (tangent space, +Y up)
Emissive
Some additional material properties or types of materials can be expressed using glTF extensions. The complete list can be found in Extensions part of this documentation.
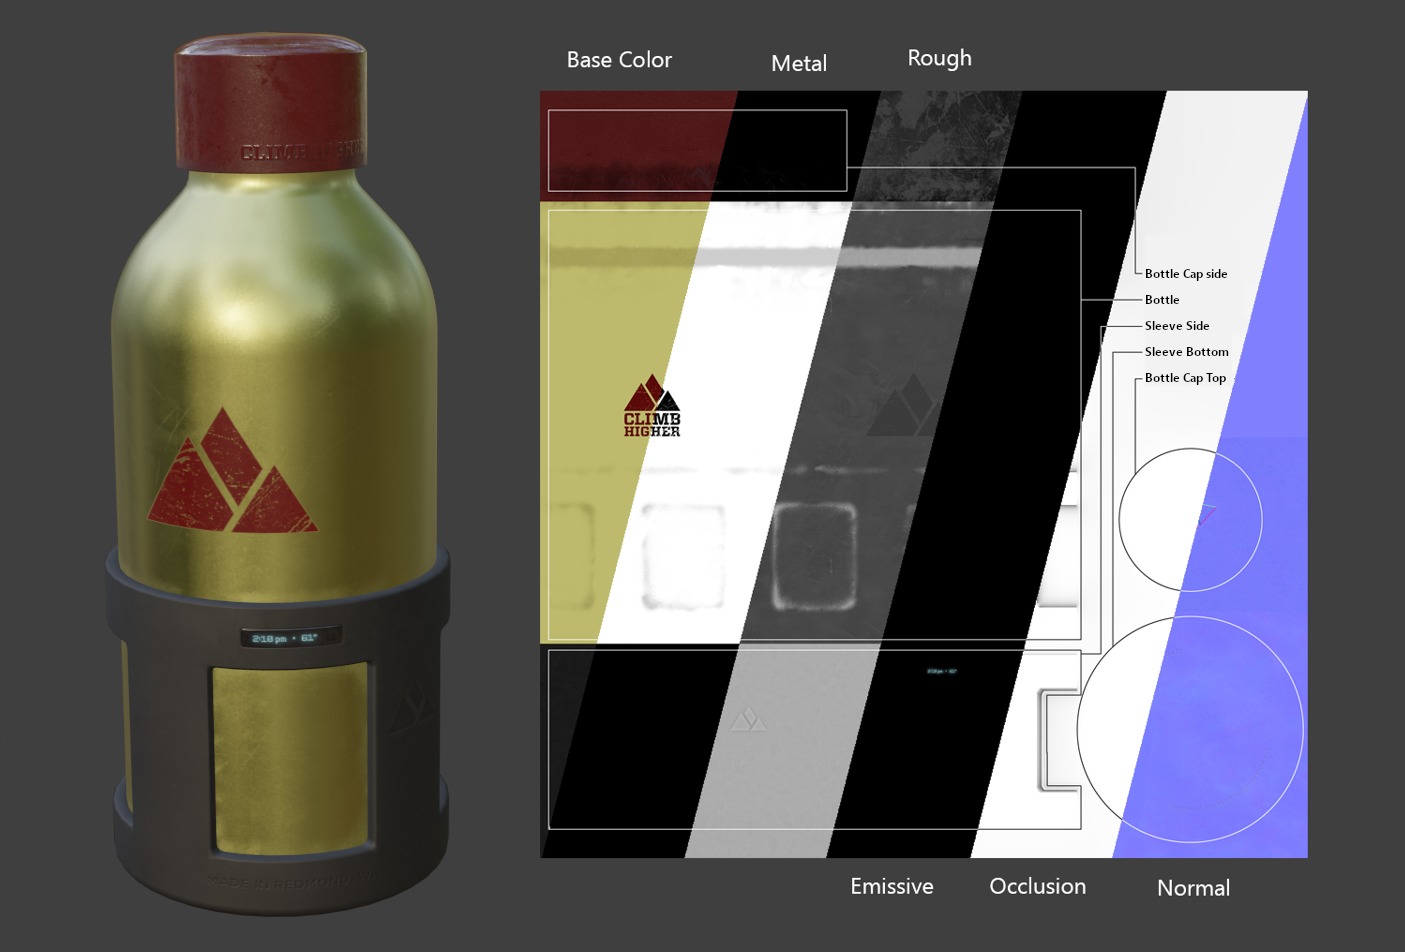
glTF 2.0コアフォーマットで利用可能な様々な画像マップの例です。これは、 water bottle sample model を様々な画像マップのスライスと一緒に表示したものです。
Imported Materials
glTFのマテリアルシステムはBlender独自のマテリアルとは異なります。glTF ファイルがインポートされると、アドオンは Blender ノードのセットを構築して、それぞれの glTF マテリアルを可能な限り忠実に複製します。
The importer supports Metal/Rough PBR (core glTF), Spec/Gloss PBR (KHR_materials_pbrSpecularGlossiness)
and some extension materials. The complete list can be found in Extensions part of this documentation.
Tip
マテリアルのインポート処理の結果を調べることで、glTF にエクスポートできるマテリアル ノードや設定の種類の例を見ることができます。
Exported Materials
エクスポータは、Metal/Rough PBR (core glTF) と Shadeless (KHR_materials_unlit) マテリアルをサポートしています。Blenderマテリアルの中で認識したノードに基づいてglTFマテリアルを構築します。マテリアルのエクスポート処理では、以下に説明する設定を処理します。
注釈
マテリアルで画像テクスチャを使用する場合、glTFではその画像がPNGまたはJPEG形式である必要があります。このアドオンは、他の形式の画像を自動的に変換し、書き出し時間を長くします。
Base Color
glTFのベースカラーは、Principled BSDFノード上のBase Color入力を探すことで決定されます。入力が未接続の場合は、入力のデフォルトカラー(未接続ソケットの隣のカラーフィールド)がglTFマテリアルのベースカラーとして使用されます。
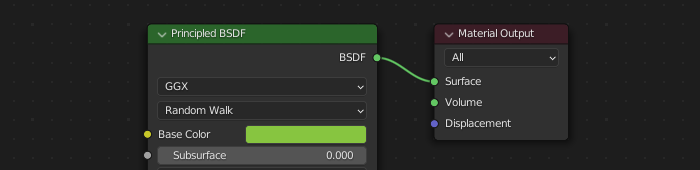
ソリッドベースの色をノード上で直接指定することができます。
Image TextureノードがBase Color入力に接続されていることが判明した場合、その画像がglTFのベースカラーとして使用されます。
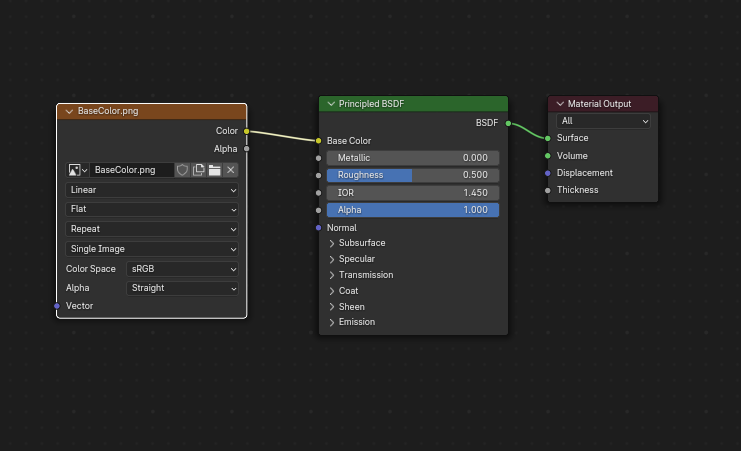
glTFのベースカラーとして画像を使用しています。
メタリックとラフネス
これらの値は、Principled BSDFノードから読み込まれます。これらの入力の両方が接続されていない場合、ノードは0.0から1.0の間でそれぞれの値を制御するためのスライダを表示し、これらの値はglTFにコピーされます。
画像を使用する際にglTFは、メタリックの値が青(B)チャンネル、ラフネスが同じ画像の緑(G)チャンネルでエンコードされることを期待しています。 もし画像がこの規則に従わない方法で Blender ノードに接続されている場合、アドオンはエクスポート中に画像を正しい形に適合させようとするかもしれません(エクスポート時間が長くなります)。
Blenderのノードツリーでは、Image Textureノードからチャンネルを分離するためにSeparate RGBノードを使用し、緑色(G)のチャンネルをRoughnessに、青色(B)のチャンネルをMetallicに接続することが推奨されます。glTF エクスポータは、この配置が glTF 標準に一致していると認識し、エクスポート中にイメージ テクスチャを glTF ファイルに単純にコピーすることができるようになります。
このためのImga Textureノードの Color Space は Non-Color に設定されている必要があります。
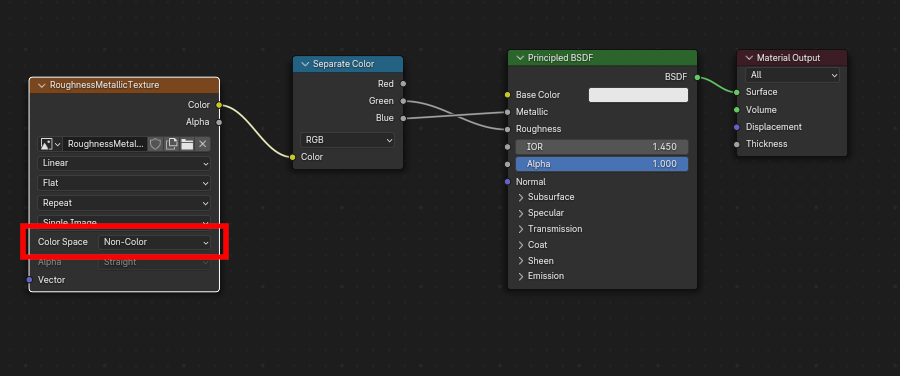
メタリック/ラフネスの画像をglTF標準に準拠した方法で接続し、エクスポートされたglTFファイル内でその通りに使用できるようにします。
Baked Ambient Occlusion
glTF is capable of storing a baked ambient occlusion map.
Currently there is no arrangement of nodes that causes Blender
to use such a map in exactly the same way as intended in glTF.
However, if the exporter finds a custom node group by the name of glTF Material Output, and
finds an input named Occlusion on that node group,
it will look for an Image Texture attached there to use as the occlusion map in glTF.
The effect need not be shown in Blender, as Blender has other ways of showing ambient occlusion,
but this method will allow the exporter to write an occlusion image to the glTF.
This can be useful to real-time glTF viewers, particularly on platforms where there
may not be spare power for computing such things at render time.
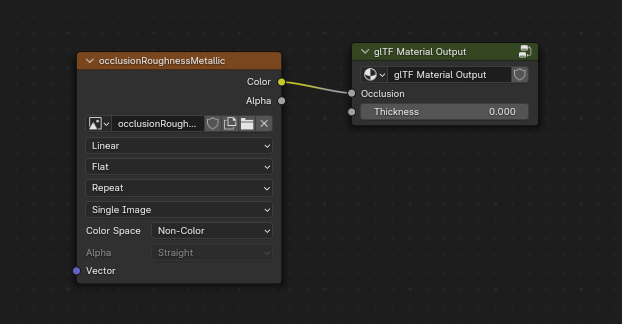
プリベイクされたアンビエントオクルージョンマップで、レンダリングはしないがglTFにエクスポートされるノードに接続されています。
Tip
If you enable Shader Editor Add-ons in preferences, you will be able to add this custom node group from Menu: Add > Output > glTF Material Output

glTFは、赤(R)チャンネルにオクルージョンを格納し、ラフネスやメタリックチャンネルと同じ画像を共有することができます。
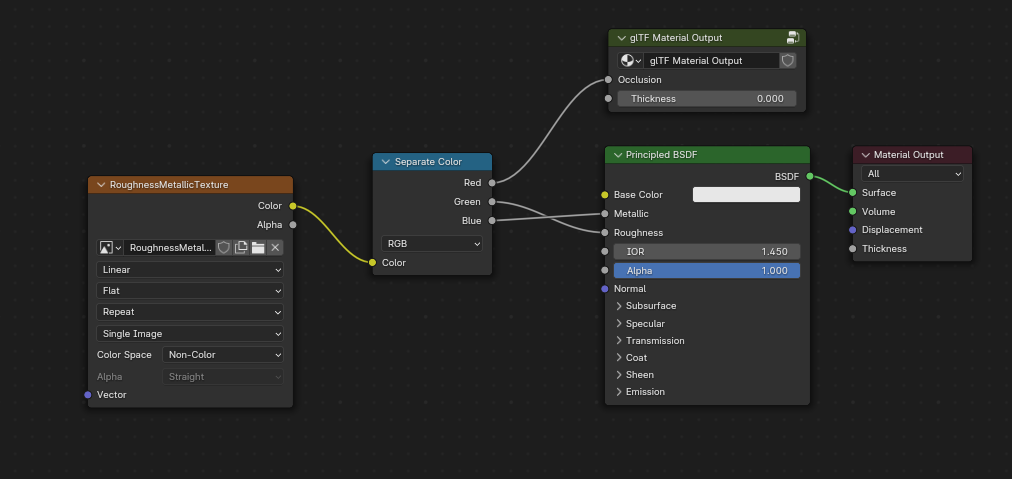
このノードの組み合わせは、glTFがオクルージョン、ラフネス、およびメタリック値を単一の画像にまとめる方法を模倣しています。
Tip
The Cycles render engine has a Bake panel that can be used to bake
ambient occlusion maps. The resulting image can be saved and connected
directly to the glTF Material Output node.
Normal Map
glTFでノーマルマップを使用するには、Image Texture ノードのcolor出力をNormal Mapノードのcolor入力に接続し、Normal Mapのnormal出力を Principled BSDF ノードのnormal入力に接続します。このためには、Image Texture ノードの Color Space プロパティが Non-Color に設定されている必要があります。
Normal Mapノードは、現在 glTF でサポートされているノーマルマップの唯一のタイプであるため、Tangent Spaceのデフォルト プロパティのままにしておく必要があります。ノーマルマップの強さは、このノードで調整できます。エクスポータはこれらのノードを直接エクスポートするのではなく、正しい画像を見つけるためにこれらのノードを使用し、Strengthの設定をglTFにコピーします。
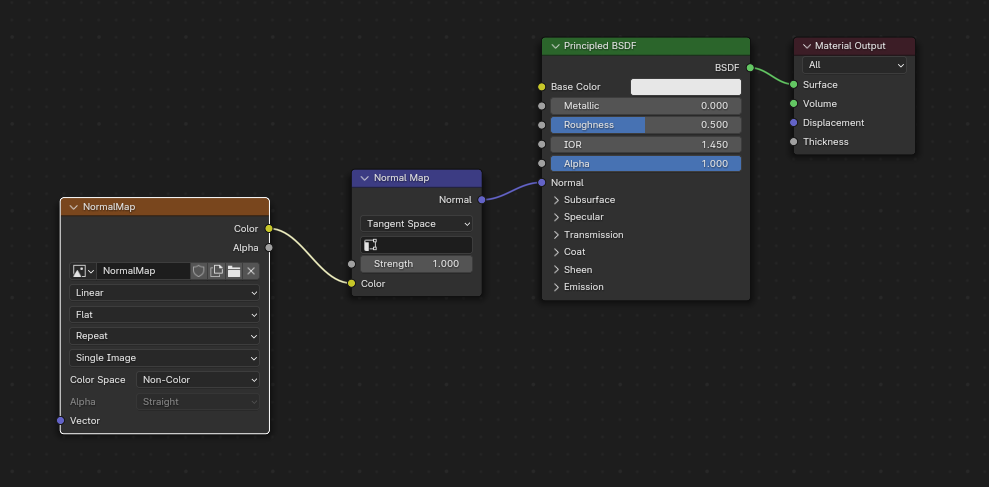
エクスポータに認識されglTFファイルにコピーされるように接続されたノーマルマップの画像。
Tip
Cycles レンダーエンジンにはベイクパネルがあり、法線ベクトルノードの他のほぼすべての配置から接線空間法線マップをベイクするために使用できます。Bake typeをNormalに切り替えます。glTF にこのベイクパネルを使用する場合は、デフォルトのスペース設定(スペース: Tangent、R: +X、G: +Y、B: +Z)を維持してください。結果として得られたベイク画像は、上記のようにNormal Mapノードを使用して保存し、新しいマテリアルに差し込むことができ、正しく書き出すことができます。
Emissive
glTFマテリアルに放射マップを含むために、Image Texture ノードをPrincipled BSDF ノードの放射 入力に接続することができます。あるいは、Image Texture ノードをEmissionシェーダーノードに接続し、Add Shader ノードを介して、Principled BSDFノードからのプロパティと組み合わせることもできます。
エミッシブマップがマテリアル内に単独で存在する場合、ベースカラーのデフォルトを黒に、ラフネスのデフォルトを1.0に設定するのがベストです。これにより、他のチャンネルが不要な場合の影響を最小限に抑えることができます。
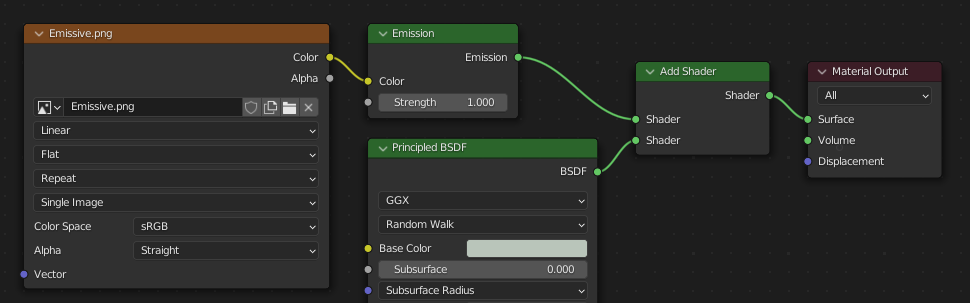
この配置は後方互換性のためにサポートされています。Principled BSDFノードを直接使用する方がシンプルです。
If any component of emissiveFactor is > 1.0, KHR_materials_emissive_strength extension will be used.
Clearcoat
When the Clearcoat input on the Principled BSDF node has a nonzero default value or
Image Texture node connected, the KHR_materials_clearcoat glTF extension will be
included in the export. This extension will also include a value or Image Texture
from the Clearcoat Roughness input if available.
If Image Textures are used, glTF requires that the clearcoat values be written to
the red (R) channel, and Clearcoat Roughness to the green (G) channel.
If monochrome images are connected, the exporter will remap them to these color channels.
The Clearcoat Normal input accepts the same kinds of inputs as the base Normal input, specifically a tangent-space normal map with +Y up, and a user-defined strength. This input can reuse the same normal map that the base material is using, or can be assigned its own normal map, or can be left disconnected for a smooth coating.
All Image Texture nodes used for clearcoat shading should have their Color Space set to Non-Color.
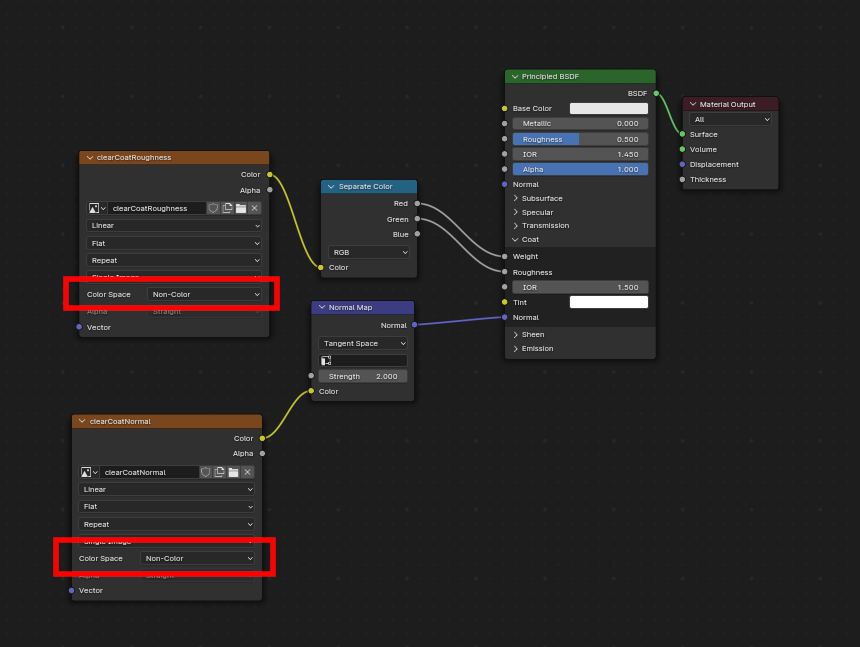
An example of a complex clearcoat application that will export correctly to glTF. A much simpler, smooth coating can be applied from just the Principled BSDF node alone.
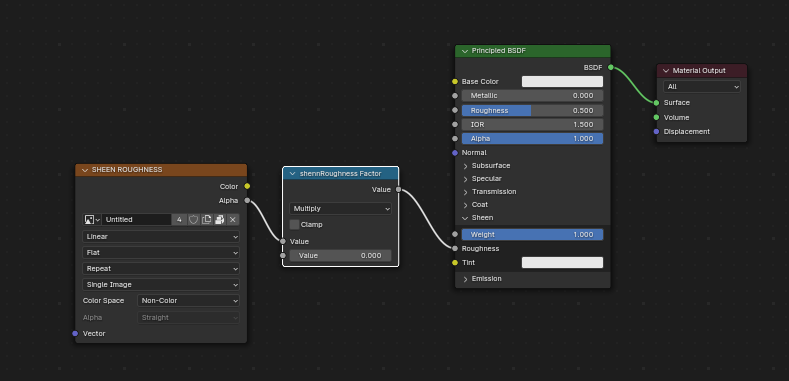
Sheen
If a Sheen Roughness Texture is used, glTF requires the values be written to the alpha (A) channel.
Tip
Sheen BSDF node is only available on Cycles render engine. You may have to temporary switch to Cycles to add this node, and get back to EEVEE.
Specular(スペキュラー)
When the Specular IOR Level or Specular Tint input of Principled BSDF node have a non default value or
Image Texture node connected, the KHR_materials_specular glTF extension will be
included in the export.
Anisotropy (異方性)
Anisotropic textures and data need to be converted at export, and at import.
At import, some nodes are created to manage this conversion

At export, this exact same nodes are detected, and used to export data.
At export, you can also plug some grayscale textures for Anisotropic and Anisotropic Rotation sockets. Then, exporter will convert these texture into a glTF compatible texture.

Note that the tangent socket must be linked to a tangent node, with UVMap. The choosen UVMap must be the UVMap of the Normal Map.
Transmission
When the Transmission input on the Principled BSDF node has a nonzero default value or
Image Texture node connected, the KHR_materials_transmission glTF extension will be
included in the export. When a texture is used, glTF stores the values in the red (R) channel.
The Color Space should be set to Non-Color.
Transmission is different from alpha blending, because transmission allows full-strength specular reflections. In glTF, alpha blending is intended to represent physical materials that are partially missing from the specified geometry, such as medical gauze wrap. Transmission is intended to represent physical materials that are solid but allow non-specularly-reflected light to transmit through the material, like glass.
Tip
The material's base roughness can be used to blur the transmission, like frosted glass.
Tip
Typically the alpha blend mode of a transmissive material should remain "Opaque", the default setting, unless the material only partially covers the specified geometry.
注釈
In real-time engines where transmission is supported, various technical limitations in the engine may determine which parts of the scene are visible through the transmissive surface. In particular, transmissive materials may not be visible behind other transmissive materials. These limitations affect physically-based transmission, but not alpha-blended non-transmissive materials.
注釈
If you want to enable refraction on your model, KHR_materials_transmission must also
be used in addition with KHR_materials_volume. See the dedicated Volume part of
the documentation.
警告
Transmission is complex for real-time rendering engines to implement,
and support for the KHR_materials_transmission glTF extension is not yet widespread.
IOR
At import, there are two different situation:
if
KHR_materials_ioris not set, IOR value of Principled BSDF node is set to 1.5, that is the glTF default value of IOR.If set, the
KHR_materials_ioris used to set the IOR value of Principled BSDF.
At export, IOR is included in the export only if one of these extensions are also used:
KHR_materials_transmissionKHR_materials_volumeKHR_materials_specular
IOR of 1.5 are not included in the export, because this is the default glTF IOR value.
Volume(ボリューム)
Volume can be exported using a Volume Absorption node, linked to Volume socket of Output node.
Data will be exported using the KHR_materials_volume extension.
For volume to be exported, some transmission must be set on Principled BSDF node.
Color of Volume Absorption node is used as glTF attenuation color. No texture is allowed for this property.
Density of Volume Absorption node is used as inverse of glTF attenuation distance.
Thickness can be plugged into the Thickness socket of custom group node
glTF Material Output.If a texture is used for thickness, it must be plugged on (
G) Green channel of the image.

glTF Variants
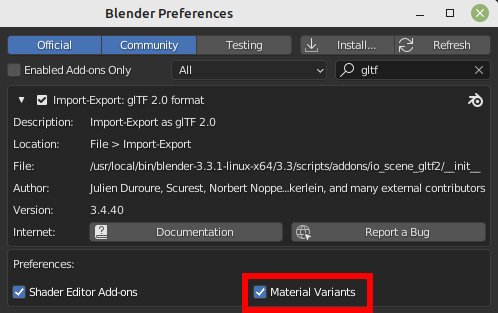
注釈
For a full Variants experience, you have to enable UI in Add-on preferences
There are two location to manage glTF Variants in Blender
In 3D View, on
glTF VariantstabFor advanced settings, in Mesh Material Properties (see Advanced glTF Variant checks)
The main concept to understand for using Variants, is that each material slot will be used as equivalent of a glTF primitive.
glTF Variants switching
After importing a glTF file including KHR_materials_variants extension, all variants can be displayed.
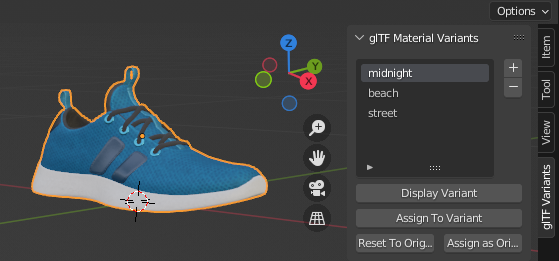
You can switch Variant, by selecting the variant you want to display, then clicking on Display Variant.
You can switch to default materials (when no Variant are used), by clicking on Reset to default.
glTF Variants creation
You can add a new Variant by clicking the + at right of the Variant list.
Then you can change the name by double-clicking.
After changing Materials in Material Slots, you can assign current materials to the active Variant using Assign to Variant.
You can also set default materials using Assign as Original.
These materials will be exported as default material in glTF.
This are materials that will be displayed by any viewer that don't manage KHR_materials_variants extension.
Advanced glTF Variant checks
If you want to check primitive by primitive, what are Variants used, you can go to Mesh Material Properties.
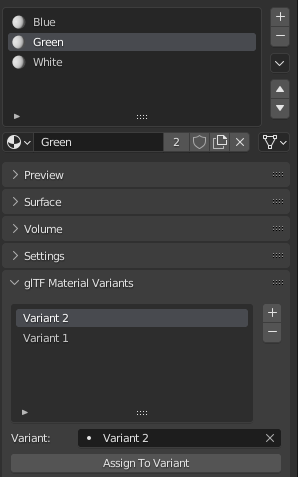
The glTF Material Variants tab refers to the active material Slot and Material used by this slot. You can see every Variants that are using this material for the given Slot/Primitive.
You can also assign material to Variants from this tab, but recommendation is to perform it from 3D View tab.
Double-Sided / Backface Culling
For materials where only the front faces will be visible, turn on Backface Culling in the Settings panel of an EEVEE material. When using other engines (Cycles, Workbench) you can temporarily switch to EEVEE to configure this setting, then switch back.
double-sidedマテリアルの場合は、このボックスのチェックを外したままにしておきます。
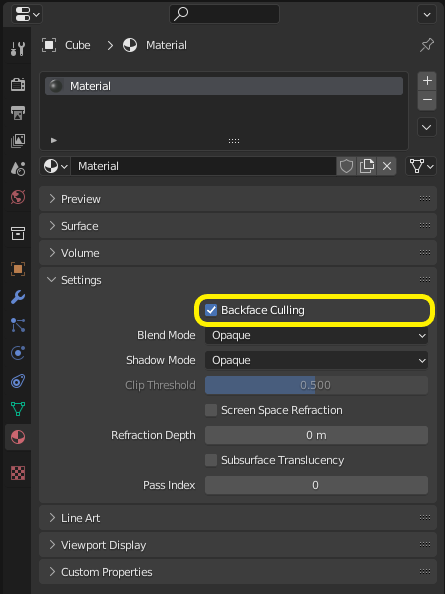
この設定のinverseは glTFの DoubleSided フラグを制御します。
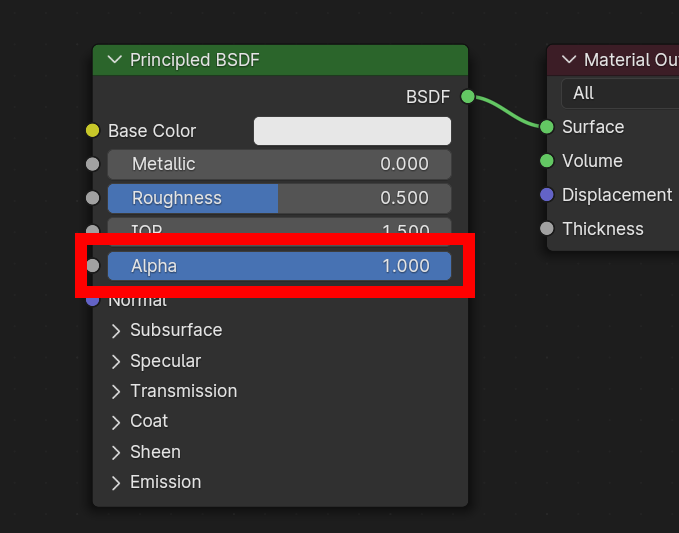
Alpha Modes
glTF has three alpha modes, depending on whether the alpha value is always 1, always 0 or 1, or can be between 0 and 1. The exporter determines the alpha mode automatically from the nodes connected to the Alpha socket.
- Opaque(不透明)
In opaque mode, the material alpha is always 1.
- Mask(マスク)
In mask mode, the material alpha is always 0 or 1. This creates "cutout" transparency, where there is a hard edge between opaque and transparent regions, and can be used for things like leaves or cloth with holes. To enable this mode, use a Math node to round the alpha value to either 0 or 1.
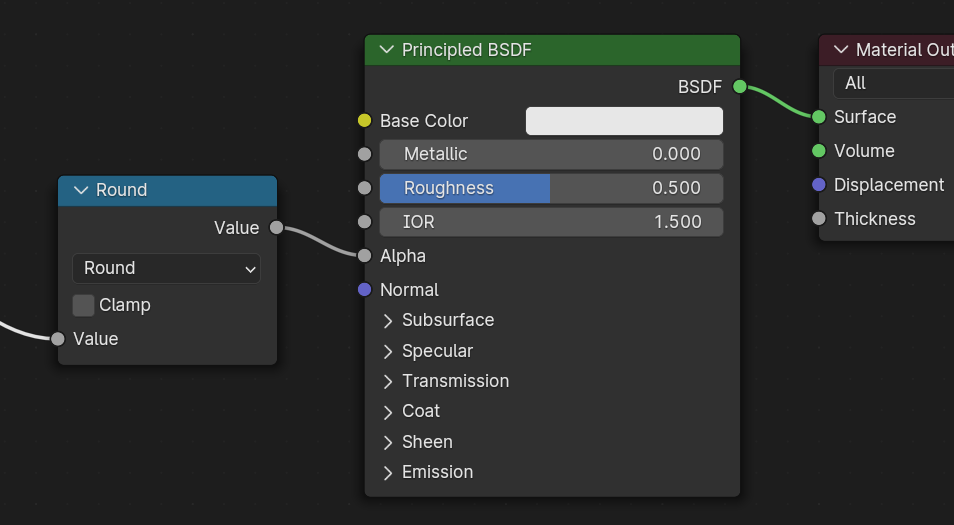
Rounding snaps alpha values that are 0.5 or greater up to 1, and ones below 0.5 down to 1. It is also possible to use a cutoff value different than 0.5 by using Math nodes to do
1 - (alpha < cutoff).Mask mode is essentially the same as EEVEE's "Alpha Clip" blend mode, but is done with shader nodes so it works in other render engines.
- Blend (混合度)
Materials that use neither of these will use blend mode. Blend mode allows partially transparent surfaces that tint the objects seen through them, like layers of colored film. However, partial transparency is complex to render, and glTF viewers may show visual artifacts in non-trivial scenes that use blend mode.
To avoid artifacts, it may be a good idea to separate out parts of a model that can use opaque or mask mode, and use blend mode only on the parts where it is necessary, or to use only a single layer of transparent polygons in front of opaque objects.
UVマッピング
UV Map ノードと Mapping ノードを任意の Image Texture ノードに接続することで、UV マップの選択と変換の制御が可能になります。
Mappingノードからの設定は、 KHR_texture_transform という名前のglTF拡張機能を使ってエクスポートされます。上の方にマッピングタイプセレクタがあります。 Point はエクスポートに推奨されるタイプです。 Texture と Vector もサポートされています。サポートされているオフセットは以下の通りです。
Location - X and Y
Rotation - Z only
Scale - X and Y
Texture タイプの場合、XとYの Scale は等しくなければなりません(一様なスケーリング)。
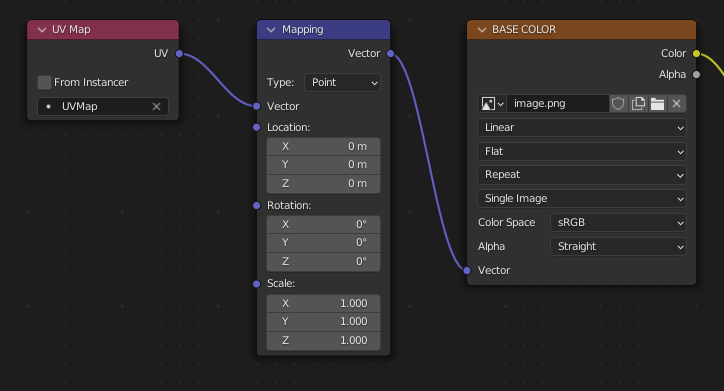
意図的に選んだUVマッピング。
Tip
これらのノードはオプションです。すべてのglTFリーダーが複数のUVマップやテクスチャ変換をサポートしているわけではありません。
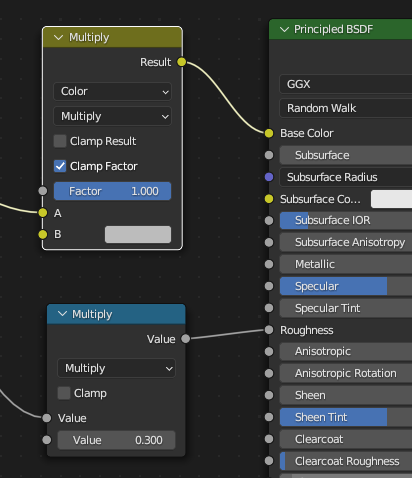
要因
任意のイメージ テクスチャ ノードには、オプションで定数の色またはスカラーを乗算することができます。これらは glTF ファイル内に因子として書き込まれ、指定された画像テクスチャに乗算された数値となります。これらは一般的ではありません。
Use Math node (multiply) for scalar factors. Use second value as factor
Use Mix node (color / multiply) for color factors. Set Factor to 1, and use Color2 (B) as factors
例
必要に応じて、ひとつのマテリアルで上記のすべてを同時に使用することができます。この図は、上記のいくつかのオプションを一度に適用した場合の典型的なノード構造を示しています。
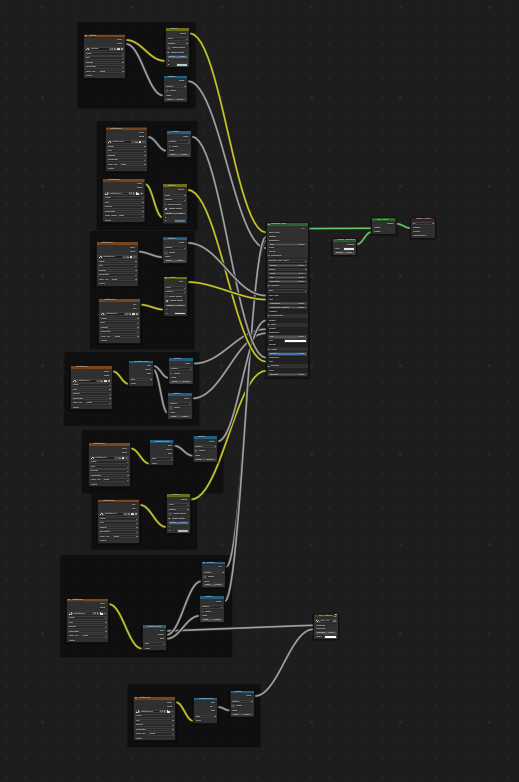
発光性のあるテクスチャーのPrincipled BSDFマテリアル。
UDIM
UDIM is a way to store multiple textures in a single image file. The UDIM system is supported by Blender, but is not supported by glTF. When exporting a model that uses UDIM, the add-on will automatically split the image into multiple images, one for each tile, and will update the material nodes to use the new images. All UDIM texture must use the same UV map to be exported.
Exporting a Shadeless (Unlit) Material
To export an unlit material, mix in a camera ray, and avoid using the Principled BSDF node.

One of several similar node arrangements that will export
KHR_materials_unlit and render shadeless in Blender.
Extensions(エクステンション)
コアとなる glTF 2.0 フォーマットは、glTF の拡張子を使用して、追加情報で拡張することができます。これにより、最初の公開時にはユニバーサルではないと考えられていた詳細な情報をファイルフォーマットに保持することができます。すべてのglTFリーダーがすべての拡張子をサポートしているわけではありませんが、かなり一般的なものもあります。
Certain Blender features can only be exported to glTF via these extensions. The following glTF 2.0 extensions are supported directly by this add-on:
Import(インポート)
KHR_materials_pbrSpecularGlossinessKHR_materials_clearcoatKHR_materials_transmissionKHR_materials_unlitKHR_materials_emissive_strengthKHR_materials_volumeKHR_materials_sheenKHR_materials_specularKHR_materials_anisotropyKHR_materials_iorKHR_materials_variantsKHR_lights_punctualKHR_texture_transformKHR_mesh_quantizationEXT_mesh_gpu_instancing
Export(エクスポート)
KHR_draco_mesh_compressionKHR_lights_punctualKHR_materials_clearcoatKHR_materials_transmissionKHR_materials_unlitKHR_materials_emissive_strengthKHR_materials_volumeKHR_materials_sheenKHR_materials_specularKHR_materials_anisotropyKHR_materials_iorKHR_materials_variantsKHR_texture_transformEXT_mesh_gpu_instancing
Third-party glTF Extensions
It is possible for Python developers to add Blender support for additional glTF extensions by writing their own third-party add-on, without modifying this glTF add-on. For more information, see the example on GitHub and if needed, register an extension prefix.
カスタムプロパティ
Custom properties are always imported, and will be exported from most objects
if the option is selected before export.
These are stored in the extras field on the corresponding object in the glTF file.
Unlike glTF extensions, custom properties (extras) have no defined namespace, and may be used for any user-specific or application-specific purposes.
Animations
A glTF animation changes the transforms of objects or pose bones, or the values of shape keys. One animation can affect multiple objects, and there can be multiple animations in a glTF file.
Import(インポート)
Imported models are set up so that the first animation in the file is playing automatically. Scrub the Timeline to see it play.
When the file contains multiple animations, the rest will be organized using the Nonlinear Animation editor. Each animation becomes an action stashed to an NLA track. The track name is the name of the glTF animation. To make the animation within that track visible, click Solo (star icon) next to the track you want to play.
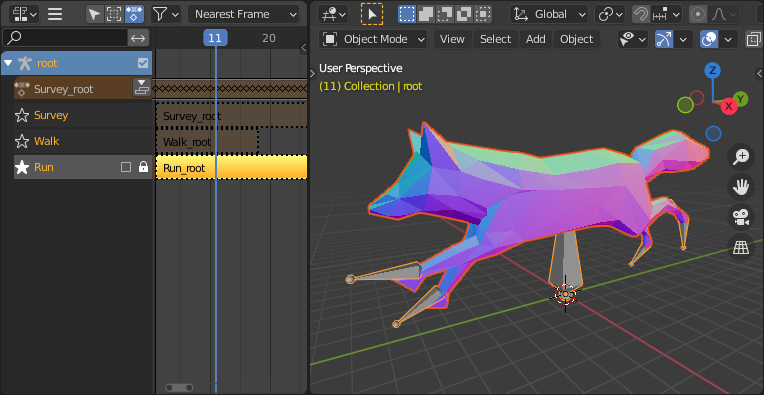
This is the fox sample model showing its "Run" animation.
If an animation affects multiple objects, it will be broken up into multiple parts. The part of the animation that affects one object becomes an action stashed on that object. Use the track names to tell which actions are part of the same animation. To play the whole animation, you need to enable Solo (star icon) for all its tracks.
Each animation will be imported as a single action, with multiple slots if the animation affects multiple objects. One slot will be created for TRS, one for shape keys, etc...
You can find more information about action slots in Animation.
注釈
There is currently no way to see the non-animated pose of a model that had animations.
You can also use the animation switcher that can be found in Dope Sheet editor.
注釈
You have to enable UI in Add-on preferences for seeing the animation switcher

You can switch all animation imported. It automatically enables Solo (star icon) for all needed tracks. It also reset non animated object to Rest transformation.
Export(エクスポート)
You can export animations using different ways. How glTF animations are made from actions / NLA is controlled by the export option.
Actions (default)
An action will be exported if it is the active action on an object, or it is stashed to an NLA track (e.g. with the Stash or Push Down buttons in the Action Editor). Actions which are not associated with an object in one of these ways are not exported. If you have multiple actions you want to export, make sure they are stashed!
A glTF animation can have a name, which is the action name by default. You can override it
by renaming its NLA track from NLATrack/[Action Stash] to the name you want to use.
For example, the Fig. fox model will export with three animations,
"Survey", "Walk", and "Run".
If you rename two tracks on two different objects to the same name, they will become part
of the same glTF animation and will play together.
The importer organizes actions so they will be exported correctly with this mode.
This mode is useful if you are exporting for game engine, with an animation library of a character. Each action must be on its own NLA track.
Before Blender 4.4, tracks was merged regarding their name. With Blender 4.4, and the introduction of slotted actions, this default behavior has been changed. Now, tracks are merged by the action they are using, and not by their name. You can find more information about action slots in Animation.
Active Actions merged
In this mode, the NLA organization is not used, and only one animation is exported using the active actions on all objects.
NLA Tracks
In this mode, each NLA Track will be export as an independent glTF animation. This mode is useful if you are using Strip modifiers, or if you get multiple action on a same Track.
If you rename two tracks on two different objects to the same name, they will become part of the same glTF animation and will play together.
Scene(シーン)
Using Scene option, animations will be exported as you can see them in viewport. You can choose to export a single glTF animation, or each object separately.
注釈
Remember only certain types of animation are supported:
Object transform (location, rotation, scale)
Pose bones
Shape key values
Animation of other properties, like physics, lights, or materials, will be ignored.
注釈
In order to sample shape key animations controlled by drivers using bone transformations, they must be on a mesh object that is a direct child of the bones' armature.
注釈
Only Actions (default) and Active Actions merged mode can handle not sampled animations.
ファイル形式のバリエーション
glTFの仕様では、データが保存されるさまざまな方法を特定しています。インポーターはこれらすべての方法を処理します。エクスポータは、以下の形式のいずれかを選択するようにユーザーに要求します。
glTFバイナリ (.glb)
これにより、すべてのメッシュデータ、イメージテクスチャ、関連する情報を一つのバイナリファイルに詰め込んだ .glb ファイルが作成されます。
Tip
1つのファイルを使用することで、モデルを他のシステムやサービスに簡単に共有したりコピーしたりすることができます。
glTF Separate (.gltf + .bin + textures)
これは全体の構造を記述したJSONテキストベースの .gltf ファイルと、メッシュとベクトルデータを含む .bin ファイル、そしてオプションで .gltf ファイルで参照された画像テクスチャを含む .png または .jpg ファイルを生成します。
Tip
別々のファイルを用意しておくと、エクスポートが完了した後、ユーザーが戻ってJSONや画像を編集するのが非常に簡単になります。
注釈
このフォーマットを共有するには、これらの別々のファイルをすべてグループとして共有する必要があることに注意してください。
glTF Embedded (.gltf)
This produces a JSON text-based .gltf file, with all mesh data and
image data encoded (using Base64) within the file. This form is useful if
the asset must be shared over a plain-text-only connection.
警告
This is the least efficient of the available forms, and should only be used when required. Available only when you activated it in addon preferences.
Properties(プロパティ)
Import(インポート)
- Merge Vertices
The glTF format requires discontinuous normals, UVs, and other vertex attributes to be stored as separate vertices, as required for rendering on typical graphics hardware. This option attempts to combine co-located vertices where possible. Currently cannot combine verts with different normals.
- Shading(シェーディング)
インポート時の法線の計算方法です。
- Lighting Mode
Optional backwards compatibility for non-standard render engines. Applies to lights. Standard: Physically-based glTF lighting units (cd, lx, nt). Unitless: Non-physical, unitless lighting. Useful when exposure controls are not available Raw (Deprecated): Blender lighting strengths with no conversion
Texture(テクスチャ)
- Pack Images
すべての画像をblendファイルに詰め込みます。
- Import WebP textures
If a texture exists in WebP format, loads the WebP texture instead of the fallback png/jpg one.
Bones & Skin
- Bone Direction
Changes the heuristic the importer uses to decide where to place bone tips. Note that the Fortune setting may cause inaccuracies in models that use non-uniform scaling. Otherwise this is purely aesthetic. The default value will not change axis, and is best for re-exporting from Blender. This default option will change display mode (adding shape and changing relationship line) to have a better view, even if original bones axis are not the most accurate (estheticaly speaking)
- Guess Original Bind Pose
編集モードでのボーン(結果としてスキンメッシュ)のポーズを決定します。オンにすると、逆バインド行列の計算に使われたポーズを推測しようとします。
- Disable Bone Shape
Do not display bone shapes in the 3D View.
- Bone Shape Scale
Scale of the bone shapes in the 3D View.
Pipeline
- Select Imported Objects
Select created objects after import.
- Import Scene Extras
Import glTF extras as custom properties, at scene level.
Export(エクスポート)
- Format(フォーマット)
- Keep Original(オリジナルを保持)
For glTF Separate file format only. Keep original textures files if possible. Warning: if you use more than one texture, where PBR standard requires only one, only one texture will be used. This can lead to unexpected results
- Textures(テクスチャ)
For glTF Separate file format only. Folder to place texture files in. Relative to the gltf-file.
- Copyright
モデルの法的権利と条件です。
- Remember Export Settings
エクスポート設定をblendファイルに保存し、次回ファイルを開いたときに呼び出せるようにします。
Include(内容)
- Selected Objects
選択したオブジェクトのみをエクスポートします。
- Visible Objects
Export visible objects only.
- Renderable Objects
Export renderable objects only.
- Active Collection
Export objects from active collection only.
- Include Nested Collections
Only when Active Collection is On. When On, export recursively objects on nested active collections.
- Active Scene
Export active scene only.
- カスタムプロパティ
カスタム プロパティを glTF extrasとしてエクスポートします。
- Cameras(カメラ)
カメラをエクスポートします。
- Punctual Lights
ディレクショナルライト、ポイントライト、スポットライトをエクスポートします。KHR_lights_punctual`` glTF 拡張モジュールを使用します。
Transform(トランスフォーム)
- Y Up
glTFの規定に沿って、+Yが上でエクスポートします。
Data - Scene Graph
- Geometry Nodes Instances
Export Geometry nodes instances. This feature is experimental.
- GPU Instances
Export using
EXT_mesh_gpu_instancingextensions.- Flatten Object Hierarchy
Useful in case of non-decomposable TRS matrix. Only skined meshes will stay children of armature.
- Full Collection Hierarchy
Export collections as empty, keeping full hierarchy. If an object is in multiple collections, it will be exported it only once, in the first collection it is found.
Data - Mesh
- Apply Modifiers
Export objects using the evaluated mesh, meaning the resulting mesh after all Modifiers have been calculated.
- UVs(UV)
UV(テクスチャ座標)をメッシュでエクスポートします。
- Normals(法線、ノーマル)
頂点の法線をメッシュでエクスポートします。
- Tangents
頂点の接線をメッシュでエクスポートします。
- Attributes(属性)
Export Attributes with meshes, when the name starts with underscore.
- Loose Edges
Export loose edges as lines, using the material from the first material slot.
- Loose Points
Export loose points as glTF points, using the material from the first material slot.
- Shared Accessor
For triangles, use shared accessor for indices. This is more efficient (smaller files when you have lots of materials).
Data - Mesh - Vertex Color
- Use Vertex Color
- Material(マテリアル):
Export vertex color when used in material node tree as Base Color multiplier. This is the default, and the most accurate regarding glTF specification.
- Active(アクティブ):
Export active vertex colors, even if not used in material node tree. A fully compliant glTF viewer should display this VC as Base Color multiplier.
- Name(名前):
Export vertex color with the given name. A fully compliant glTF viewer should display this VC as Base Color multiplier.
- None(なし):
Do not export vertex color.
- Export all vertex colors
Export all vertex colors, additional VC will be COLOR_1, COLOR_2, etc.
- Export active vertex color when no material
Export active vertex color when no material is assigned to the object.
Data - Material
- Materials(マテリアル)
Export full materials, only placeholders (all primitives but without materials), or does not export materials. (In that last case, primitives are merged, losing material slot information).
- Images
Output format for images. PNG is lossless and generally preferred, but JPEG might be preferable for web applications due to the smaller file size. If WebP is chosen, all textures will be saved as WebP, without any png/jpg fallback. If None is chosen, materials are exported without textures.
- Image Quality
When exporting jpeg or WebP files, the quality of the exported file.
- Create WebP
Creates WebP textures for every textures, in addition to the existing texture. For already WebP textures, nothing happen.
- WebP fallback
For all WebP textures, create a png fallback texture.
- Unused images
Export images that are not used in any material.
- Unused textures
Export texture info (sampler, image, texcoord) that are not used in any material.
Data - Shape Keys
シェイプキー(モーフターゲット)をエクスポートします。
- Shape Key Normals
シェイプキー(モーフターゲット)を使って頂点法線を書き出します。
- Shape Key Tangents
シェイプキー(モーフターゲット)を使って頂点の接線をエクスポートします。
Data - Shape Keys - Optimize
- Use Sparse Accessor if better
Sparse Accessor will be used if it save space (if the exported file is smaller)
- Omitting Sparse Accessor if data is empty
If data is empty, omit to export SParce Accessor. Not all viewer managed it correctly, so this option is Off by default
Data - Armature
- Use Rest Position Armature
Export Armatures using rest position as joint rest pose. When Off, the current frame pose is used as rest pose.
- Export Deformation Bones only
Export Deformation bones only, not other bones. Animation for deformation bones are baked.
- Remove Armature Object
Remove Armature Objects if possible. If some armature(s) have multiple root bones, we can't remove them.
- Flatten Bone Hierarchy
Useful in case of non-decomposable TRS matrix.
Data - Skinning
Export skinning data
- Bone influences
How many joint verex influences will be exported. Models may appear incorrectly in many viewers with value different to 4 or 8.
- Include All Bone Influences
Export all joint vertex influences. Models may appear incorrectly in many viewers.
Data - Lighting
- Lighting Mode
Optional backwards compatibility for non-standard render engines. Applies to lights. Standard: Physically-based glTF lighting units (cd, lx, nt). Unitless: Non-physical, unitless lighting. Useful when exposure controls are not available Raw (Deprecated): Blender lighting strengths with no conversion
Data - Compression
Google Dracoを使ってメッシュを圧縮します。
- Compression Level
圧縮率が高くなると、エンコードやデコードが遅くなります。
- Quantization Position
値が大きいほど圧縮率が高くなります。
- Normal(ノーマル)
値が大きいほど圧縮率が高くなります。
- Texture Coordinates(テクスチャ座標)
値が大きいほど圧縮率が高くなります。
- Color(カラー)
値が大きいほど圧縮率が高くなります。
- Generic(汎用)
値が大きいほど圧縮率が高くなります。
Animation(アニメーション)
- Animation mode
Animation mode used for export (See Animations)
Animation - Bake & Merge
- Bake All Objects Animations
Useful when some objects are constrained without being animated themselves.
- Merge Animation
Merge animation mode. Can be by Action (using slot), by NLA Track Name, or no merge. When merging by NLA Track Name, all animation with the same NLA Track name will be merged. When merging by Action, all animations with the same action will be merged. When no merge, all animations will be exported as separate animations.
Animation - Rest & Ranges
- Use Current Frame as Object Rest Transformations
Export the scene in the current animation frame. When off, frame 0 is used as rest transformation for objects.
- Limit to Playback Range
選択した再生範囲にアニメーションをクリップします。
- Set all glTF Animation starting at 0
Set all glTF Animation starting at 0. Can be useful for looping animation
- Negative Frames
When some frames are in negative range, slide or crop the animation.
Animation - Armature
- Export all Armature Actions
Export all actions, bound to a single armature. Warning: Option does not support exports including multiple armatures.
- Reset pose bones between actions
Reset pose bones between each action exported. This is needed when some bones are not keyed on some animations.
Animation - Shape Keys
- Shape Keys Animations
Export Shape Keys Animation. Need Shape Keys to be exported (See Data - Shape Keys)
- Reset Shape Keys between actions
Reset Shape Keys between each action exported. This is needed when some shape keys are not keyed on some animations.
Animation - Sampling
Apply sampling to all animations. Do not sample animation can lead to wrong animation export.
- Sampling Rate
アニメーションの値を評価する頻度(フレーム数)です。
- Sampling Interpolation Fallback
Interpolation choosen for properties that are not keyed (LINEAR or STEP/CONSTANT)
Animation - Optimize
- Optimize Animation Size
Reduce exported file size by removing duplicate keyframes when all identical.
- Force keeping channel for armature / bones
if all keyframes are identical in a rig, force keeping the minimal animation.
- Force keeping channel for objects
if all keyframes are identical for object transformations, force keeping the minimal animation.
- Disable viewport for other objects
When exporting animations, disable viewport for other objects, for performance reasons, when possible.
Animation - Filter
Restrict actions to be exported to the ones matching the filter.
Collection Exporters
This exporter can be used as a collection exporter. See Collections(コレクション) for more information about collections and their exporters.
Here are the options & specificity for collection export:
Include part of options are not available for collection exporter (like every other exporter).
Option to export at collection center (at center of mass of all root objects of the collection).
Custom Properties of the collection are exported as Scene glTF extras.
Contributing
このインポータ/エクスポータは glTF-Blender-IO リポジトリ を通じて開発されており、バグレポートの提出、機能要求の提出、コードの貢献が可能です。
glTF 2.0フォーマット自体の議論や開発はKhronos Groupの glTF GitHubリポジトリ で行われており、そこでのフィードバックは歓迎されています。