Editing Nodes
Transform(トランスフォーム)
参照
- Menu(メニュー):
- ショートカットキー:
G, R, S
You can move the selected node(s) by clicking and dragging any empty part of them. Alternatively, press G, move the mouse, and click LMB to confirm.
Dragging a node on top of an existing link will intelligently insert the selected node into the link path. This generally uses the first socket that matches the link type. The automatic node attachment feature can be toggled with Alt. When a node is automatically attached, the surrounding nodes will be offset to the right or left depending on the T toggle; see Auto-Offset(自動オフセット) for more information.
While dragging nodes, you can press F to toggle their parent Frame:
If the nodes are inside a frame, they will be detached from it.
If the nodes are not inside a frame and there is a frame under the cursor, they will be attached to that frame.
In general, it is recommended to arrange your nodes so that data flows from left to right, top to bottom.
The width of a node can be adjusted by dragging its left or right border. When multiple nodes are selected, resizing one node affects all selected nodes.
Rotating (R) and scaling (S) only apply when multiple nodes are selected, and only affect their positions.
ソケットの接続
LMB-click on a socket and drag. "Connect to Output" will see a line coming out of it; this is called a link. Keep dragging and connect the link to an input socket of another node, then release the LMB.
While multiple links can route out of an output socket, typically a single link can be attached to an input socket, that is unless the input is a multi-socket input with looks like a pill shaped socket.
To swap multiple links of a similar type, press and hold Alt while moving a link. This feature also works when adding a new link into a pre-existing socket.
新しいリンクを追加するのではなく、リンクの発信元を変更するには、Ctrl を押しながら出力ソケットからドラッグします。これは単一のものだけでなく、複数のリンク発信に対しても機能します。
Nodes that have no connections can be inserted on a link by just moving the node over the link and release when the link is highlighted.
- Make Links J
空いているソケットを持つノードを複数選択し、Make Links(リンク作成) を実行することで間にリンクが作成されます。接続できるものが他にもある場合は、 Make Links(リンク作成) を再実行してください。
- Make and Replace Links Shift-J
Make and Replace Links(リンクし直し) は Make Links(リンク作成) と似た挙動ですが、既に存在するリンクがあっても、それを置き換えて接続します。
ソケットの接続解除
対話的操作
Drag the link away from its input socket and let it go, keeping it unconnected.
Mute Links(リンクをミュート)
参照
- Menu(メニュー):
- ショートカットキー:
Ctrl-Alt-RMB
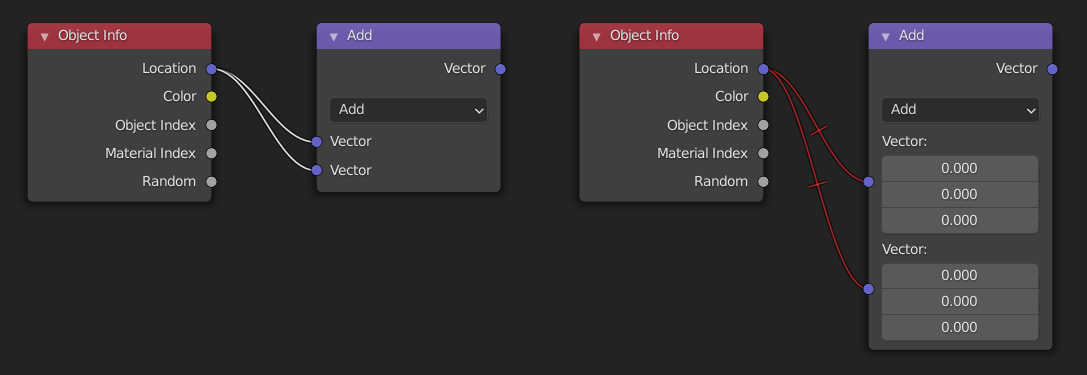
Activate the menu item or hold the key combination, then draw a line across one or more links to mute/unmute them. A muted link acts as though it's no longer there; this also means the input fields for specifying fixed values become visible again.
When muting links on the input side of a reroute node, the links on its output side will be muted too.
Cut Links(リンクをカット)
参照
- Menu(メニュー):
- ショートカットキー:
Ctrl-RMB
Activate the menu item or hold the key combination, then draw a line across one or more links to delete them.
注釈
The key combination is normally reserved for Lasso Select. In node editors, lasso selection is instead performed with Ctrl-Alt-LMB.
- Detach Links Alt-LMB drag
Use Detach Links to cut all the links attached to the selected nodes and move the nodes to a new location.
Cut/Copy/Paste
参照
- Menu(メニュー):
, ,
- ショートカットキー:
Ctrl-C 、 Ctrl-V
These operators allow transferring nodes within a node tree, between different node trees, or even between Blender instances.
- Cut(カット)
Removes the selected nodes and places them on the clipboard. When possible, links are automatically reconnected to preserve the node flow.
- Copy(コピー) Ctrl-C
Copies the selected nodes to the clipboard, including the connections between them.
- Paste(貼り付け) Ctrl-V
Inserts the nodes from the clipboard into the node tree.
注釈
Pasted nodes are placed at the same coordinates as when they were copied. The same considerations as duplicating nodes apply.
Tip
Nodes can be copied and pasted between Blender instances. This also works across different node editors, provided the node types are supported by the destination editor.
Duplicate(複製)
参照
- Menu(メニュー):
- ショートカットキー:
Shift-D
Select one or more nodes, activate the menu item or press the key combination, then move the mouse to a new location and click LMB (or press Return) to place the duplicated node(s).
注釈
ノードを複製した時、新しいノードは複製元のノードの上に「 正確に 」配置されます。そのままそこに配置した場合 (それはとても簡単に行えてしまいます)、そこに 2 つのノードがあることが簡単には 見分けがつきません !疑わしい場合は、ノードを選択して少し移動し、下に何かが隠れていないかを確認してください。
Duplicate Linked(リンク複製)
参照
- Menu(メニュー):
- ショートカットキー:
Alt-D
Duplicate selected nodes, but not their node trees (in the case of group nodes), and move them.
Delete(削除)
参照
- Menu(メニュー):
- ショートカットキー:
X 、 Delete
選択したノードを削除します。
Delete with Reconnect
参照
- Menu(メニュー):
- ショートカットキー:
Ctrl-Delete
Deletes the selected node(s), then creates new links connecting their former input nodes to their former output nodes.
Swap(スワップ)
参照
- Menu(メニュー):
- ショートカットキー:
Shift-S
The Swap operator replaces the selected node with another node type chosen from the menu.
All existing links are automatically reconnected where possible, matching input and output sockets by name and type. If a connection cannot be matched, it is left unconnected.
Show/Hide(表示/隠す)
Mute(無効化)
参照
- Menu(メニュー):
- ショートカットキー:
M
Muting a node removes its contribution to the node tree, and makes all links pass through it without change. Links will appear red as an indicator of passing through the muted node.
Tip
個々のノードリンクは、 Mute Links(リンクをミュート) を使用してミュートできます。
Node Preview
参照
- Menu(メニュー):
- ショートカットキー:
Shift-H
ノードへのオペレーションが適用された後、プレビューリージョンがノード内へ表示/非表示されるようになります。この操作は、ノードのヘッダーにあるマテリアルボールのアイコンをクリックして切り替えることもできます。
注釈
This operator are only available in the Compositor.
Node Options
参照
- Menu(メニュー):
ノードプロパティをすべて表示/非表示にします。
Unconnected Sockets
参照
- Menu(メニュー):
- ショートカットキー:
Ctrl-H
他のノードへ接続されていない入力または出力ソケットを、折りたたみ/展開します。
Collapse(束ねる)
参照
- Menu(メニュー):
- ショートカットキー:
H
Collapses the node so only the node header is visible. This can also be toggled by clicking the triangle on the left of the node header.
Collapse and Hide Unused Sockets(未使用ソケットの折りたたみと非表示)
参照
- Menu(メニュー):
- ショートカットキー:
H
Applies both the Unconnected Sockets and Collapse(束ねる) operations.
Read View Layers
参照
- Menu(メニュー):
- ショートカットキー:
Ctrl-R
必要に応じて、現在のシーンのすべてのレンダーレイヤーをキャッシュから読み取ります。レンダーレイヤーをRAMに保存する必要がなくなり、レンダリング中にRAMを節約できます。また、失敗したレンダリングからいくつかの情報を回復するためにも使われます。これを機能させるには、 Cache Result を有効にする必要があります。
注釈
This operator are only available in the Compositor.
Connect to Output
参照
- ショートカットキー:
Shift-Alt-LMB
Connect the output of the selected node to the final output of the node tree (Material Output or World Output in Shader, the final Group Output in Geometry Nodes and Compositor, Output in Texture Nodes), or, if the node is inside a group, to the Group Output.