はじめに
Modifiers(モディファイアー)は、オブジェクトのジオメトリに非破壊的な方法で影響を与える自動操作です。モディファイアーを使用すると、オブジェクトのベースジオメトリに影響を与えることなく、手動で実行するには面倒な多くのエフェクト(サブディビジョンサーフェスなど)を自動的に実行できます。
これらは、オブジェクトの表示方法とレンダリング方法を変更することで機能しますが、直接編集できるジオメトリは変更しません。1つのオブジェクトに複数のモディファイアーを追加して、 Modifier Stack(モディファイアースタック) を形成し、変更を永続的にしたい場合はモディファイアーを Apply(適用) できます。
They can be added to the active object using the Add Modifier operator, the "Add Modifier" button at the top of Modifiers tab in the Properties Editor, or using Shift-A in the same tab. New modifiers are always added at the bottom of the stack (i.e. will be applied last).
There are many built-in modifiers but Blender also allows users to make their own modifiers through Geometry Nodes(ジオメトリノード).
Categories
There are four categories of built-in modifiers:
- Edit(編集)
Similar to the Deform modifiers (see below), however, they usually do not directly affect the geometry of the object, but some other data, such as vertex groups.
- Generate(生成)
Constructive/destructive modifiers that will affect the whole Topology of the mesh. They can change the general appearance of the object, or add new geometry to it...
- Deform(変形)
Unlike Generate ones above, these modifiers only change the shape of an object, without altering its topology.
- シミュレート
Represent physics simulations. In most cases, they are automatically added to the modifiers stack whenever a Particle System or Physics simulation is enabled. Their only role is to define the position in the modifier stack from which is taken the base data for the simulation they represent. As such, they typically have no properties, and are controlled by settings exposed in separate sections of the Properties Editor.
You will also notice a category called "Hair", this category comes from a bundled Asset Library that is distributed with Blender. See Hair Nodes for more information.
Users can make their own categories by making geometry node groups assets and assigning them to a Asset Catalog. This catalog name will be the category name. If a user creates a catalog with the same name as one of the built-in categories the node group will be added to the bottom of the corresponding menu.
Node Groups that are non-assets or that do not belong to a category will be available in the "Unassigned" sub-menu.
注釈
Geometry Node Groups must have the Modifier property enabled for the node group to show up in the Add Modifier menu.
Interface(インターフェイス)
各モディファイアーのインターフェイスは同じ基本コンポーネントを共有します。図. パネルレイアウト (例として、Subdivision Surface(サブディビジョンサーフェス))。 を参照してください。
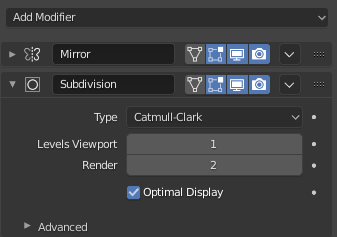
パネルレイアウト (例として、Subdivision Surface(サブディビジョンサーフェス))。
上部にはパネルヘッダーがあります。アイコンはそれぞれ、モディファイアーのさまざまな設定を表します(左から右)。
- / Expand
モディファイアーを折りたたんで、ヘッダーのみを表示し、そのオプションは表示しません。
- Type(タイプ)
モディファイアーのタイプのクイックビジュアルリファレンスとしてのアイコン。
- Name(名前)
すべてのモディファイアーには、オブジェクトごとに一意の名前があります。1つのオブジェクトの2つのモディファイアーには一意の名前を付ける必要がありますが、異なるオブジェクトの2つのモディファイアーには同じ名前を付けることができます。デフォルトの名前は、モディファイアーのタイプに基づいています。
- On Cage Meshes
以前の設定に応じて、有効にすると、元のジオメトリの代わりに、変更されたジオメトリを直接編集することもできます。
警告
While it shows edited items in their final, modified positions, you are still editing original data.
In situations where the positions diverge it can lead to confusing behavior, so you may wish to disable it in those cases.
It's also worth noting that some features don't use the cage positions including:
Snap targets, such as snapping to vertex.
The transform gizmo uses the original positions.
- Apply On Spline Curves Surfaces Text
テッセレート後のジオメトリではなく、モディファイアースタック全体を、カーブやサーフェスの制御点に適用します。
注釈
By default, curves, texts and surfaces are always converted to mesh-like geometry before the modifier stack is evaluated on them.
- Edit Mode
変更したジオメトリと、編集可能な元のジオメトリをEdit Mode(編集モード)で表示します。
- / Realtime
3D Viewport(3Dビューポート)でのモディファイアーのエフェクトの表示を切り替えます。
- / Render
レンダリングでのモディファイアーのエフェクトの表示を切り替えます。
注釈
オブジェクトとモディファイアーのタイプによっては、 Square(正方形) 、 Triangle(三角形) 、 Surface(サーフェス) のアイコンが使用できない場合があります。
- Extras(その他)
- Apply(適用) Ctrl-A
モディファイアーを "リアル" にします: 適用されたモディファイアーの結果と一致するようにオブジェクトのジオメトリを変換し、モディファイアーを削除します。
When applying a modifier to an object that shares Object Data between multiple objects, the object must first be made a Single User which can be performed by confirming the pop-up message.
Note, modifiers cannot be applied to Empty object types, use Visual Geometry as Mesh(表示の形状をメッシュ化) instead.
警告
スタックの最初ではないモディファイアーをApply(適用)すると、スタックの順序が無視され(最初のモディファイアーであるかのように適用されます)、望ましくない結果が生じる可能性があります。
- Apply as Shape Key(シェイプキーとして適用)
そのモディファイアーの結果を新しい相対 Shape key(シェイプキー) に保存し、そして、モディファイアースタックからモディファイアーを削除します。これは、トポロジに影響を与えないモディファイアーでのみ使用できます(通常、 Deform(変形) モディファイアーのみ)。
注釈
シェイプキーをサポートするジオメトリタイプで機能するはずですが、現在はメッシュでのみ機能します。
- Save as Shape Key(シェイプキーとして保存)
そのモディファイアーの結果を新しい相対 Shape key(シェイプキー) に保存し、モディファイアーをモディファイアースタックに保持します。これは、トポロジに影響を与えないモディファイアーでのみ使用できます(通常、 Deform(変形) モディファイアーのみ)。
- Duplicate(複製) Shift-D
スタック内の現在のモディファイアーのすぐ下にモディファイアーの複製を作成します。
- Copy to Selected(選択にコピー)
Active(アクティブ) オブジェクトから、選択したすべてのオブジェクトにモディファイアーをコピーします。
- Move to First/Last(最初/最後に移動)
モディファイアーをモディファイアースタックの最初や最後の位置に移動します。
- Pin to Last
Keeps the modifier at the end of the modifier stack. When a modifier is pinned, a pin icon will be displayed on the right side of the panel's header.
- Move to Nodes
Converts the existing Geometry Nodes(ジオメトリノード)モディファイアー node tree to a group node to be reused in other node trees. See Move to Nodes Operator for more information.
This operator is only available for the Geometry Nodes Modifier.
- Delete(削除) X, Delete
モディファイアーを削除します。
- (Move)
モディファイアーを スタック 内で上下に移動し、モディファイアーの評価順序を変更します。
A modifier is not movable if Pin to Last is enabled.
このヘッダーの下に、各モディファイアー固有のオプションがすべて表示されます。
Tip
Use Alt to affect all selected objects at once when performing operators such as add, apply, remove, and move to index.
See 複数のオブジェクトへの編集 for more information.
モディファイアー スタック
Modifiers are a series of non-destructive operations which can be applied on top of an object's geometry. You can apply them in almost any order. This kind of functionality is often referred to as a "modifier stack" and is also found in several other 3D applications.
In a modifier stack, the order in which modifiers are applied has an effect on the result. Therefore the modifiers can be re-arranged by clicking (grip icon) in the top right, and moving the selected modifier up or down. For example, the image below shows Subdivision Surface and Mirror modifiers that have switched places.
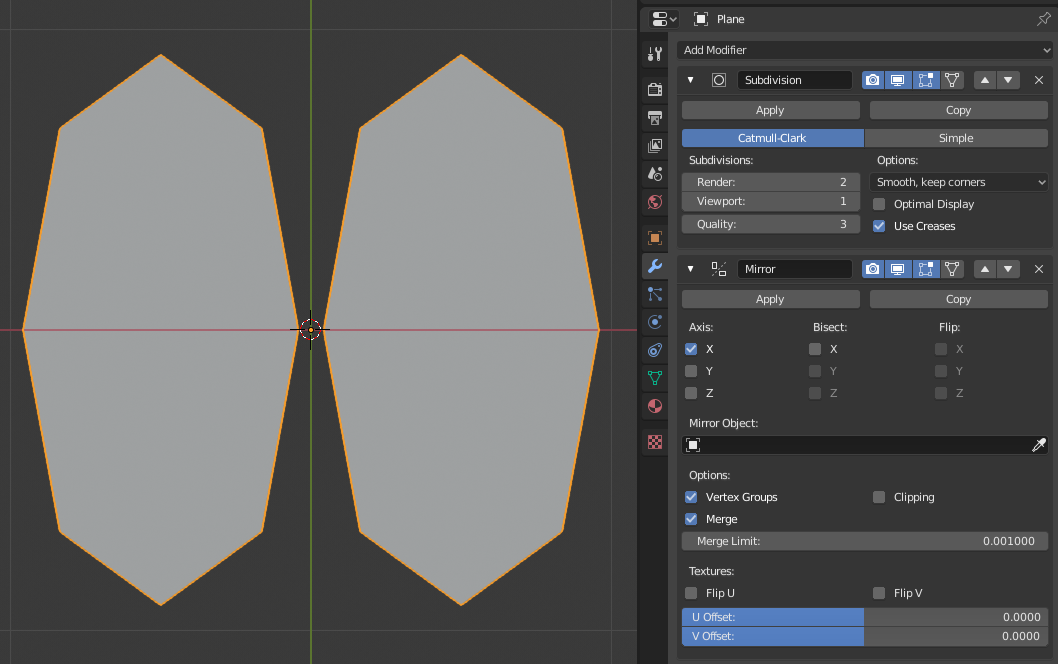
Mirror(ミラー)モディファイアーはスタックの最後のアイテムであり、結果は2つのサーフェスのように見えます。¶ |
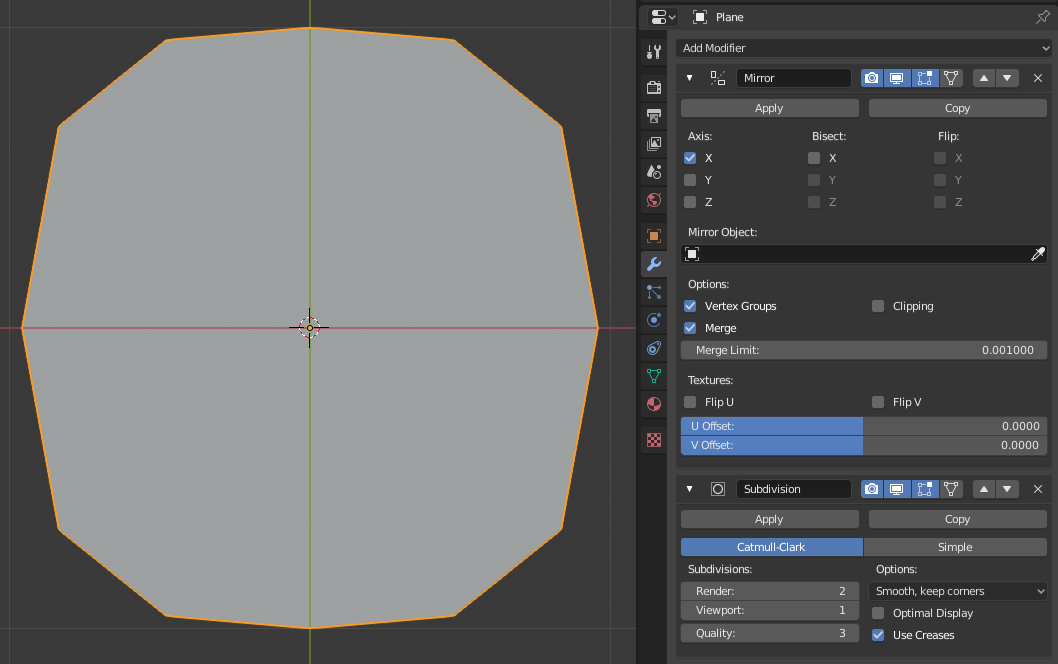
Subdivision Surface(サブディビジョンサーフェス)モディファイアーはスタックの最後のアイテムであり、結果はマージされた単一のサーフェスになります。¶ |
モディファイアーは、スタックの上から下に計算されます。この例では、最初にオブジェクトをミラーリングし、次にサブディビジョンサーフェスを計算することで、目的の結果(右側)が得られます。
アクティブなモディファイアー
A modifier in the stack can be selected to mark it as Active, the active modifier displays an outline around the modifier's panel. To set an active modifier, select an area of the modifier's panel background, the modifier's icon, or, select a modifier in the Outliner(アウトライナー).
アクティブなモディファイアーは、どのノードグループが変更されるかを判断するために Geometry Node Editor(ジオメトリノードエディター) によって使用されます。
例
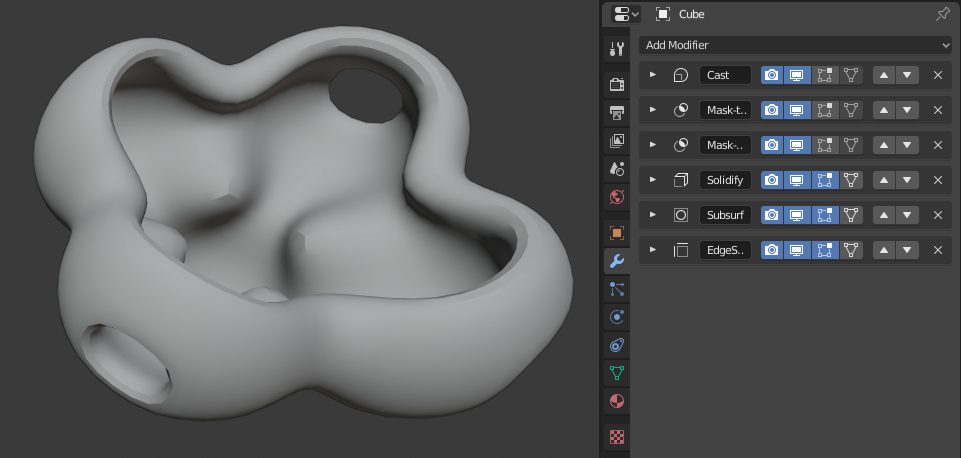
この例では、モディファイアースタックを使用して、単純な細分化された立方体がかなり複雑なオブジェクトに変換されています。