Bám Dính (Snapping)
Tham Chiếu [Reference]
- Chế Độ [Mode]:
Chế Độ Đối Tượng, Biên Soạn và Chế Độ Tư Thế
- Vị Trí [Location]:
- Tổ Hợp Phím Tắt [Shortcut]:
Shift-Tab
Trình Đơn Bám Dính.
Snapping makes it easy to align objects and mesh elements to others. It can be toggled by clicking (Snap Off) / (Snap On) in the 3D Viewport's header, or more temporarily by holding Ctrl.
Xem thêm
Transform Modal Map for further keyboard shortcuts.
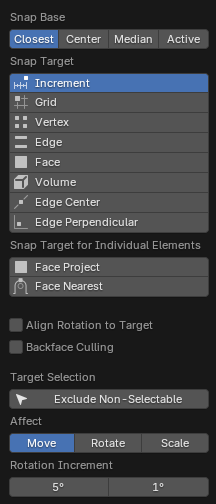
Cơ Sở Bám Dính [Snap Base]
Tham Chiếu [Reference]
- Chế Độ [Mode]:
Chế Độ Đối Tượng, Biên Soạn và Chế Độ Tư Thế
- Tiêu Đề (Header):
- Tổ Hợp Phím Tắt [Shortcut]:
Shift-Ctrl-Tab
Determines which point in the geometry will snap to the target.
- Gần Nhất (Closest):
Snaps using the bounding box corner (in Object Mode) or vertex (in Edit Mode) that's closest to the target.
- Trung Tâm (Center):
Snaps using the current transformation center, which is another word for the pivot point. This option is especially useful in combination with the 3D Cursor for choosing the snapping point completely manually.
- Trung Vị (Median):
Snaps using the average position of the selected objects' origins (in Object Mode) or vertices (in Edit Mode).
- Active [Đang Hoạt Động]:
Snaps using the origin (in Object Mode) or center (in Edit Mode) of the active element.
Mục Tiêu Bám Dính (Snap Target)
Tham Chiếu [Reference]
- Chế Độ [Mode]:
Chế Độ Đối Tượng, Biên Soạn và Chế Độ Tư Thế
- Tiêu Đề (Header):
- Tổ Hợp Phím Tắt [Shortcut]:
Shift-Ctrl-Tab
Determines the target which the selection will be snapped to.
- Gia Lượng (Increment):
Snaps to an imaginary grid that starts at the selection's original location and has the same resolution as the viewport grid. In other words, it allows moving the selection in "increments" of the grid cell size.
- Khung Lưới Đồ Thị (Grid):
Snaps tới the khung lưới đồ thị that's displayed trong cổng nhìn.
- Vertex (Điểm Đỉnh):
Snaps to the vertex that's closest to the mouse cursor.
- Edge (Cạnh):
Snaps to the edge that's closest to the mouse cursor.
- Face (Mặt):
Snaps to the surface of the face under the mouse cursor. This is useful for retopologizing.
- Volume [Thể Tích]:
Snaps the selection to a depth that's centered inside the object under the cursor. This is useful for positioning an Armature bone so it's centered inside a character's arm, for example; the other snapping options would place it on the arm's surface instead.
Trong Khi Blender đồng thời Các đối tượng thể tích (Volume objects), this tùy chọn được không/không phải/nghịch/phủ định (not) related tới those.
- Trung Điểm của Cạnh (Edge Center):
Snaps tới the centerpoint của cạnh that's gần nhất tới the con trỏ chuột.
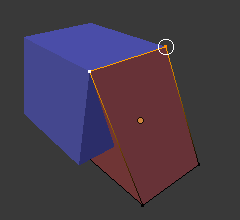
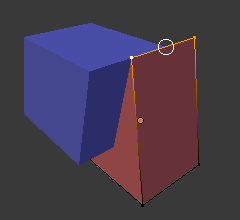
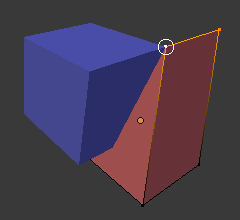
- Cạnh Vuông Góc (Edge Perpendicular):
Snaps to a specific point on the edge so that the line from the selection's original location (indicated by a white cross) to its new location is perpendicular to that edge.
- Face Center:
Snaps to the centerpoint of the face under the mouse cursor.
Mẹo
Chúng ta có thể bật nhiều chế độ bám dính lên cùng một lúc bằng tổ hợp Shift-NCT (LMB).
Mục Tiêu Bám Dính cho Cá Nhân Phần Tử [Snap Target for Individual Elements]
Tham Chiếu [Reference]
- Chế Độ [Mode]:
Chế Độ Đối Tượng, Biên Soạn và Chế Độ Tư Thế
- Tiêu Đề (Header):
- Tổ Hợp Phím Tắt [Shortcut]:
Shift-Ctrl-Tab
- Phóng Chiếu Mặt (Face Project):
Individually snaps each object (in Object Mode) or vertex (in Edit Mode) to the face found by projecting from the current viewing depth along the current viewing direction. This can be used for bending a flat sheet so it snugly fits against a curved surface, for example.
- Gần Nhất Mặt (Face Nearest):
Individually snaps each object or vertex to the face that's closest to its new location. Contrary to Face Project, this allows snapping to occluded geometry.
Xem thêm
Shrinkwrap constraint / modifier.
Lựa Chọn Mục Tiêu (Target Selection)
Sets more detailed snapping options. The available options depend on the mode (Object/Edit) as well as the Snap Target.
- Căn Chỉnh Xoay Chiều vào Mục Tiêu (Align Rotation to Target)
Rotate the selection so that its Z axis gets aligned to the normal of the target.
- Loại Bỏ Mặt Trái (Backface Culling)
Không bám dính vào các mặt trái hình học.
- Bao Gồm cái đang Hoạt Động (Include Active) Chế Độ Biên Soạn (Edit Mode)
Bám Dính tới cái khác khung lưới phần tử của đối tượng đang hoạt động.
This option is ignored if Proportional Editing is enabled.
- Bao Gồm cái được Biên Soạn Chế Độ Biên Soạn (Edit Mode)
Bám Dính tới cái khác đối tượng that sẽ được đồng thời vào/trong Chế Độ Biên Soạn.
- Bao Gồm cái Chưa được Biên Soạn Chế Độ Biên Soạn (Edit Mode)
Bám Dính tới cái khác đối tượng that không vào/trong Chế Độ Biên Soạn.
- Loại Trừ cái Không Thể Chọn (Exclude Non-Selectable)
Snap only to objects that are selectable.
- Absolute Increment Snap Increment
Snap to the viewport grid (instead of moving by increments of the grid cell size). This is similar to setting the Snap Target to Grid, except that the latter moves the selection to the grid point closest to the mouse cursor.
- Bám Dính vào Đối Tượng Bóc (Snap Peel Object) Thể Tích (Volume)
If the target object is composed of several disconnected mesh islands that intersect each other, Snap To Volume will normally snap to the island under the mouse cursor, ignoring the others. Enabling Snap Peel Object instead treats the target object as one connected whole, looking only at the "peel" (outer surface) while ignoring inner/enclosed faces.
- Snap to Same Target Gần Nhất Mặt (Face Nearest)
Snap only to the object which the selection was nearest to before starting the transformation.
- Số Bước Mặt Gần Nhất (Face Nearest Steps) Mặt Gần Nhất (Face Nearest) Chế Độ Biên Soạn (Edit Mode)
Breaks the overall transformation into multiple steps, performing a snap each time. This can give better results in certain cases.
Tác Động (Affect)
Specifies which transformations are affected by snapping. By default, snapping only happens while moving something, but it can also be enabled for rotating and scaling.
Lượng Tăng Tiến Xoay Chiều [Rotation Increment]
Angle used in incremental snapping for the rotation operator. The second value is the Rotation Precision Increment, used for finer transformations and activated by default with the Shift key.