Mở Rộng (Expand)
This is a multi-purpose modal operator to intuitively create and edit masks/face sets. When executed, it uniformly expand outwards a pattern from the vertex under the cursor.
Ghi chú
These thao tác sẽ được meant được used trong chế độ tương tác through the tổ hợp phím tắt.
There is also a full showcase of the Expand features and use cases.
Một minh họa của [A preview of] "Mở Rộng Màn Chắn Lọc theo Cấu Trúc Liên Kết"
Mở Rộng Màn Chắn Lọc theo Cấu Trúc Liên Kết (Expand Mask by Topology)
Tham Chiếu [Reference]
- Chế Độ [Mode]:
Chế Độ Điêu Khắc (Sculpt Mode)
- Trình Đơn [Menu]:
- Tổ Hợp Phím Tắt [Shortcut]:
Shift-A
Mở Rộng một màn chắn lọc từ the điểm đỉnh đang hoạt động.
Cách Dùng [Usage]
- Màn Chắn Lọc từ một tới B [Mask from A to B]
Start the operator and expand a mask from an origin to your mouse cursor distance. Then confirm with LMB or Return
By default the expansion will use a Geodesic falloff 1 to create perfectly accurate distances along the surfaces. Use other falloff types via 2, 3 & 4 to expand via triangles, whole faces or scene distances instead.
The typical result when using the Diagonals falloff to expand along the quads of the face.
Start Expand while pointing at an open boundary to expand from the entire boundary loop. This will always use the Topology falloff mode.
- Vùng/Tô Phủ Kín/Lấp Đầy Kết Nối Khung Lưới [Fill Connected Meshes]
Move your cursor outside of the boundaries of the mesh to mask the entire connected mesh. This can be done repeatedly to quickly mask separate meshes.
- Vùng/Tô Phủ Kín/Lấp Đầy Mặt Ấn Định [Fill Face Sets]
Hold Ctrl to snap to face sets under your cursor and fill them. Any face set that was already fully covered in the expansion will be filled as well.
- Automatically Set Transform Pivot
While using any Transform tool, the pivot point will automatically snap the border of an Expand result. This way areas (Like limbs) can be masked and then immediately rotated or otherwise transformed.
- Hoa Văn/Mẫu Creation [Pattern Creation]
The different falloff types can be used for circular, triangular and square patterns. More loops can also be added/removed via W & Q to repeat the pattern across the mesh.
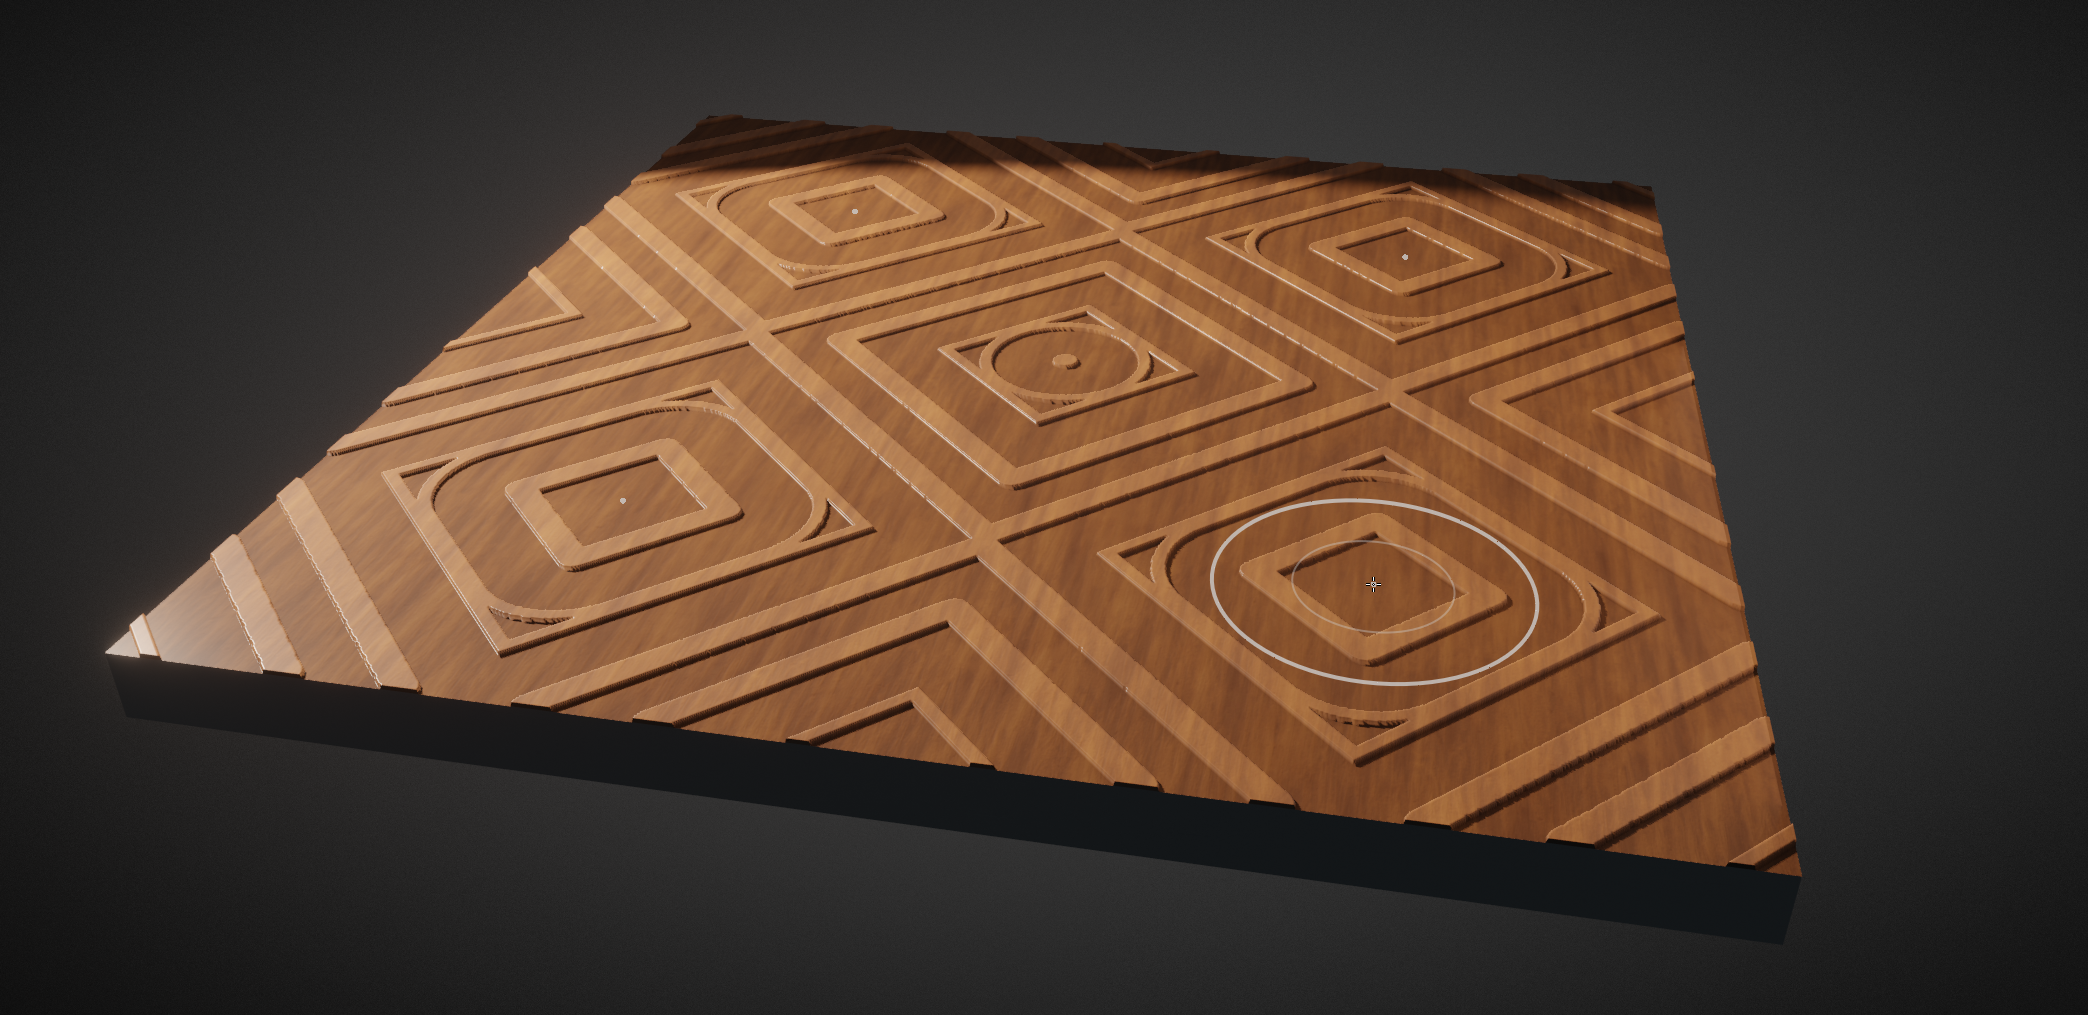
An example of using expand with mirror options, loops and a recursion to create wood carving patterns.
Mẹo
Mirror options can also be combined with the expansion.
Linear gradients G or brush falloff gradients B will help to add slanted surfaces to the patterns.
A "Recursions" with R or Alt-R will start a new expansion along the border of the current expansion. Doing this multiple times, can help for increasingly random patterns or advanced pattern creation.
An example of using loops and gradients with multiple expanded masks.
Mẹo
Remember that Expand only affects visible geometry. So if a pattern should only be created on a part of the mesh, hide the other geometry first.
Use the Mesh Filter to deform the geometry and the Color Filter to add colors, to apply the patterns on the sculpt.
- Expanding Chất Liệu [Expanding Textures]
Textures can be used to affect the shape and gradients of the expanded mask. This feature can be combined with loops and recursion to create unique results.
To use a texture, you need to assign it to your currently active brush in the Texture Brush Settings. The texture can be edited/created in the Texture Properties.
Ghi chú
This texture only works when the Mapping is set to 3D.
Use Y and T to increase or decrease the affect the texture has on the edge of the mask.
Các Điều Khiển (Controls)
- Đảo Nghịch (Invert):
F Flips giữa expanding một dương màn chắn lọc (giá trị của cái/số một) hoặc một âm màn chắn lọc (giá trị của số không). Vào/trong the kiểu chữ của mặt ấn định, this tùy chọn flips giữa including vùng bên trong the bị che chắn khu vực/diện tích hoặc vùng bên ngoài the bị che chắn khu vực/diện tích. .. needs trực quan kỹ thuật một số ví dụ cho/đối với cả hai
- Bật/Tắt Bảo Tồn Trạng Thái (Toggle Preserve State):
E Chồng Chất/Tích Tụ the Mới Màn Chắn Lọc trên cùng/đỉnh của Trước cái/số một hoặc Thay Thế it. Cho/đối với Mặt Ấn Định, this will đảo lật/bật/tắt giữa tạo Mặt Ấn Định ranh giới hoặc replacing the existing Mặt Ấn Định.
- Di Chuyển Tọa Độ Gốc (Move Origin):
Dấu Cách (Spacebar) Di Chuyển the khởi đầu điểm đỉnh used cho/đối với calculating the suy giảm dần. .. needs trực quan kỹ thuật ví dụ
- Suy Giảm Dần Trắc Địa (Geodesic Falloff):
1 Sử dụng suy giảm dần dựa trên Geodesic (Trắc Địa) từ ranh giới cạnh đến điểm đỉnh đang hoạt động.
- Suy Giảm Dần theo Cấu Trúc Liên Kết (Topology Falloff):
2 Sử dụng suy giảm dần dựa trên tô phủ tràn kín dùng các cạnh.
- Suy Giảm Dần Chéo Góc (Diagonals Falloff):
3 Sử dụng suy giảm dần dựa trên tô phủ tràn kín dùng các đường chéo và cạnh của đa giác.
- Suy Giảm Dần Hình Cầu [Spherical Falloff]:
4 Sử Dụng một suy giảm dần dựa trên the Euclid distances từ the cạnh ranh giới tới the điểm đỉnh đang hoạt động. .. needs trực quan kỹ thuật một số ví dụ
- Bật/Tắt Dốc Màu (Toggle Gradient):
G Bật dốc màu tiếp tuyến của giá trị từ the tọa độ gốc tới the hiện tại điểm đỉnh đang hoạt động.
- Bật/Tắt Dốc Màu của Đầu Bút (Toggle Brush Gradient):
B Tương Tự tới dốc màu tiếp tuyến but uses the hiện tại đầu bút Suy Giảm Dần (Falloff) tới define the hình dạng của suy giảm dần. .. needs trực quan kỹ thuật một số ví dụ
- Tiến Bước Đệ Quy Trắc Địa (Geodesic Recursive Step):
R Khởi/Đầu một mới expansion với một Geodesic (Trắc Địa) suy giảm dần từ the ranh giới của hiện tại suy giảm dần.
- Bước Đệ Quy Cấu Trúc Liên Kết (Topology Recursive Step):
Alt-R Khởi/Đầu một mới expansion với một suy giảm dần theo cấu trúc liên kết (topology falloff) từ the ranh giới của hiện tại suy giảm dần. .. needs trực quan kỹ thuật một số ví dụ
- Bám Dính vùng Mở Rộng vào các Mặt Ấn Định (Snap Expanded to Face Sets):
Ctrl Cô lập vùng mở rộng trong ranh giới của mặt ấn định nằm dưới con trỏ.
- Tăng Số Vòng Tuần Hoàn (Loop Count Increase):
W Tăng lên số vòng lặp hoặc số lần nhắc lại mà thao tác sẽ thi hành; sử dụng bốn vòng sẽ tách phân màn chắn lọc thành bốn phần.
- Giảm Số Vòng Tuần Hoàn (Loop Count Decrease):
Q Giảm the số/lượng của vòng mạch hoặc số lần lặp lại the thao tác được chạy; using four vòng mạch will tách phân the màn chắn lọc vào four phần. .. needs trực quan kỹ thuật một số ví dụ
- Tăng Biến Dạng Chất Liệu (Texture Distortion Increase):
Y Tăng lên khoảng cách suy giảm dần khi sử dụng chất liệu để làm biến dạng hình dạng màn chắn lọc.
- Giảm Biến Dạng Chất Liệu (Texture Distortion Decrease):
T Giảm the suy giảm dần khoảng cách khi using một chất liệu tới biến dạng the màn chắn lọc hình dạng. ..needs trực quan kỹ thuật một số ví dụ
Mở Rộng Màn Chắn Lọc theo Pháp Tuyến (Expand Mask by Normals)
Tham Chiếu [Reference]
- Chế Độ [Mode]:
Chế Độ Điêu Khắc (Sculpt Mode)
- Trình Đơn [Menu]:
- Tổ Hợp Phím Tắt [Shortcut]:
Shift-Alt-A
Mở Rộng một Màn Chắn Lọc, following the Độ Cong của Bề Mặt. This Thao Tác uses the giống nhau Nội Bộ Thao Tác as bpy.các thao tác.điêu khắc.mở rộng (bpy.ops.sculpt.expand) meaning toàn bộ the đường cắt ngắn và functionality works the giống như that công cụ.
This operator is especially useful for hard surface sculpting.
Mẹo
If one expansion does not properly fill the entire desired surface, use the operator repeatedly with a different starting point.
Ghi chú
Using any of the Falloff shortcuts 1-4 will replace the curvature falloff of this operator.
Mở Rộng các Mặt Ấn Định theo Cấu Trúc Liên Kết (Expand Face Set by Topology)
Tham Chiếu [Reference]
- Chế Độ [Mode]:
Chế Độ Điêu Khắc (Sculpt Mode)
- Trình Đơn [Menu]:
- Tổ Hợp Phím Tắt [Shortcut]:
Shift-W
Mở Rộng một Mặt Ấn Định từ the Điểm Đỉnh đang Hoạt Động. This Thao Tác uses the giống nhau Nội Bộ Thao Tác as bpy.các thao tác.điêu khắc.mở rộng (bpy.ops.sculpt.expand) meaning toàn bộ the phím nóng và functionality works the giống như that công cụ, với the dốc màu chức năng as the exception.
Cách Dùng [Usage]
- Lưu [Saving Masks]
Expanding Face Sets has all the same use cases as expanding masks. The advantage for this one is that they will be saved for repeated usage. Face sets can be filled any time with a mask, so assigning areas face sets will save you time. (And of course face sets can be used to hide face sets)
- Điểm Tựa cho/đối với Tư Thế Đầu Bút [Pivot Points for Pose Brush]
When using the Pose Brush it is most predictable when using it with Face Sets to define the face set boundaries as pivot point locations. Face Sets can be expanded from a point or from a boundary between hidden face sets to create them quickly. Alternatively Grow/Shrink Face Sets or use the Expand Active Face Set to dynamically grow/shrink them.
- Điêu Khắc Vải Vóc (Cloth Sculpting)
Tools like the Cloth Filter and Cloth Brush work especially well when only simulating small areas at a time. Face Sets can very easily be created with Expand to assign areas of action.
Mở Rộng các Mặt Ấn Định đang Hoạt Động (Expand Active Face Set)
Tham Chiếu [Reference]
- Chế Độ [Mode]:
Chế Độ Điêu Khắc (Sculpt Mode)
- Trình Đơn [Menu]:
- Tổ Hợp Phím Tắt [Shortcut]:
Shift-Alt-W
Mở Rộng một existing Mặt Ấn Định với một Suy Giảm Dần Trắc Địa. This Thao Tác uses the giống nhau Nội Bộ Thao Tác as bpy.các thao tác.điêu khắc.mở rộng (bpy.ops.sculpt.expand) meaning toàn bộ the phím nóng và functionality works the giống như that công cụ.
Ghi chú
Using any of the Falloff shortcuts 1-4 the operator to switch to Expand Face Set by Topology.
Cách Dùng [Usage]
- Đổi Kích Thước Mặt Ấn Định [Resizing Face Sets]
Resize a Face Set along the surface distances. It is an alternative to Grow/Shrink Face Sets which follows the topology instead of geodesic distances.
- Hội Nhập Mặt Ấn Định [Joining Face Sets]
When holding Ctrl the expansion will instead snap to other Face Sets. This is a fast way of joining multiple face sets into one.