UV & Không Gian Chất Liệu (UVs & Texture Space)
Ánh Xạ UV (UV Maps)
Tham Chiếu [Reference]
- Chế Độ [Mode]:
Toàn Bộ các Chế Độ
- Panel (Bảng):
If you have a mesh object selected, you'll find its UV maps in the Data tab of the Properties editor. After selecting a map, you can view and edit it in the UV editor.
One mesh can have multiple UV maps (e.g. one map per texture), although it's also possible to reuse a UV map for multiple textures.
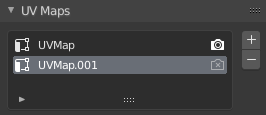
The UV Ánh Xạ bảng trong Dữ Liệu thẻ.
- / Active Render
Marks the UV map as the default one for rendering. The Active Render UV map is used for:
The UV Pass for compositing
The Nút Tọa Độ Chất Liệu (Texture Coordinate Node) for material shading.
The Nút Ánh Xạ UV (UV Map Node) for material shading when no UV map is specified.
- Add UV Map
Số Bản Sao đã chọn UV ánh xạ, hoặc creates một mới cái/số một nếu danh sách được đối tượng trống rỗng.
- Remove UV Map
Xóa đã chọn UV ánh xạ.
Texture Space (Không Gian Chất Liệu)
Tham Chiếu [Reference]
- Chế Độ [Mode]:
Toàn Bộ các Chế Độ
- Panel (Bảng):
This panel lets you configure the object's Texture Space, which is a 3D box used for generating texture coordinates without the use of a UV map. You can visualize the texture space using the option in the Hiển Thị Cổng Nhìn (Viewport Display) panel.
- Khung Lưới của Chất Liệu [Texture Mesh] Các đối tượng khung lưới (Mesh objects)
Sử Dụng Một cái khác/ngoài ra Khung Lưới cho/đối với Chất Liệu Chỉ Số. The Điểm Đỉnh của hai đối tượng nhất định be perfectly Thẳng Hàng hoặc the UV ánh xạ will be biến dạng.
- Tự Động Không Gian Chất Liệu
Calculates the texture space automatically.
- Location X, Y, Z, Size X, Y, Z
Lets you define the texture space manually, relative to the object. Note that you can also edit it in the 3D Viewport -- see Editing below.
- Match Texture Space Curve objects
Điều Chỉnh the "Địa Điểm/Vị Trí" và "Kích Thước" Tới Khớp the Đối Tượng Khung Hộp Viền. This disables Tự Động Không Gian Chất Liệu.
Biên Soạn (Editing)
Tham Chiếu [Reference]
- Chế Độ [Mode]:
Chế Độ Đối Tượng [Object Mode]
- Trình Đơn [Menu]:
Click one of these menu items, then move the mouse to adjust the texture space and press LMB to confirm. While transforming, you can use keyboard shortcuts to lock certain axes; see the status bar.
Truy Cập (Accessing)
When setting up a material shader, you can use the Generated output of the Nút Tọa Độ Chất Liệu (Texture Coordinate Node) to read the 3D coordinate inside the object's texture space. You can then pass this coordinate to a texture node.
Mẹo
Texture spaces do not have rotation support. You can use a Nút Ánh Xạ (Mapping Node) to manually rotate the coordinate in the material shader instead.