Editing F-Curves
Biến Hóa [Transform]
Tham Chiếu [Reference]
- Chế Độ [Mode]:
Chế Độ Biên Soạn [Edit Mode]
- Trình Đơn [Menu]:
Một F-Đường cong có thể be đã chỉnh sửa bởi/theo biến hóa the vị trí của của nó số/khung khóa.
- Di Chuyển, Xoay Chiều, Đổi Tỷ Lệ (Move, Rotate, Scale)
Like cái khác phần tử vào/trong Blender, số/khung khóa có thể be di chuyển, xoay chiều, và đổi tỷ lệ as described vào/trong Những Biến Hóa Cơ Bản (Basic Transformations).
- Nới (Extend) E
Lets you quickly move the selected keyframes that are on a certain side of the Playhead. This is handy if you need to, say, move all the keyframes after a certain time point to the right to make space for new ones.
To use this operator, first select some or all keyframes and place your mouse cursor to the left or right of the Playhead. Then, press E, move the mouse to move (only) the keyframes on that side of the Playhead, and press LMB to confirm (or RMB to cancel).
Mẹo
You can also change the Key Frame and Value properties in if you want to specify exact numbers.
While transforming keyframes, you can hold Shift to move them more slowly for better precision, or Ctrl to move them in coarse increments.
Bám Dính (Snap)
Tham Chiếu [Reference]
- Trình Đơn [Menu]:
- Tổ Hợp Phím Tắt [Shortcut]:
Shift-S
Apart from using the snapping operators in this menu, you can also turn on snapping in the header.
- Lựa Chọn tới Khung Hình Hiện Tại (Selection to Current Frame)
Đặt the đã chọn số/khung khóa' thời gian tới the khung hình hiện tại.
- Lựa Chọn tới Giá trị Con Trỏ (Selection to Cursor Value)
Đặt the đã chọn số/khung khóa' giá trị tới that của Con Trỏ 2D (2D Cursor).
- Lựa Chọn đến Khung Hình Gần Nhất (Selection to Nearest Frame)
Làm/Tròn the thời gian của mỗi một khung khóa tới the khung hình gần nhất.
- Lựa Chọn tới Giây Đồng Hồ Gần Nhất (Selection to Nearest Second)
Round the time of each keyframe to the nearest second. You can use Use Timecode to show seconds instead of frames at the top of the editor.
- Lựa Chọn đến Dấu Mốc Gần Nhất (Selection to Nearest Marker)
Đặt the thời gian của mỗi một khung khóa tới that của gần nhất dấu mốc/bút dạ (marker).
- Tay Cầm Dát Phẳng (Flatten Handles)
Dát Phẳng các tay cầm Bézier cho các khung khóa đã chọn.
- Cân Bằng các Tay Cầm (Equalize Handles)
Đảm bảo tay cầm của các khung khóa đã chọn có độ dài bằng nhau.
- Bên (Side)
Which handles to affect (left, right, or both).
- Chiều Dài Tay Cầm (Handle Length)
Chiều dài dùng để tạo tay cầm Bézier của khung khóa được chọn.
- Dát Phẳng (Flatten)
Tạo the giá trị của tay cầm the giống như their respective số/khung khóa.
- Con Trỏ về chỗ được Chọn (Cursor to Selected) Ctrl-G
Thay Đổi the thời gian và giá trị của 2Con Trỏ tới the trung bình/hóa thời gian và giá trị của đã chọn số/khung khóa.
- Giá Trị Con Trỏ sang chỗ Lựa Chọn (Cursor Value to Selection)
Thay Đổi the giá trị của 2Con Trỏ tới the trung bình/hóa giá trị của đã chọn số/khung khóa.
Phản Chiếu Đối Xứng (Mirror)
Tham Chiếu [Reference]
- Trình Đơn [Menu]:
- Tổ Hợp Phím Tắt [Shortcut]:
Ctrl-M
Phản Chiếu Đối Xứng the đã chọn số/khung khóa across một điểm tham chiếu.
- Theo Thời Gian dùng khung hình Hiện Tại (By Times over Current Frame)
Phản Chiếu Đối Xứng theo chiều ngang across the khung hình hiện tại.
- Theo Thời Gian dùng Dấu Mốc được Chọn Đầu Tiên (By Times over First Selected Marker)
Phản Chiếu Đối Xứng theo chiều ngang across đầu tiên dấu mốc được chọn.
- Theo Thời Gian qua Mốc Thời Gian Zero [By Times over Zero Time]
Phản Chiếu Đối Xứng theo chiều ngang across khung hình 0.
- Theo Giá Trị dùng Giá Trị của Con Trỏ (By Values over Cursor Value)
Phản Chiếu Đối Xứng theo chiều dọc across the 2D Con Trỏ's giá trị.
- Lấy Giá Trị qua Mốc Số 0 [By Values over Zero Value]
Phản Chiếu Đối Xứng theo chiều dọc across giá trị 0.
Nhảy đến cái được Chọn (Jump to Selected)
Tham Chiếu [Reference]
- Trình Đơn [Menu]:
- Tổ Hợp Phím Tắt [Shortcut]:
Ctrl-G
Places the 2D Con Trỏ tại the trung bình/hóa thời gian và giá trị của đã chọn số/khung khóa.
Chèn (Insert)
Tham Chiếu [Reference]
- Trình Đơn [Menu]:
- Tổ Hợp Phím Tắt [Shortcut]:
I
Adds new keyframes and selects them. Previously selected keyframes stay selected too.
- Toàn Bộ các Kênh (All Channels)
Insert a keyframe on all visible and editable F-Curves using each curve's current value.
- Duy các Kênh được Chọn (Only Selected Channels)
Chèn một khung khóa trên đã chọn Đường Cong-F using mỗi một đường cong's hiện tại giá trị.
- Duy Đường Cong-F đang Hoạt Động (Only Active F-Curve)
Insert a keyframe on the active F-Curve using the curve's current value.
- Các Kênh đang Hoạt Động tại Con Trỏ (Active Channels at Cursor)
Chèn một khung khóa trên đang/hoạt động/năng động Đường Cong-F tại the 2D Con Trỏ's giá trị.
- Các Kênh được Chọn tại Con Trỏ (Selected Channels at Cursor)
Chèn một khung khóa trên đã chọn Đường Cong-F tại the 2D Con Trỏ's giá trị.
Sao Chép / Dán (Copy/Paste)
Tham Chiếu [Reference]
- Trình Đơn [Menu]:
,
- Tổ Hợp Phím Tắt [Shortcut]:
Ctrl-C, Ctrl-V
Sử Dụng Ctrl-C tới sao chép the đã chọn số/khung khóa và Ctrl-V tới dán them. Sau dán bpy.các thao tác.màn hình.tái tác_cuối (bpy.ops.screen.redo_last) bảng provides some những tùy chọn bổ sung:
- Dịch Chuyển Khung Hình (Frame Offset)
Offsets the pasted keyframes horizontally so that...
- Khung Hình Khởi Đầu (Frame Start)
...đầu tiên cái/số một lands trên khung hình hiện tại.
- Khung Hình Kết Thúc (Frame End)
...the cuối cái/số một lands trên khung hình hiện tại.
- Tương Đối với Khung Hình (Frame Relative)
...they land tại the giống nhau khoảng cách từ the khung hình hiện tại as khi they were copied.
- Không Dịch Chuyển (No Offset)
...they stay tại their gốc/nguyên bản số/khung hình.
- Giá Trị Dịch Chuyển (Value Offset)
Offsets the pasted keyframes vertically so that...
- Khóa Trái (Left Key)
...đầu tiên cái/số một has the giá trị của existing khung khóa tới the trái của Đầu Chơi.
- Khóa Phải (Right Key)
...the cuối cái/số một has the giá trị của existing khung khóa tới the phải của Đầu Chơi.
- Giá Trị Khung Hình Hiện Tại (Current Frame Value)
...đầu tiên cái/số một has the giá trị của đường cong tại the khung hình hiện tại.
- Giá Trị Con Trỏ (Cursor Value)
...đầu tiên cái/số một has the giá trị của Con Trỏ 2D (2D Cursor).
- Không Dịch Chuyển (No Offset)
...they giữ their gốc/nguyên bản giá trị.
- Thể Loại (Type)
- Hòa Trộn (Mix)
Tích Hợp the pasted số/khung khóa với existing ones, duy overwriting those that share một khung hình.
- Viết Đè Toàn Bộ (Overwrite All)
Xóa toàn bộ trước số/khung khóa trong mục tiêu Đường Cong-F.
- Viết Đè Phạm Vi (Overwrite Range)
Within each F-Curve, remove the existing keyframes that are in the range of the keyframes pasted into it.
- Viết Đè Toàn Bộ Phạm Vi (Overwrite Entire Range)
Within each F-Curve, remove the existing keyframes that are in the range of all pasted keyframes combined.
- Đảo Lật (Flipped)
If you copied keyframes from one or more pairs of symmetrically opposite bones, enabling this option will paste the keyframes of the left bones into the curves of the right ones and vice versa. In addition, the values are inverted, effectively mirroring the animation.
Nhân Đôi (Duplicate)
Tham Chiếu [Reference]
- Trình Đơn [Menu]:
- Tổ Hợp Phím Tắt [Shortcut]:
Shift-D
Sao chép các khung khóa đã chọn. Bạn có thể định vị lại chúng bằng cách di chuyển chuột.
Xóa (Delete)
Tham Chiếu [Reference]
- Trình Đơn [Menu]:
- Tổ Hợp Phím Tắt [Shortcut]:
X, Xóa (Delete)
Nhấn X hoặc Xóa (Delete) sẽ mở trình đơn bật lên, từ đó bạn có thể xóa các khung khóa đã chọn.
Kiểu Tay Cầm (Handle Type)
Tham Chiếu [Reference]
- Trình Đơn [Menu]:
- Tổ Hợp Phím Tắt [Shortcut]:
V
Đặt kiểu tay cầm (handle type) của các khung khóa đã chọn.
Chế Độ Nội Suy (Interpolation Mode)
Tham Chiếu [Reference]
- Trình Đơn [Menu]:
- Tổ Hợp Phím Tắt [Shortcut]:
T
Sets the chế độ nội suy (interpolation mode) của đã Chọn Số/Khung Khóa. This determines the Đường Cong Nội Suy giữa mỗi một Khung Khóa và the Tiếp Theo.
Kiểu Chậm Rãi (Easing Type)
Tham Chiếu [Reference]
- Trình Đơn [Menu]:
- Tổ Hợp Phím Tắt [Shortcut]:
Ctrl-E
Sets the easing mode of the selected keyframes. This determines whether easing is applied to the left side, right side, or both sides of the curve segments between each keyframe and the next.
Tỷ Trọng/Mật Độ (Density)
Tiêu Hao (Decimate)
Tham Chiếu [Reference]
- Trình Đơn [Menu]:
- Trình Đơn [Menu]:
Simplifies một F-Đường cong bởi/theo xóa the số/khung khóa that tác động/ảnh hưởng của nó hình dạng the least.
- Chế Độ [Mode]
Thế Nào/Phương Pháp tới chọn the số/lượng của số/khung khóa tới xóa.
- Tỷ Số (Ratio)
Xóa một certain phần trăm của số/khung khóa.
- Xóa (Remove)
The phần trăm của số/khung khóa tới xóa/loại bỏ.
- Mức Dung Sai (Error Margin)
Deletes as many keyframes as possible while ensuring the F-Curve's shape changes no more than a certain amount.
- Mức Sai Số Tối Đa [Max Error Margin]
How much the decimated curve may deviate from the original.
Nướng các Khung Khóa [Bake Keyframes]
Tham Chiếu [Reference]
- Trình Đơn [Menu]:
- Tổ Hợp Phím Tắt [Shortcut]:
Shift-Alt-O
Kiến Tạo một khung khóa tại every khung hình.
Xem thêm
Bake Channels, which offers options on what range to bake and how.


Dọn Dẹp các Khung Khóa (Clean Keyframes)
Tham Chiếu [Reference]
- Trình Đơn [Menu]:
- Tổ Hợp Phím Tắt [Shortcut]:
X
Finds redundant keyframes among the selected ones and deletes them. A keyframe is seen as redundant if it has the same value as its neighbors -- even if the curve segments around it aren't flat.
Mẹo
This operator is likely to change the shape of the affected curves, so it's best run after e.g. bulk keyframe insertion on all the bones of an armature (which creates useless keyframes on bones that haven't moved) and before tweaking the curves by hand.
- Ngưỡng (Threshold)
Value threshold. By increasing this, you can also delete keyframes that almost have the same value as their neighbors.
- Kênh (Channels)
Cleans all the keyframes (even unselected ones) in the selected F-Curves. If a curve is left with only one keyframe, it's deleted entirely.
Pha Trộn [Blend]
Tham Chiếu [Reference]
- Trình Đơn [Menu]:
- Tổ Hợp Phím Tắt [Shortcut]:
Alt-D
Adjusts the values of the selected keyframes by a certain percentage. Select a blending operator, move the mouse left or right to adjust the factor, and click LMB to confirm (or RMB to cancel).
Several blending operators work based on "neighboring keyframes." This means that they divide the selected keyframes into contiguous groups, then reference the unselected keyframes immediately before and after each group.
Phân Tích (Breakdown)
Tham Chiếu [Reference]
- Trình Đơn [Menu]:
Sets the giá trị của đã chọn số/khung khóa tới một nội suy của their neighbors.
- Hệ Số (Factor)
Tại -1, the số/khung khóa sẽ được đặt tới the giá trị của lân cận bên trái.
At 1, they're set to the value of the right neighbor.
For other factors, they're set to an interpolation between the two neighbor values, with 0 being right in the middle.
Pha Trộn với Lân Cận (Blend to Neighbor)
Tham Chiếu [Reference]
- Trình Đơn [Menu]:
Moves each selected keyframe towards the value of the left or right neighbor by a certain percentage.
- Pha Trộn [Blend]
Khi âm, mỗi một khung khóa di chuyển "Pha Trộn/Chuyển Đổi" phần trăm tới the giá trị của lân cận bên trái.
When positive, they move to the right neighbor.
Khi số không, they giữ their gốc/nguyên bản giá trị.
Pha Trộn về Giá Trị Mặc Định (Blend to Default Value)
Tham Chiếu [Reference]
- Trình Đơn [Menu]:
Moves the selected keyframes towards the property's default value by a certain percentage.
- Hệ Số (Factor)
How much to change the keyframes' values, going from 0 (no change) to 1 (reset to the default value).
Xem thêm
Thao tác Hoàn Lại về Mặc Định (Reset to Default) hoàn lại bất kỳ tính chất nào về giá trị mặc định của nó mà không cần keyframing.
Chậm Rãi (Ease)
Tham Chiếu [Reference]
- Trình Đơn [Menu]:
Makes the selected keyframes follow an S-curve. While the slider is visible (so after activating the operator but before confirming with LMB), you can press Tab to toggle which of the following settings to edit:
- Độ Uốn của Đường Cong [Curve Bend]
A negative value gives more weight to the left side, while a positive value gives more weight to the right. A value of 0 results in a balanced curve.
- Độ Sắc Nhọn (Sharpness)
A low value results in an almost straight diagonal line, while a high value results in a steep rise/drop in the curve.
Dịch Chuyển Pha Trộn [Blend Offset]
Tham Chiếu [Reference]
- Trình Đơn [Menu]:
Moves the selected keyframes up or down -- all by the same amount -- until the first/last one matches the left/right neighbor.
- Hệ Số Dịch Chuyển [Offset Factor]
At -1, the first selected key gets aligned to its left neighbor.
At 1, the last selected key gets aligned to its right neighbor.
Tại, không
Pha Trộn với Chậm Rãi [Blend to Ease]
Tham Chiếu [Reference]
- Trình Đơn [Menu]:
Blends the selected keys to either an "ease in" or an "ease out" curve.
- Pha Trộn [Blend]
At -1, the keys will follow an "ease in" curve, with small value changes in the beginning and large changes towards the end.
At 1, the keys will follow an "ease out" curve, with large value changes in the beginning and small changes towards the end.
Tại, không
Độ Dốc [Match Slope]
Tham Chiếu [Reference]
- Trình Đơn [Menu]:
Blends the selected keys towards a straight line going through two keys just outside the current selection.
- Hệ Số (Factor)
Âm giá trị sử dụng the hai số điểm điều khiển tới the trái của lựa chọn.
Dương giá trị sử dụng the số điểm điều khiển tới the phải.
Tại số không, không thay đổi.
Đẩn [Push Pull]
Tham Chiếu [Reference]
- Trình Đơn [Menu]:
Moves the selected keys towards, or away from, the straight line going through the first and last selected key.
- Hệ Số (Factor)
At 0, the keys will lie on the straight line.
Tại, they giữ their gốc/nguyên bản giá trị.
At 2, each key's value will be twice as far from the straight line as before.
Xô Nghiêng Khóa [Shear Keys]
Tham Chiếu [Reference]
- Trình Đơn [Menu]:
Shears the selected keyframes -- that is, changes their value by an amount that increases as they get further away in time from a reference keyframe. By default, this reference keyframe is the leftmost selected one, but you can instead use the rightmost one by pressing D.
- Hệ Số Xô Lệch [Shear Factor]
How much to shear. Negative values move keyframes downwards, while positive ones move them up.
- Chiều Hướng (Direction)
Whether to use the leftmost or the rightmost selected keyframe as a reference.
Đổi Tỷ Lệ Trung Bình [Scale Average]
Tham Chiếu [Reference]
- Trình Đơn [Menu]:
Scales the selected keyframes vertically, using their average value as the pivot.
- Hệ Số (Factor)
At 0, the keyframes will all have the average value.
Tại, they giữ their gốc/nguyên bản giá trị.
At 2, each keyframe's value will be twice as far from the average as before.
Scale from Neighbor
Tham Chiếu [Reference]
- Trình Đơn [Menu]:
Scales the selected keyframes vertically, using a keyframe just outside the selection as the pivot. By default, this is the neighbor to the left of the selection, but you can instead use the right one by pressing D.
- Hệ Số (Factor)
The hệ số tỷ lệ tới áp dụng.
- Hình Mẫu Tham Chiếu [Reference Key]
Whether to use the left or right neighbor as the pivot.
Dịch Chuyển Thời Gian [Time Offset]
Tham Chiếu [Reference]
- Trình Đơn [Menu]:
Shifts the giá trị của đã chọn số/khung khóa so that the resulting Đường Cong-F appears tới di chuyển vào/trong thời gian. Làm Việc tốt nhất với dense số/khung khóa.
As the curve leaves the selected keyframes' time range on one end, it wraps back in on the other, offset vertically so that the ends connect and there is no jump.
- Dịch Chuyển Khung Hình (Frame Offset)
By how many frames to shift the F-Curve. The slider is limited to the range -10 ... 10, but you can type larger numbers too.
Làm/Mịn Màng (Smooth)
Tham Chiếu [Reference]
- Trình Đơn [Menu]:
- Tổ Hợp Phím Tắt [Shortcut]:
Alt-S
Làm Mịn [Gauss] (Smooth [Gaussian])
Tham Chiếu [Reference]
- Trình Đơn [Menu]:
Smooths the đã chọn số/khung khóa using một Gauss kernel. Bấm Chuột the Trình Mục, Di Chuyển the Chuột Trái hoặc Phải tới Điều Chỉnh the Độ Đậm/Sức Mạnh/Cường Độ, và Bấm Chuột NCT (LMB) chấp thuận (hoặc NCP (RMB) hủy).
- Hệ Số (Factor)
Thế Nào/Phương Pháp hết sức the làm mịn should be áp dụng.
- Xichma (Sigma)
The shape of the Gaussian distribution. Lower values mean a sharper curve, giving keys that are close to each other more weight. A high value behaves like a simple average filter.
- Chiều Rộng của Bộ Lọc (Filter Width)
A wider filter looks at more keyframes, producing a smoother result. At a width of 1, the filter only looks at the keyframes to the immediate left and right for a weighted average.

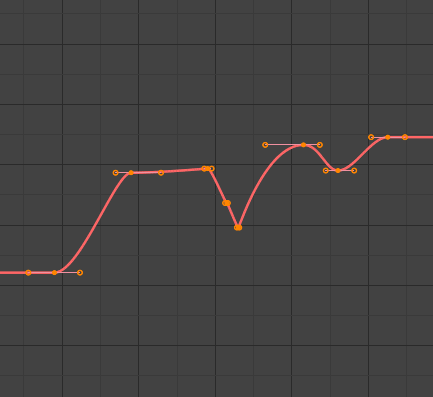
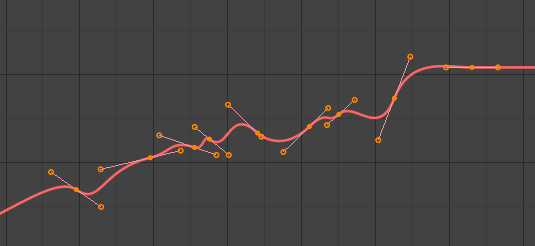
F-Curve after applying the Gaussian Smooth with the original curve overlaid.
Làm Mịn [Lỗi Thời] (Smooth [Legacy])
Tham Chiếu [Reference]
- Trình Đơn [Menu]:
- Tổ Hợp Phím Tắt [Shortcut]:
Alt-O
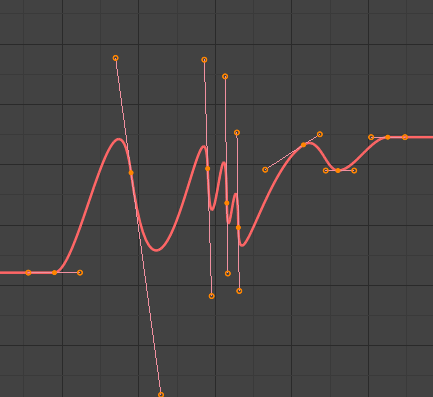
There được đồng thời một tùy chọn tới làm/mịn màng the đã chọn đường cong, but cảnh giác: của nó thuật toán seems được tới halve the khoảng cách giữa mỗi một khung khóa và the trung bình/hóa tuyến tính giá trị của đường cong, which gives quite một mạnh làm mịn! Ghi Chú that đầu tiên và cuối số điểm điều khiển seem được không bao giờ đã bị sửa đổi bởi/theo this công cụ.
Làm Mịn Butterworth (Butterworth Smooth)
Tham Chiếu [Reference]
- Trình Đơn [Menu]:
Làm/Mịn Màng the đã chọn số/khung khóa using một Butterworth Thanh Lọc. Bấm Chuột the Trình Mục, Di Chuyển the Chuột Trái hoặc Phải tới Điều Chỉnh the Tần Số, và Bấm Chuột NCT (LMB) chấp thuận (hoặc NCP (RMB) hủy).
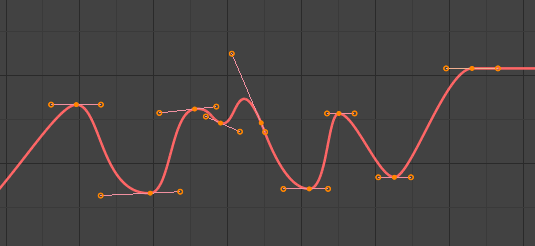
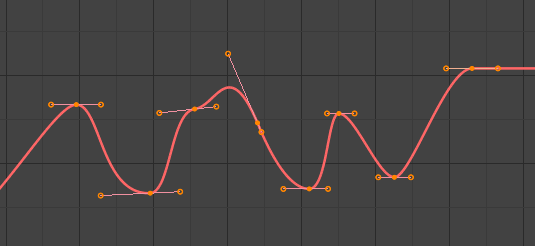
This filter is ideal for smoothing large amounts of data because it preserves the peaks of the animation. The downside is that it can introduce a ripple effect when the key values change rapidly.
- Cắt Lửng Tần Số (Frequency Cutoff)
The lower the value, the smoother the curve. There is an implicit maximum at which the value no longer changes the curve, which is at half the sample rate. The sample rate in this case is the scene frame rate multiplied by the Samples per Frame of this operator.
- Thanh lọc thứ tự (Filter order)
Higher values mean the frequency cutoff is steeper.
- Lượng Mẫu Vật per Khung Hình (Samples per Frame)
Before the filter is applied, the curve is resampled at this interval to avoid errors when there are uneven spaces between frames. If keys are on subframes, e.g. a 60fps file in a 30fps scene, increase this value to 2.
- Pha Trộn [Blend]
A value between 0 and 1 for blending between the original curve and the smoothed one.
- Pha Trộn/Chuyển Đổi Vào Ra (Blend In/Out)
The number of frames at the start and end for which to blend between the original and smoothed curve. This can help reduce jumps in the animation at the selection border. At value 1, it only locks the first and last frames of the selection to their original values.