Bevel (Bo Tròn)
Tham Chiếu [Reference]
- Chế Độ [Mode]:
Chế Độ Biên Soạn [Edit Mode]
- Trình Đơn [Menu]:
,
- Tổ Hợp Phím Tắt [Shortcut]:
Shift-Ctrl-B (Bevel Vertices), Ctrl-B (Bevel Edges)
The Bevel tool smooths out corners and edges. This helps make objects look more realistic -- after all, nothing in real life is infinitely sharp.

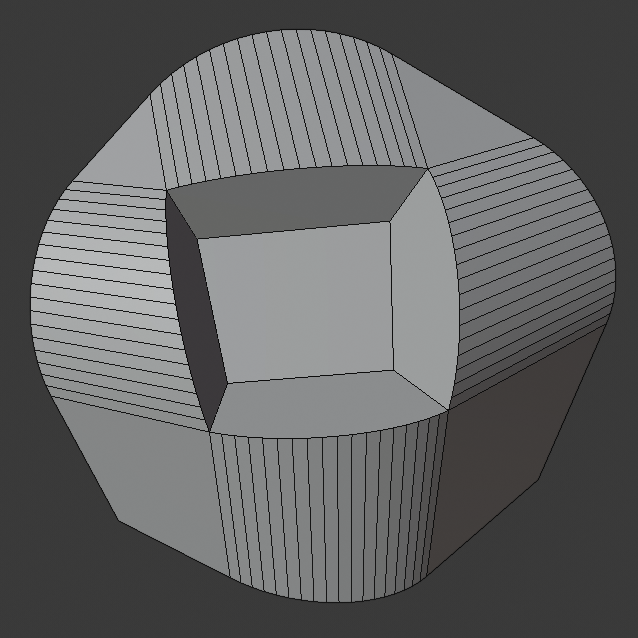
Cubes without and with bevel.
Xem thêm
The Bộ Điều Chỉnh Bo Tròn (Bevel Modifier) does this non-destructively.
Cách Dùng [Usage]
Select one or more vertices, edges, or faces, then press either Ctrl-B to smooth both edges and corners or Shift-Ctrl-B to smooth only corners. Move the mouse to increase the bevel radius and roll the Wheel to set the density of the new geometry. Finally, press LMB/Return to confirm or RMB/Esc to cancel.

Các Tùy Chọn (Options)
While the tool is active, the current settings are shown at the top of the 3D Viewport. Use the keyboard shortcuts (also shown in the status bar) to select a setting, then move the mouse or type a number to change it. When moving the mouse, hold Shift to change the value more slowly for better precision, or Ctrl to snap to coarse increments.
After confirming with LMB, the settings can still be changed in the Điều Chỉnh Thao Tác Trước Đây (Adjust Last Operation) panel.
- Tác Động (Affect) V
- Vertices (Điểm Đỉnh)
Bevel the selected vertices, leaving the edges unchanged.
- Cạnh (Edges)
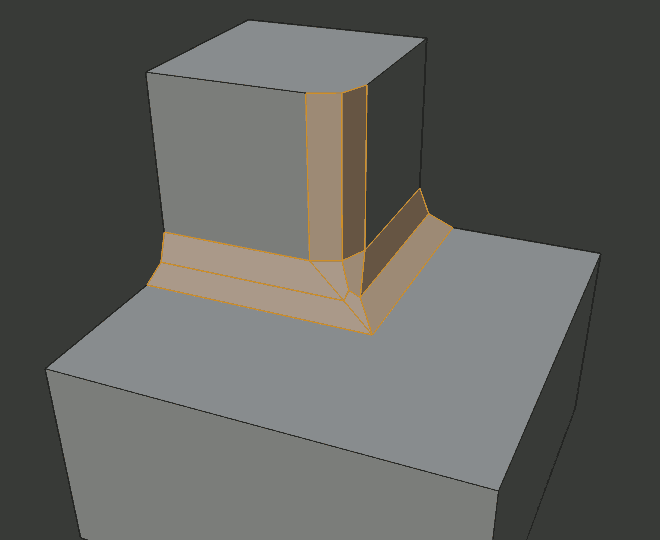
Bevel the selected edges, as well as the vertices where three or more edges meet.
- Loại Chiều Rộng (Width Type) M
The meaning of the Width setting. In the examples below, the Width is set to 50% for the "Percent" Width Type and to 1.0 for the other types.
- Chiều Rộng (Width) A
The size/radius of the bevel. The precise meaning depends on the Width Type.
Ghi chú
When multiple edges are beveled at the same time, it is sometimes impossible to make the width match the above definition on all edges simultaneously. Bevel tries to compromise in such cases. Sometimes turning off Loop Slide (see below) can make it easier for Bevel to make the widths as specified.
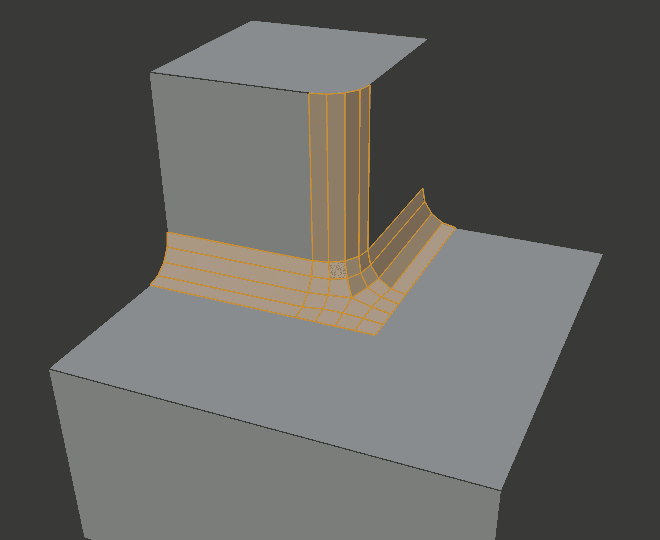
- Số Phân Đoạn (Segments) S
The density of the new geometry. Higher values will give a smoother result.
While the tool is active, this setting can be changed with Wheel even if it is not selected.
- Profile Shape P
A number between 0 and 1 that controls the shape of the profile (side view of each beveled edge).

If Miter Outer or Miter Inner is set to Arc, this also controls the shape of the miters.
- Chỉ Số Nguyên Vật Liệu (Material Index)
The 0-based index of the material slot to assign to the newly created faces. If set to -1, the new faces inherit the materials of their neighbors.
- Cương Pháp Tuyến (Harden Normals) H
When enabled, assigns custom split normals to the newly created faces to make them appear smoothly shaded without affecting the rest of the mesh.
- Chống Đè Gối Lên Nhau (Clamp Overlap) C
Prevents beveled edges from overshooting past the end of their neighboring faces.
- Trượt Đẩy theo Mạch Lưới (Loop Slide)
Whether the new inner edges should be perpendicular to the beveled edge or match the direction of the existing inner edges.
- Đánh Dấu (Mark)
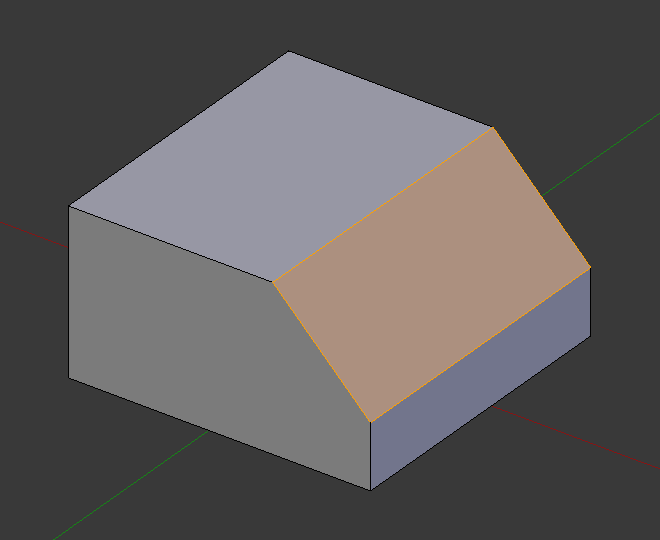
- Góc Cắt Bên Ngoài (Miter Outer) O
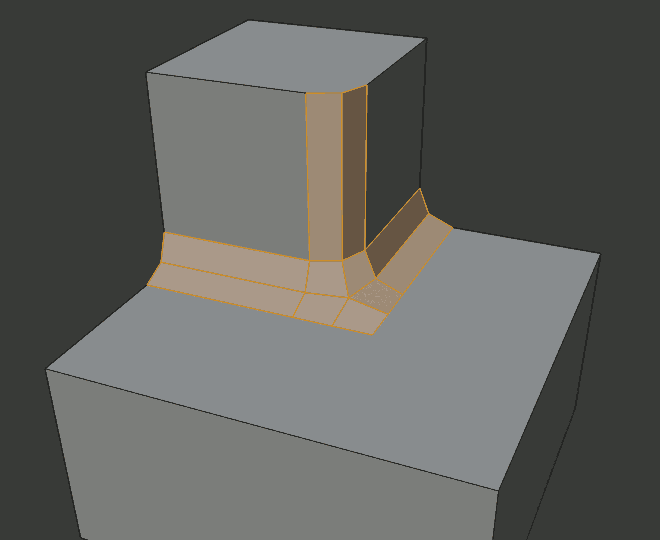
When beveling three or more edges connected to the same vertex, and two of those edges form a corner of more than 180° on the side where there are faces, the Outer Miter determines if any extra geometry is created in that corner to avoid pinching.
- (Miter) Inner I
When beveling two or more edges connected to the same vertex, and there are edges that form a corner of less than 180° on the side where there are faces, the Inner Miter determines if any extra geometry is created in those corners.
- Mức Lan Tỏa (Spread)
The size of the Inner Miter when set to Arc. This also affects the Outer Miter.
- Kiểu Giao Cắt (Intersection Type) N
The type of geometry to generate at points where three or more beveled edges meet.
- Lấp Kín Khung Lưới Đồ Thị (Grid Fill):
Fill the space between the edges with geometry that smoothly connects them.
- Ngắt/Cắt Lửng (Cutoff):
Cap off each edge with a flat face.
- Cường Độ Mặt (Face Strength)
Whether to apply a Face Strength to the faces involved in the bevel. This can be used in conjunction with a Weight Normals Modifier (with the Face Influence option checked).
- None [Không]:
Không đặt cường độ mặt.
- Mới (New):
Đặt cường độ mặt của các mặt mới dọc theo các cạnh thành "Trung Bình" và cường độ mặt của các mặt mới tại các điểm đỉnh thành "Yếu".
- Bị Ảnh Hưởng (Affected):
Ngoài những thiết lập cho trường hợp "Mới", đồng thời, cũng đặt các mặt liền kề với các mặt mới có cường độ là "Mạnh".
- Toàn Bộ (All):
Ngoài những thiết lập cho tùy chọn "Bị Ảnh Hưởng" ra, đồng thời đặt toàn bộ các mặt còn lại của mô hình có cường độ là "Mạnh" nữa.
- Thể Loại Mặt Cắt (Profile Type) Z
Determines the flow of the edges that are generated along each beveled edge.
- Siêu Êlíp (Superellipse)
Use an auto-generated profile based on the Profile Shape setting.
- Tùy Chỉnh (Custom)
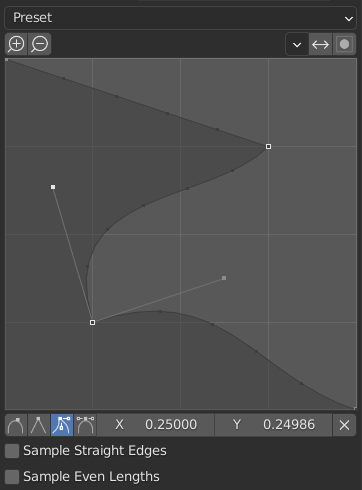
Thành tố điều khiển mặt cắt tùy chỉnh.
Use a custom profile as defined in the Thành Tố Điều Khiển Đường Cong (Curve Widget) in the Adjust Last Operation panel. The curve is a side view of a bevel between two faces that meet at a right angle; the darkened area represents the inside of the mesh.
- Sắp Đặt Sẵn (Presets)
The Support Loops and Steps presets are built dynamically depending on the number of bevel Segments. If the number of segments is changed, the preset will have to be re-applied.
- Sample Straight Edges
Whether to sample the profile in the middle of perfectly straight curve segments (lines between two control points with the Vector handle type). This is disabled by default, as it's normally enough to sample the profile at the control points themselves.
- Sample Even Lengths
By default, each profile segment (piece between two control points) receives the same number of sample points. By enabling this option, the sample points are instead distributed evenly along the whole length of the profile.