Animation Editors
Blender provides a set of editors designed for creating, editing, and refining animation. These editors let you work with keyframes, curves, non-linear actions, drivers, video sequencing, and motion tracking as part of the animation pipeline.
Each editor serves a different purpose:
The Dope Sheet organizes and manipulates keyframes across multiple objects and data-blocks.
The Graph Editor provides fine control over F-Curves to refine motion and interpolation.
The Nonlinear Animation (NLA) Editor arranges and layers animation actions for complex sequencing.
The Drivers Editor links properties with expressions for procedural animation.
The Movie Clip Editor supports motion tracking, mask editing, and stabilization, which can be integrated into animation and compositing workflows.
The Video Sequence Editor (VSE) combines rendered animations, image sequences, audio, and effects into a final movie edit.
Together, these editors form the backbone of Blender's animation system -- from quick keyframe adjustments to advanced rigging, motion editing, visual effects integration, and final shot assembly.
This page describes features that are shared across the different animation focused editors.
Đầu Chơi (Playhead)
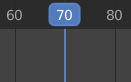
Đầu Chơi.
The "Đầu Chơi" được the lam chiều dọc đường nét/thẳng showing the khung hình hiện tại số/lượng.
It can be moved to a new position by clicking or dragging LMB in the scrubbing area at the top or by click and drag Shift-RMB anywhere in the timeline.
While dragging it can snap to elements of the editor in which it is dragged. - Seconds - Frames - Markers - Strips - Keys
It is only possible to snap to elements that are visible in the editor in which the playhead is dragged. For example having "Strips" enabled but dragging in the Graph Editor will do nothing. Snapping can be toggled during scrubbing by holding down Ctrl.
Snapping to seconds or frames can have a custom increment for example snapping to every third frame. This is always relative to the first frame of the scene and ignores the preview range. In contrast to the other snapping options, seconds and frames will always snap to the closest position, regardless of the snap distance set. When mixing options, the system will first try to snap to elements that are snapped by distance. Only if no element is close enough will it snap to seconds or frames.
You can also move it in single-frame increments by pressing Left or Right or Alt-Wheel. To jump to the beginning or end frame (of the ends of the preview range if that is active) press Shift-Left or Shift-Right.
Bám Dính (Snapping)
Tham Chiếu [Reference]
- Trình Đơn [Menu]:
Playhead snapping helps you position the playhead precisely when scrubbing the timeline by snapping it to specific elements like frames, markers, or keyframes.
- Use Snapping
Enables or disables snapping behavior when moving the playhead.
- Snap Distance
The maximum distance (in pixels) the playhead can be from a target before snapping to it.
- Mục Tiêu Bám Dính (Snap Target)
Specifies which elements the playhead can snap to:
- Số/Khung Hình (Frames):
Snap to frame intervals.
- Số Giây Đồng Hồ (Seconds):
Snap to second intervals.
- Các Dấu Mốc (Markers):
Snap to timeline markers.
- Các/Số/Khung Khóa (Keyframes):
Snap to animation keyframes.
- Dải Phim (Strips):
Snap to the start and end points of strips (e.g. in the Video Sequencer).
- Frame Step Frames
The interval in frames between each snap point when using the Frames target.
- Second Step Seconds
The interval in seconds between each snap point when using the Seconds target.
Playback Controls
The Playback Controls region of the animation editors (such as the Timeline, Dope Sheet, Graph Editor, and NLA Editor) contains controls and options related to playback, keying, auto keyframing, and transport.
These settings allow you to:
Control how animations are previewed and synchronized with audio.
Insert and manage keyframes through keying sets and auto keying.
Navigate the timeline using playback and transport controls.
Adjust frame ranges and preview specific segments of the animation.
The footer is shared across animation editors to provide a consistent workflow for animators, whether they are editing keyframes, adjusting curves, or sequencing actions.

Chơi Lại (Playback)
Properties for how animations are played.
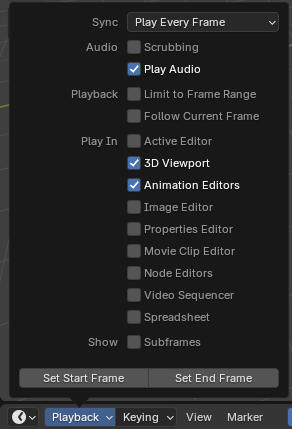
- Đồng Bộ Hóa (Sync)
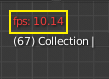
Cổng Nhìn 3D: đỏ, tốc độ Khung Hình/Giây.
If animation playback can't keep up with the desired Frame Rate, the actual frame rate (shown in the top left corner of the 3D Viewport) will turn red, and the Sync option determines how the situation should be handled.
- Chơi Mọi Khung Hình (Play Every Frame):
Play every frame, even if this results in the animation playing slower than intended.
- Nhảy Cách Khung Hình (Frame Dropping):
Giảm số khung hình nếu quá trình chơi lại trở nên chậm hơn tốc độ khung hình của cảnh.
- Đồng Bộ Hóa với Âm Thanh (Sync to Audio):
Giảm số khung hình nếu quá trình chơi lại quá chậm để vẫn được đồng bộ hóa với âm thanh.
- Audio -- Scrubbing
Play bits of the sound in the animation (if there is any) while you drag the Playhead around.
- Audio -- Play Audio
Uncheck to mute all sound.
- Playback -- Limit to Frame Range
Đừng/chớ/không nên cho phép di chuyển the Đầu Chơi bên ngoài của Phạm Vi Khung Hình using the chuột.
- Playback -- Allow Preroll
Allows playback to continue before the Start Frame.
This is useful when starting playback from outside the scene frame range, such as when scrubbing earlier frames or previewing motion that leads into the defined frame range.
This option is disabled when Limit to Frame Range is enabled.
- Playback -- Follow Current Frame
Automatically pan the view to catch up when the Playhead goes off screen.
- Tuần Hoàn (Loop)
Defines what happens when playback reaches the last frame.
- Infinite:
After the last frame, playback jumps back to the first frame and continues playing indefinitely.
- Stop at End Frame:
Playback stops when the last frame is reached.
- Stop at Start Frame:
After reaching the last frame, playback jumps to the first frame and stops.
- Restore Frame:
After reaching the last frame, playback stops at the frame where playback originally started.
- Bật Nẩy (Bounce):
When the last frame is reached, playback reverses direction.
- Chơi Trong (Play In)
Which editors to update on each animation frame. If an editor is unchecked, it'll only be updated once playback stops (with some exceptions where it'll update on each frame anyway). When starting playback in either the Graph Editor, Dope Sheet or the NLA Editor, all editors will play back regardless of the settings. This is a feature requested by animators to easily play back all views.
- Show -- Subframes
Display and allow setting fractional frame values for the current frame.
- Show -- Scrubbing Region Video Sequencer
Show a dedicated region above the timeline for scrubbing through the entire playback range without changing the current timeline zoom level.
Like other editor regions, the Scrubbing Region can be hidden by dragging its boundary toward the edge of the editor.
- Đặt Khung Hình Đầu/Cuối [Set Start/End Frame]
Set the scene's start/end frame to the current frame. If the Preview Range is active (see Frame Controls), that one is changed instead.
Keying
Cửa sổ bật lên "Khóa Hóa" chứa các tùy chọn ảnh hưởng đến việc chèn thêm khung khóa.
Ghi chú
The name of this popover will change depending on the active keying set.
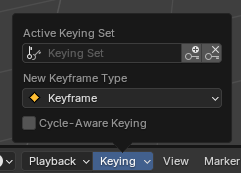
- Bộ Khóa đang Hoạt Động (Active Keying Set)
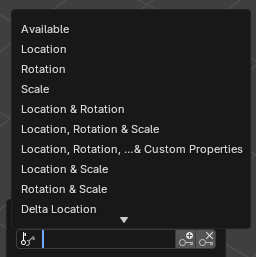
Các Bộ Khóa của Lịch Trình Thời Gian.
A Keying Set is a named collection of animatable properties. If you select one and then press I while not hovering over any input field, Blender will create keyframes for the properties in that keying set.
If you don't have a keying set selected, you'll get keyframes on a default set of properties instead (e.g. Location/Rotation/Scale for objects).
There are a number of predefined keying sets, but you can also create your own in the Keying Sets panel.
- Chèn Thêm Khung Khóa :bl-Biểu Tượng:Khóa_hlt [Insert Keyframes ] I
Chèn số/khung khóa trên khung hình hiện tại.
- Xóa Khung Khóa :bl-Biểu Tượng:Khóa_dehlt [Delete Keyframes ] Alt-I
Xóa số/khung khóa trên khung hình hiện tại.
- Loại Khung Khóa Mới (New Keyframe Type)
The loại khung khóa (keyframe type) cho/đối với newly created số/khung khóa.
- Khóa Hóa Cảnh Giác về sự Tuần Hoàn (Cycle-Aware Keying)
Khi chèn thêm các khung khóa vào đường cong tuần hoàn tầm thường (trivially cyclic curves) thì xử lý đặc biệt được áp dụng để bảo tồn tính trọn vẹn của chu trình tuần hoàn (hữu ích nhất khi hiệu chỉnh một chu trình tuần hoàn đã được thiết lập):
Nếu một cố gắng chèn thêm khóa bên ngoài phạm vi thời gian chính của chu kỳ xảy ra thì nó sẽ được ánh xạ lại bên trong phạm vi.
Khi viết đè một trong các khóa kết thúc thì cái kia sẽ được cập nhật tương ứng.
Vào/trong addition, khi bổ sung một mới đường cong vào một hành động với một Khoanh Phạm Vi Khung Hình Thủ Công (Manual Frame Range) và "Hoạt Họa Tuần Hoàn" Bật, the Đường Cong được tự động made Tuần Hoàn với the Chu Kỳ matching the Phạm Vi Khung Hình. Cho/đối với convenience, this Kiểm Tra và Chuyển Đổi được đồng thời Hoàn Thành Trước Bổ Sung the Giây/Thứ Hai Khung Khóa tới such một Đường Cong.
Tự Động Tạo Khung Khóa [Auto Keying]
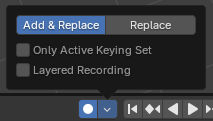
Tự Động Tạo Khung Khóa nút bấm.
When the record button () is enabled, Blender will automatically create keyframes on the current frame whenever you transform an object or bone in the 3D Viewport (or change one of its transform properties in the Properties Editor).
One special use case is to record a camera path as you fly through the scene. See Fly/Walk Navigation.
Ghi chú
Auto Keying only works for transform properties (Location, Rotation, Scale). It won't create a keyframe if you change, say, the color of a material -- you still have to do that manually.
- Chế Độ [Mode]
- Thêm & Thay Thế (Add & Replace):
Thêm hoặc thay thế số/khung khóa as hình tháp nhọn.
- Thay Thế (Replace):
Chỉ thay thế các khung khóa hiện có mà thôi.
- Duy Bộ Khóa đang Hoạt Động (Only Active Keying Set)
By default, Auto Keying will create keyframes even for properties that are not in the active keying set. Use this checkbox to change that.
- Thu Ghi Phân Tầng (Layered Recording)
Thêm mới Rãnh NLA (NLA Track) cho/đối với every lượt made đè lên trên the hoạt họa tới cho phép non-destructive hiệu chỉnh.
Những Điều Khiển Máy Chơi Lại (Transport Controls)
These nút bấm sẽ được used tới đặt the khung hình hiện tại và điều khiển chơi lại.

Những điều khiển máy chơi lại.
- Jump to Start Shift-Left
Sets the Đầu Chơi tới the khởi/đầu của phạm vi khung hình.
- Jump to Previous Keyframe Up
Di chuyển Đầu Chơi tới the khung khóa trước.
- Rewind Shift-Ctrl-Spacebar
Starts playing the hoạt họa vào/trong đảo ngược.
- Play Spacebar
Starts playing the hoạt họa.
- Pause Spacebar
Stops playing the hoạt họa.
- Jump to Next Keyframe Down
Di chuyển Đầu Chơi tới the khung khóa tiếp theo.
- Jump to End Shift-Right
Sets the Đầu Chơi tới the cuối/kết thúc của phạm vi khung hình.
- Jump Backward by Delta Ctrl-Left
Jumps the playhead backwards by a user-configured delta.
- Jump Forward by Delta Ctrl-Right
Jumps the playhead forward by a user-configured delta.
Additionally, there is a menu accessible to the right of the Jump by Delta buttons where their delta can be set:

Các Điều Khiển về Khung Hình (Frame Controls)
- Khung Hình Hiện Tại (Current Frame) Alt-Bánh Xe (Wheel)
The number of the frame that's currently being displayed in the 3D Viewport. This is also the location of the Playhead.
- Use Preview Range
The Preview Range is an alternative Frame Range that you can use for focusing on a particular part of the animation. It lets you repeatedly play a short segment without having to manually rewind or change the frame range of the entire scene.
This range only affects the preview in the 3D Viewport; it doesn't affect rendering.
The boundaries of the Preview Range are shown in dark orange. You can quickly configure and enable it by pressing P and dragging a box. To disable it, you can press Alt-P.
- Khởi Đầu, Kết Thúc [Start, End]
The đầu/cuối khung hình của cảnh (hoặc the phạm vi xem trước, nếu đang/hoạt động/năng động).