Настройки мира (world settings)
Проход тумана (mist pass)
Ссылка
- Панель:
Примечание
Проход тумана должен быть включён на вкладке „Слой визуализации“ редактора свойств, прежде чем приведённые ниже настройки станут доступными на вкладке „Мир“.
Туман может значительно усилить иллюзию глубины вашего рендера. Чтобы создать туман, Blender генерирует слой рендеринга с картой глубины в диапазоне от 0.0 до 1.0, который можно использовать в компо́зиторе для создания эффекта тумана.
- Начало (start)
Расстояние от камеры, на котором начинает проявляться туман.
- Глубина (depth)
Расстояние от начала тумана, на котором он «скрывает». Объекты, находящиеся дальше от камеры, чем начало + глубина, – скрыты туманом в полной мере.
- Спад (falloff)
Функция кривой, которая контролирует степень изменения силы тумана в зависимости от расстояния.
- Квадратично (quadratic):
Использует тот же расчёт, что и „спад“ света (\(1\over{x^2}\)), и обеспечивает максимально плавный переход от прозрачного („0.0“) к непрозрачному („1.0“).
- Линейно (linear):
Имеет более крутое начало, чем квадратичный (\(1\over{x}\)).
- Обратно-квадратично (inverse quadratic):
Имеет самый крутой старт (\(1\over{\sqrt{x}}\)) и приближается к „1.0“ быстрее, чем две другие функции.
Совет
Визуализацию можно активировать на панели .
Пример тумана (blend-файл).
Видимость для лучей (ray visibility)
Ссылка
- Панель:
Как и в случае с другими объектами, «видимость для лучей» позволяет вам контролировать, какие другие шейдеры могут «видеть» окружающую среду.
Хитрости
Иногда может быть полезно иметь другой фон, который виден напрямую, а не тот, который косвенно освещает объекты. Простое решение этой проблемы – добавить ноду Mix с «коэффициентом смешения», установленным на «Is Camera Ray». При этом первый входной цвет является непрямым цветом, а второй – непосредственно видимым цветом. Это полезно при использовании изображения с высоким разрешением в качестве фона и изображение с низким разрешением для фактического освещения.
Аналогично, добавление лучей «Is Camera» и «Is Glossy» будет означать, что изображение с высоким разрешением также будет видно и в отражениях.
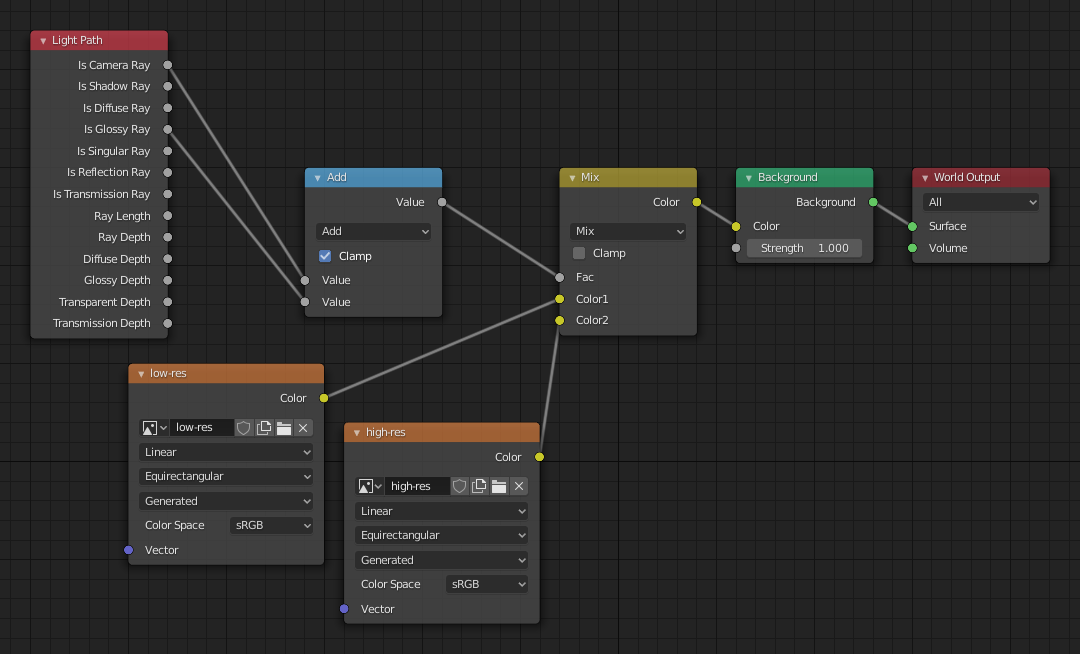
Ноды для вышеописанного приёма.
Настройки (settings)
Ссылка
- Панель:
Поверхность (surface)
- Сэмплирование (sampling)
Управляет методом сэмплирования мирового материала. Выбор «авто» или «вручную» включает сэмплирование «множественной значимости», а «нет» – отключает. Сэмплирование множественной значимости – это метод сэмплинга фоновой текстуры, при котором предпочтение отдаётся более светлым участкам, что создаёт карту значимости. Это будет производить меньше шума при рендеринге в обмен на появление артефактов (светлячки). Включите это при использовании текстуры изображения с небольшими источниками-областями (например, солнцем), иначе шуму может потребоваться много времени для схождения.
Ниже приведено сравнение сэмплирования множественной значимости в выключенном и включённом состоянии. Оба изображения визуализируются в течение 25 секунд (Выкл.: 1,500 сэмплов, Вкл.: 1,000 сэмплов).

- Разрешение карты (map resolution)
Устанавливает разрешение карты значимости. Более высокое разрешение позволяет лучше обнаруживать мелкие объекты на карте и обеспечивает более точное сэмплирование, но, с другой стороны, потребует больше памяти и будет выполняться немного медленнее. Более высокие значения также могут привести к меньшему шуму при использовании изображений с высоким разрешением.
- Максимум отскоков (max bounces)
Максимальное количество отскоков для лучей света от фона, вносящих свой вклад в итоговую визуализацию.
См. также
Дополнительную информацию по снижению шумов смотрите в разделе «уменьшение шума».
- Каустика теней (shadow caustics)
Отметьте мировой шейдер как отбрасыватель преломляющейся каустики. Этот параметр можно использовать в сочетании с настройками объекта каустики «отбрасывать» и «получать» для выборочного ускорения рендеринга преломляющей каустики выделенных объектов.
Объём* (volume)
- Метод сэмплирования (sampling method)
- Расстояние (distance):
Для плотных объёмов, освещённых издалека, сэмплирование на «расстоянии» в большинстве случаев более эффективно. Обычно это не следует использовать для объёмов мира.
- Равноугольно (equiangular):
Если у вас есть источник света внутри или рядом с объёмом, то лучше использовать равноугольное сэмплирование.
- Множественная значимость (multiple importance):
Если у вас комбинация и того, и другого, то лучшим будет множественное сэмплирование по значимости.
- Интерполяция (interpolation)
Метод интерполяции для объёма.
- Линейно (linear):
Простая интерполяция, дающая хорошие результаты для тонких объёмов.
- Кубический(-ая) (cubic):
Сглаженная высококачественная интерполяция, необходимая для более плотных объёмов, но медленнее.
- Step Size Biased
Distance between volume shader samples for world volume shaders. Only enabled when is enabled. See Volume Render Settings for more information.
Группа освещения (light group)
- Группа освещения (light group) только Cycles
Выбрать группу освещения, чтобы также добавить текущий «шейдер мировых поверхностей».
- Добавить группу освещения (add light group)
Если имя, введённое в поле «группы освещения», не совпадает с существующей группой освещения, то нажатие этой кнопки создаст группу освещения с этим именем и назначит ей этот «мировой шейдер».