Меню блока данных
Позволяет выбрать блок данных (например, материал), чтобы связать его с чем-то другим (например, с объектом).
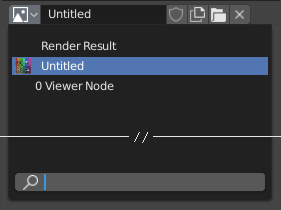
Меню блока данных с полем поиска.
- Тип (type)
Показывает значок, указывающий тип блока данных. Щелчок по изображению или стрелке «вниз» открывает всплывающее меню. Перетаскивание изображения позволяет применить блок данных к чему-то другому. (Например, вы можете перетащить материал на объект в 3D-вьюпорте, чтобы назначить ему. Также возможно перетаскивание на поля идентификатора данных.)
- Список (list)
Lists the data-blocks available in the current blend-file, or provides a link to select an item from.
The menu may display preview images, a search field, and state icons to indicate whether a data-block is linked from another blend-file, is a library override, or is marked as an asset. These icons make it easier to distinguish data-blocks with the same name. Collection entries may also display their assigned color tag.
Примечание
Блоки данных с именами, начинающимися с
., в списке скрыты, если только в поле поиска не введена строка, которая также начинается с., или не выбрана опция «показать скрытые блоки файлов/данных» в настройках пользователя.
- Имя (name)
Отображает и позволяет редактировать имя выбранного блока данных.
- Количество пользователей (user count )
Отображает количество пользователей данных (если имеется более одного пользователя). Нажав на неё, вы создадите однопользовательскую копию.
Например, если три отдельных объекта ссылаются на один и тот же материал, количество пользователей материала будет равно „3“. Изменение материала повлияет на все три объекта. Если вы выделите объект и щёлкнете по счётчику пользователей, объект получит свою собственную копию материала, которую можно будет изменять независимо от оригинала, который всё ещё используется двумя другими.
- Фиктивный пользователь (fake user) (значок щита)
Если в блоке данных нет реальных пользователей, он обычно очищается (удаляется) при сохранении blend-файла. Чтобы предотвратить это, вы можете назначить для него настройку «фиктивных пользователь»; таким образом, он гарантированно «выживет». Блоки данных с параметром «фиктивного пользователя» имеют в выпадающем списке префикс «F».
Аутлайнер может отображать список всех блоков данных без учёта «реальных пользователей» в blend-файле. Просто измените его режим отображения на „Unused Data“.
- Новый/добавить (значок файлов)
Создаёт новый блок данных (или дублирует текущий) и выделяет его.
- Открыть файл (значок папки)
Открывает браузер файлов, например, для импорта изображения.
- Распаковать файл (значок корзины)
Распаковывает файл, запакованный в текущий blend-файл, во внешний.
- (Отсоединить блок данных)
Очищает ссылку. Shift-ЛКМ, чтобы обнулить «пользователей», что позволит полностью удалить данные из blend-файла.
Иногда есть список применённых блоков данных (например, список материалов, использованных на объекте).
См. также
Блоки данных обсуждаются далее в главе о системных данных.
Предварительный просмотр (preview)
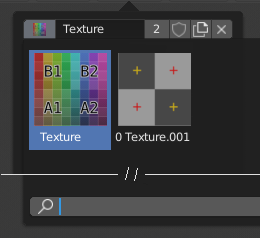
Меню блока данных с «предварительным просмотром».
В некоторых меню блоков данных, в раскрывающемся списке, вместо значков и названий есть большие изображения предварительного просмотра.
Идентификатор данных
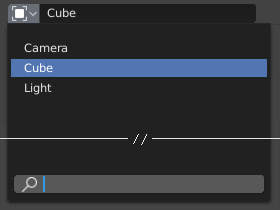
Поле идентификатора данных.
Поле идентификатора данных похоже на меню блока данных, но предназначено только для выбора (а не для других функций, таких как создание новых данных или управление «пользователями»).
Оно может отображать следующие элементы:
- Тип (type)
Значок слева указывает принятый тип блока данных.
- Имя (name)
Текстовое поле функционирует как поле поиска, сопоставляя элементы в списке. Нажмите Tab, чтобы автоматически заполнить имена до уровня, на котором найдено совпадение. Если существует более одного совпадения, вам придётся продолжить ввод. Если вы введёте неверное имя, значение останется неизменным.
- Список (list)
Позволяет выбрать блок данных напрямую.
Like the Data-Block Menu, entries may display state icons indicating whether a data-block is linked, a library override, or an asset.
- Пипетка
В некоторых идентификаторах данных присутствует пипетка, доступная через значок пипетки с правой стороны.
- (Очистить строку кнопки)
Нажмите кнопку справа, чтобы удалить ссылку.
Субданные идентификатора
Для выбора, доступными могут стать соответствующие типы подданных идентификатора, в зависимости от типа блока данных и его предполагаемого использования.
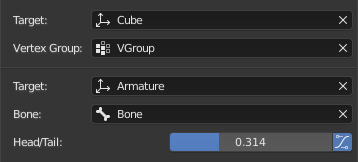
Пример дополнительных данных.
- Группа вершин (vertex group)
Если выбранный объект в поле „Target“ представляет собой меш или решётку, – может отображаться дополнительное поле для выбора одной из его групп вершин.
- Кость (bone)
Если выделенный объект в поле „Target“ является арматурой, – отображается дополнительное поле, в котором можно выбрать кость.
- Начало/конец (head/tail)
После выделения кости становится доступным числовое поле для указания точки на кости. Значение 0 соответствует началу кости, а значение 1 – её концу. Любые значения между ними приведут к линейной интерполяции (поэтому значение 0.5 соответствует центру кости).
- Использовать форму сгибаемой кости
Когда кость является сгибаемой костью, нажатие на эту кнопку заставит точку следовать кривизне B-сплайна между началом и концом, а не просто двигаться по прямой.