Группы нод (node groups)
Пример группы нод.
Группировка нод позволяет упростить нодовое дерево, скрывая разветвлённость и повторно используемые функции. Группа нод визуально идентифицируется по зелёной строке заголовка.
Концептуально нодовые группы позволяют вам обращаться с набором нод так, как если бы это была всего лишь одна нода. Они аналогичны функциям в программировании: их можно использовать повторно, они компонуются и есть возможность изменять их параметры.
В качестве примера предположим, что вы создали материал «дерево», который хотели бы использовать в разных цветах. Один из способов это сделать – продублировать всю связку нод для каждого цвета, но сохранение всех этих дубликатов будет утомительным, если позже вы решите изменить детализацию текстуры древесины. Вместо этого вы можете переместить ноды, генерирующие текстуру древесины, в нодовую группу. Затем каждый материал может повторно использовать эту группу нод и предоставлять собственный цвет в качестве входных данных. Любые изменения детализации текстуры нужно вносить только один раз – внутри группы нод.
Группы нод могут быть вложенными, то есть, внутри одной группы нод можно создать другую группу нод.
Примечание
Рекурсивные группы нод запрещены во избежание бесконечной рекурсии. Группа не может содержать саму себя, ни прямо, ни косвенно.
Совет
Как и другие блоки данных, группы нод с именами, начинающимися с ., скрыты в меню и списках и доступны только через поиск. Это может быть полезно авторам ассетов нод, которые захотят скрыть внутренние служебные группы от конечного пользователя.
Ноды „Group Input“ и „Group Output“ используются для представления данных, поступающих в группу и исходящих из неё.
Нода „Group Input“ обеспечивает доступ к входным сокетам группы изнутри группы нод. Эти сокеты действуют как параметры, управляющие поведением группы извне. Вы можете подключать их к внутренним нодам для управления такими значениями, как коэффициенты, цвета или геометрические входные данные.
Примечание
Входные значения, не влияющие на вывод будут выделены серым цветом.
Нода „Group Output“ определяет данные, передаваемые «из» группы нод. Доступны будут только те сокеты, которые вы подключаете к этой ноде в качестве выходов для самой группы.
Важно
Избегайте использования нод вывода, таких как „Material Output“, внутри нодовых групп. Их следует использовать на верхнем уровне дерева нод для повышения удобства повторного использования нодовых групп.
Используйте „Group Input“ для передачи данных из группы нод.
Использование
Управление входами/выходами
Вы можете добавлять, удалять и изменять порядок входных и выходных сокетов на панели „Group“ в боковой панели. Новые сокеты также можно создавать напрямую, перетаскивая соединение на пустой сокет в ноде „Group Input“ или „Group Output“ на другой сокет в нодовом редакторе.
Повторное использование нодовых групп
Ссылка
- Меню:
- Горячая клавиша:
Shift-A
Существующие группы нод можно разместить снова после их первоначального установления, будь то в том же дереве нод или в другом. Также возможно и импортировать группы нод из другого blend-файла, используя .
Совет
При добавлении нодовой группы из другого blend-файла, Blender не делает различий между группами нод материалов и группами нод компо́зитинга. Во избежание путаницы рекомендуется придерживаться определённого соглашения об именовании, которое позволит вам различать эти два типа.
Свойства (properties)
Группа (group)
Ссылка
- Панель:
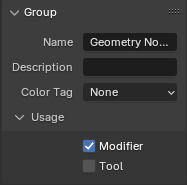
Панель «Группа».
Данная панель содержит свойства, относящиеся к группе нод, такие как её название и внешний вид.
- Имя (name)
Имя ноды, отображаемое в заголовке.
- Описание (description)
Сообщение отображается при наведении курсора на заголовок или в меню „Add“.
- Цветовой тег (color tag)
Цветовой тег группы нод, влияющий на цвет заголовка.
- Ширина ноды (node width)
Ширина для вновь создаваемых групповых нод.
- (Установить ширину нодовой группы «по умолчанию»)
Установить ширину на основе родительской групповой ноды в текущем контексте
- Показать панель управления (show manage panel) Геометрические ноды (geometry nodes)
Включить отображение панели „Управление (manage)“ в модификаторах геометрических нод при создании модификатора из ассета нодовых групп.
Использование (usage) Геометрические ноды (geometry nodes)
Данная панель видна только в редакторе геометрических нод.
- Модификатор (modifier)
Группа нод предназначена для использования с модификатором „Geometry Nodes“.
- Инструмент (tool)
Группа нод предназначена для использования в качестве инструмента.
Меню блока данных в заголовке редактора геометрических нод содержит только те нодовые группы, использование которых соответствует текущему подтипу дерева нод.
Совет
Если вы случайно отключите оба метода использования – группа нод больше не будет доступна через меню блока данных. Чтобы сделать её снова доступной, вы можете добавить её как ноду в другую группу нод ( ), выделить эту ноду и нажать Tab, чтобы войти в неё. Оттуда вы можете снова включить один из методов использования.
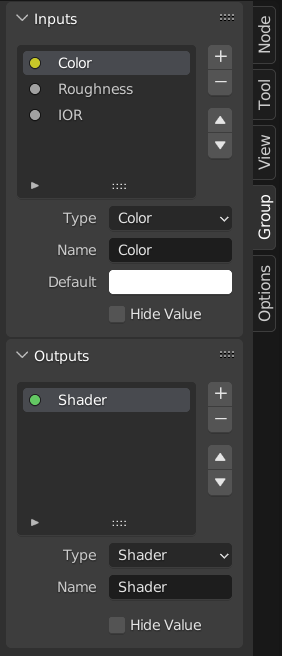
Сокеты группы (group sockets)
Ссылка
- Панель:
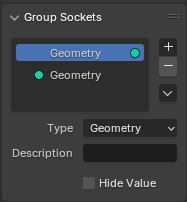
Панель «Сокеты группы».
Данная панель используется для добавления, удаления, изменения порядка и редактирования элементов пользовательского интерфейса группы нод. Она определяет, – как сокеты будут отображаться в групповой ноде, и организует их для удобства использования.
Доступные типы элементов включают:
Входы: Определить входные сокеты для группы нод.
Выходы: Определить сокеты вывода для группы нод.
- Панели:
Для группировки и организации связанных сокетов. Полезно для структурирования сложных нодовых связок. Панели всегда отображаются в нижней части интерфейса ноды. Их можно вкладывать друг в друга, перетаскивая одну панель поверх другой в списке элементов интерфейса.
- Переключатель панелей:
Добавляет логический тип флажка (/) в заголовок панели, позволяя управлять её содержимым. Данная опция доступна только при выборе панели в списке элементов интерфейса.
У переключателей панелей есть собственные параметры в подпанели „Panel Toggle“. Обратите внимание, что переключаемые сокеты не отображаются в списке интерфейса напрямую – вместо этого панели с переключателями отображают логический значок сокета рядом с их именем. Чтобы переключаемый сокет снова стал видимым, его необходимо отсоединить от панели.
Примечание
Переключатель панелей не отключает и не затемняет сокеты автоматически. Чтобы визуально и функционально отключать сокеты, используйте ноду „Switch“ или аналогичную логику и вручную отсоедините сокет.
- Список элементов интерфейса
Поле «список», отображающий все входные/выходные сокеты и панели. Каждый элемент можно переименовывать и настраивать индивидуально. Имя отображается в пользовательском интерфейсе ноды.
Совет
Выделение метки сокета на самой ноде также выделяет и этот сокет в списке элементов интерфейса.
Специальные настройки ()
- Дублировать элемент (duplicate item)
Дублирует выделенный сокет или панель.
- Сделать переключателем панелей (make panel toggle)
Преобразует выделенный логический вход в переключатель для родительской панели. Доступно только при выделении панели и активном элементе в качестве логического сокета.
- Отсоединить переключатель панелей (unlink panel toggle)
Удаляет взаимосвязь переключения между логическим сокетом и панелью, снова делая его обычным автономным входом.
Сокеты
Свойства, доступные для сокетов, зависят от нескольких факторов, включая то, является ли этот сокет входным или выходным, также от типа данных и типа дерева нод.
- Тип (type)
Тип сокета, сгенерированный этим элементом интерфейса.
- Описание (description)
Текстовая подсказка, отображаемая при наведении курсора на сокет.
- Домен атрибута (attribute domain) Геометрические ноды (geometry nodes) – Вывод (output) – Целое число (integer) Цвет (color) Вектор (vector) Логический (boolean) Нецелое (float)
Тип элемента геометрии, которому соответствует атрибут. Полный список доменов атрибутов см. разделе «Домены атрибутов».
- Атрибут по умолчанию (default attribute) Геометрические ноды (geometry nodes) – Целое число (integer) Цвет (color) Вектор (vector) Логический (boolean) Нецелое (float)
Имя атрибута, используемое по умолчанию, когда нодовая группа используется в качестве модификатора геометрических нод.
- Подтип (subtype) Целое число (integer) Нецелое (float) Вектор (vector) Строка (string)
Позволяет определить то, как данные интерпретируются, отображаются и иногда ограничиваются в пользовательском интерфейсе. Визуальное представление, суффикс единиц измерения и поведение ввода часто зависят от единиц измерения сцены.
Изменение подтипа не меняет базовый тип данных. Оно будет влиять только на то, как значение отображается и редактируется.
- Целые числа (integers)
- Нет* (none):
Стандартные целочисленные значения, не требующие специальной интерпретации.
- Пиксель (pixel):
Represents values in pixels, showing a «px» suffix. Typically used for dimensions, resolutions, image sizes, or other screen-space measurements.
- Процент (percentage):
Отображаемое значение представляет собой процент. Обычно минимальное и максимальное значения равны „0“ и „100“.
- Коэффициент (factor):
Представляет собой нормализованный коэффициент между нижней и верхней границей, часто используемый в диапазоне [0.0 – 1.0].
- Нецелые (floats)
- Нет* (none):
Стандартные значения с плавающей запятой без специальных единиц измерения.
- Пиксель (pixel):
Represents values in pixels, showing a «px» suffix. Typically used for dimensions, resolutions, image sizes, or other screen-space measurements.
- Процент (percentage):
Отображаемое значение представляет собой процент. Обычно минимальное и максимальное значения равны „0“ и „100“.
- Коэффициент (factor):
Нормализованное значение между нижней и верхней границами, обычно в диапазоне [0.0 - 1.0].
- Масса (mass):
Значение массы, используемое системой единиц сцены.
- Угол (angle):
Величина вращения, отображаемая в градусах или радианах, в зависимости от настроек единиц измерения сцены.
- Время (относительно сцены) (time (scene relative)):
Время в кадрах, автоматически преобразованное в секунды на основе частоты кадров сцены.
- Время (абсолютное) (time (absolute)):
Время, измеряемое непосредственно в секундах.
- Расстояние (distance):
Измерение пространственного расстояния с использованием единиц измерения длины сцены.
- Длина волны (wavelength):
Расстояние между циклами волны. Отображается в миллиметрах (мм), микрометрах (мкм), нанометрах (нм) или пикометрах (пм).
- Цветовая температура (color temperature):
Значение температуры (в градусах Кельвина), соответствующее воспринимаемому цвету источника света.
- Частота (frequency):
Частота повторения в секунду (герцы).
- Векторы (vectors)
- Нет* (none):
Стандартные векторные значения.
- Пиксель (pixel):
Represents values in pixels, showing a «px» suffix. Typically used for dimensions, resolutions, image sizes, or other screen-space measurements.
- Процент (percentage):
Каждый компонент отображается в процентах.
- Коэффициент (factor):
Каждый компонент рассматривается в качестве нормализованного коэффициента.
- Перемещение (translation):
Вектор смещения, использующий единицы длины сцены.
- Направление (direction):
Геометрический вектор направления, как правило, нормализованный.
- Cкорость (velocity):
Вектор, представляющий скорость и направление движения.
- Ускорение (acceleration):
Вектор, представляющий темп изменения скорости.
- Углы Эйлера (Euler angles):
Углы вращения Эйлера.
- XYZ:
Декартовы координаты. В зависимости от контекста может также поддерживаться и четвёртый компонент (W).
- Строки (strings)
- Нет* (none):
Стандартная текстовая строка.
- Путь к файлу (file path):
Строка, интерпретируемая в качестве пути к файлу, что позволяет открывать диалоговые окна выбора файлов в пользовательском интерфейсе.
- Измерения (dimensions) Вектор (vector)
Задаёт количество компонентов для векторного сокета: „2“, „3“ или „4“. Изменение измерений влияет на то, как сокет будет отображаться в интерфейсе и как через него будут передаваться данные.
2D: только компоненты „X“ и „Y“.
3D: компоненты „X“, „Y“ и „Z“.
4D: компоненты „X“, „Y“, „Z“ и „W“.
- По умолчанию (default)
Значение, которое будет использоваться, когда к сокету ничего не подключено.
- Минимум, Максимум (min, max)
Минимальные и максимальные значения для элемента управления пользовательского интерфейса в интерфейсе ноды.
Важно
Это не ограничивает фактические данные, проходящие через сокет. Если в сокет передаётся бо́льшее значение, оно всё равно будет обрабатываться без изменений.
- Default Input Geometry Nodes, Compositing Nodes – Input – Integer Vector Matrix Object
The value used when the socket is unconnected. The available options depends on the socket type. Requires Hide Value to be enabled.
- Значение по умолчанию (default value):
The node socket’s default value.
- Индекс (index):
The index from the context.
- ID or Index:
The “id” attribute if available, otherwise the index.
- Нормаль (normal):
The geometry’s normal direction.
- Положение (position):
The position from the context.
- Left Handle:
The left Bézier control point handle from the context.
- Right Handle:
The right Bézier control point handle from the context.
- Scene Frame:
The current frame in the scene.
- Uniform Image Coordinates:
The uniform image coordinates of the compositing space.
- Сам объект (self object):
The object that contains the geometry nodes modifier currently being executed.
- Опциональная метка (optional label) Вход (input)
Указать, что маркировка данного сокета необязательно обозначает именно его назначение. В некоторых случаях маркировка может быть пропущена.
- Скрыть значение (hide value)
Скрывает элемент управления значением сокета по умолчанию, даже если он не подключён.
- Выбор слоя (layer selection) Геометрические ноды (geometry nodes) – Вход (input) – Логический (boolean)
В качестве поля выбора можно использовать слой Grease Pencil или группу слоёв.
- Скрыть в модификаторе (hide in modifier) Геометрические ноды (geometry nodes) – Вход (input)
Скрыть входное значение в интерфейсе модификатора „Geometry Nodes“. Позволяет использовать сокет внутри нодовой группы, но не предоставлять его модификатору.
Данная опция доступна только для входных сокетов геометрических нод.
- Форма (shape) Геометрические ноды (geometry nodes) – Вход (input)
Указывает, какие данные высшего порядка принимает сокет. Подробнее см. в разделе «Форма сокета».
- Авто (auto):
Автоматически определяет наиболее подходящую форму в зависимости от назначения сокета. Является опцией «по умолчанию», которая подходит для большинства случаев.
- С динамикой (dynamic):
Сокет может адаптироваться к различным формам, что делает его гибким при использовании с различными соединениями. Полезно для универсальных нодовых групп, предназначенных для обработки различных типов данных.
- Одиночный (single):
Допускаются только единичные значения (константы), а не структурированные данные. Поля и сетки соединены быть не могу.
- Поле (field):
Сокет ожидает поле, то есть значение может меняться в зависимости от элемента геометрии или контекста.
- Сетка (grid):
Сокет ожидает структуру данных сетки, в которой хранятся значения, сэмплированные из объёма или двумерного пространства.
Панели
- Описание (description)
Текст подсказки, отображаемый при наведении курсора на заголовок панели.
- Закрыто по умолчанию (closed by default)
Если эта опция включена, – на новых нодах панель будет свёрнутой по умолчанию.
Анимация (animation)
Позволяет управлять данными анимации для свойств нодовой группы, включая активные действия и назначенные им слоты.
Для получения дополнительной информации см. раздел «Ручное назначение действий и слотов».
Создать группу (make group)
Ссылка
- Меню:
- Горячая клавиша:
Ctrl-G
Создаёт новую группу нод, содержащую все выделенные ноды.
Ноды „Group Input“ и „Group Output“ будут созданы для представления соединений с невыделенными нодами вне группы. Входы будут направлены на „Group Input“, а выходы – на „Group Output“.
При группировке одной ноды, – результирующая группа нод будет:
Сохранять интерфейс исходной ноды, включая панели и значения по умолчанию.
Наследовать имя исходной ноды.
При группировке нескольких нод, – группа создаётся с входными и выходными сокетами, сгенерированными из соединений. В этом случае используется общее имя, например, «NodeGroup», «NodeGroup.001» и т. д..
Вставить в группу (insert into group)
Ссылка
- Меню:
Перемещает выделенные ноды в активную группу нод. Для использования, – сделайте выделение набора нод, заканчивающееся нодой целевой группы, затем выполните операцию, тем самым перемещая выделенные ноды в эту группу. Перемещённые ноды собираются в отдельную группу, чтобы сохранить контекст соединения, имея собственные входные и выходные ноды. Существующие ноды ввода и вывода группы обновляются новыми сокетами, если таковые имеются, из новых нод. Группу нод необходимо отредактировать, чтобы она содержала одну ноду „Group Input“ и одну ноду „Group Output“.
Редактировать группу (edit group)
Ссылка
- Меню:
- Колонтитул:
- Горячая клавиша:
Tab, Ctrl-Tab
Выделив группу нод, нажмите Tab, чтобы перейти в неё и просмотреть её содержимое. Нажмите Tab ещё раз (или Ctrl-Tab), чтобы выйти из группы и вернуться к её родительскому элементу, которым может быть дерево нод верхнего уровня или другая группа нод. Вы можете обратиться к навигационной цепочке в верхнем левом углу нодового редактора, чтобы увидеть, где вы находитесь по иерархии.
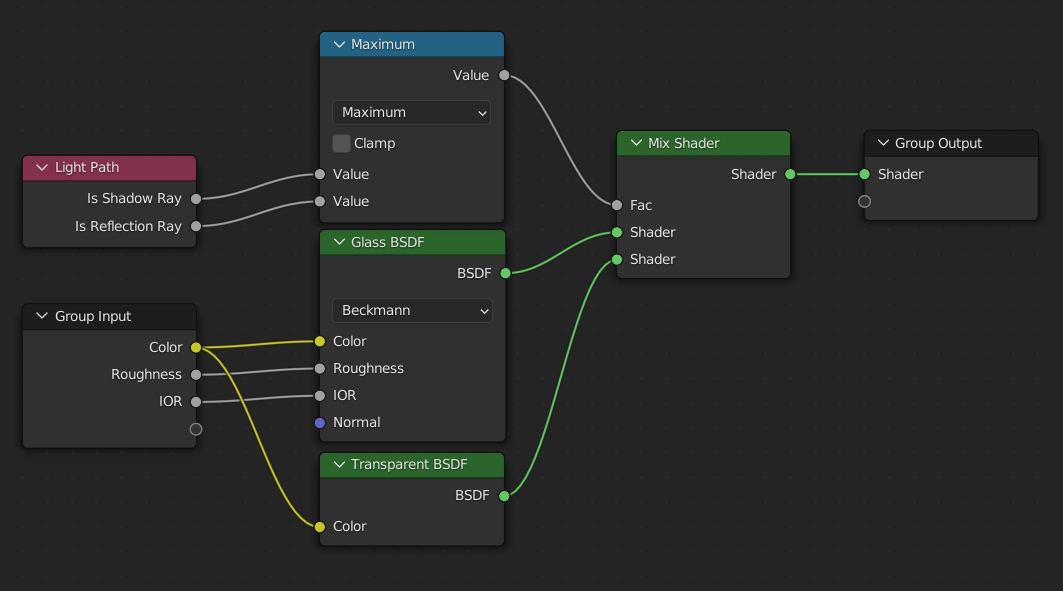
Пример раскрытой группы нод.
Разгруппировать (ungroup)
Ссылка
- Меню:
- Горячая клавиша:
Ctrl-Alt-G
Удаляет группу и помещает отдельные ноды в рабочую область вашего редактора. Внутренние соединения не теряются, и теперь вы можете связать внутренние ноды с другими нодами в вашей рабочей области.
Отделить (separate)
Ссылка
- Горячая клавиша:
P
Оператор „Separate“ удаляет выделенные ноды из нодовой группы и помещает их в дерево родительских нод. Полезно, когда ноды необходимо редактировать вне группы для удобства или повторного использования.
- Копировать (copy)
Копировать выделенные ноды в дерево родительских нод, сохраняя оригиналы внутри группы. Полезно, когда вы хотите повторно использовать ноды вне группы, но при этом сохранить определение группы.
- Переместить (move)
Переместить выделенные ноды в дерево родительских нод, удаляя их из исходной группы. Полезно при упрощении группы или непосредственном отображении её содержимого.
Объединить входы группы (join group inputs)
Ссылка
- Меню:
- Горячая клавиша:
Ctrl-J
Объединить несколько выделенных нод „Group Input“ в одну объединённую ноду „Group Input“, когда это возможно. Существующие соединения будут сохраняться, а дублирующиеся входы объединяются для упрощения дерева нод и уменьшения загромождения.
Данная операция полезна для очистки нодовых групп, которые стали неорганизованными или содержат избыточные вводные ноды.