Введение
Sculpt Mode is similar to Edit Mode in that it is used to alter the shape of a drawing, but Sculpt Mode uses a very different workflow: Instead of dealing with individual elements (points and edit lines), an area of the model is altered using a brush. In other words, instead of selecting a group of points, Sculpt Mode manipulates the drawing in the brush region of influence.
Режим скульптинга (sculpt mode)
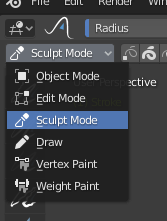
3D Viewport Mode selector: Sculpt Mode.
Sculpt Mode is selected from the Mode menu in the 3D Viewport header. Once Sculpt Mode is activated, the Toolbar of the 3D Viewport will change to Sculpt Mode specific panels. A red circle will appear and follow the location of the cursor in the 3D Viewport.
Sculpting Options

General sculpting options.
- Selection Mask
Sculpt Mode in Grease Pencil allows you to select points or strokes to restrict the effect of the sculpting tools to only a certain areas of your drawing.
You can use the selection tools in the Toolbar for a quick selection. You can restrict sculpting only on the selected points or strokes with the Selection mode buttons. The three modes can be toggled with 1, 2, or 3 respectively.
- Multiframe
Sometimes you may need to modify several frames at the same time with the sculpting tools.
You can activate multiframe edition with the Multiframe button next to the modes selector (faded lines icon). See Multiframe for more information.
Keyboard Shortcuts
Invert stroke toggle Ctrl
Изменить активный материал U