Поверхность (surface)
Трансформировать (transform)
Ссылка
- Режим (mode):
Режим редактирования (edit mode)
- Меню:
Инструменты для перемещения контрольных точек.
- Переместить, Вращать, Масштабировать (move, rotate, scale)
См. раздел о базовых трансформациях.
- В сферу, Сдвиг, Изогнуть, Толкать/тянуть, Деформировать, Рандомизировать (to sphere, shear, bend, push/pull, warp, randomize)
См. раздел о трансформациях мешей.
Зеркало (mirror)
Ссылка
- Режим (mode):
Режим редактирования (edit mode)
- Меню:
- Горячая клавиша:
Ctrl-M
См. раздел «Зеркало (mirror)».
Привязать (snap)
Ссылка
- Режим (mode):
Режим редактирования (edit mode)
- Меню:
- Горячая клавиша:
Shift-S
См. раздел о меню „Привязать (snap)“, а также параметры привязки.
Прокрутить* (spin)
Ссылка
- Режим (mode):
Режим редактирования (edit mode)
- Меню:
Подобно своему аналогу для мешей, данный оператор несколько раз экструдирует выделенные контрольные точки по окружности с центром в 3D-курсоре и параллельно плоскости вида. Веса новых контрольных точек устанавливаются для создания окружности, а для поверхности помечаются параметры „Цикличности“, „Безье“ и „Конечной точки“ в направлении экструдирования (см. раздел «Активный сплайн»).
Добавить дубликат (add duplicate)
Ссылка
- Режим (mode):
Режим редактирования (edit mode)
- Меню:
- Горячая клавиша:
Shift-D
Дублирует выделенные контрольные точки и создаёт на их основе новую поверхность. Новые контрольные точки размещаются в режиме перемещения: переместите мышку, чтобы разместить их в нужном положении, затем нажмите ЛКМ для подтверждения. Также есть возможность нажать ПКМ или Esc, чтобы оставить их в исходном положении.
Обратите внимание, что выделенные контрольные точки должны образовывать единую корректную подсетку. В противном случае дублирование завершится ошибкой.
Разделить (split)
Ссылка
- Режим (mode):
Режим редактирования (edit mode)
- Меню:
- Горячая клавиша:
Y
Отсоединяет выделенную подсетку от остальной поверхности, сохраняя её в пределах того же объекта-поверхности. Контрольные точки на границе дублируются, чтобы они присутствовали как на исходной поверхности, так и на отсоединённой.
Подсетка должна состоять из одного или нескольких полных рядов или столбцов поверхностной сетки.
Отделить (separate)
Ссылка
- Режим (mode):
Режим редактирования (edit mode)
- Меню:
- Горячая клавиша:
P
Отсоединяет выделенную подсетку от остальной поверхности и перемещает её в новый объект-поверхность. Контрольные точки на границе дублируются, чтобы они присутствовали как на исходной, так и на отсоединённой поверхности.
Подсетка должна состоять из одного или нескольких полных рядов или столбцов поверхностной сетки.
Переключить замкнутость (toggle cyclic)
Ссылка
- Режим (mode):
Режим редактирования (edit mode)
- Меню:
- Горячая клавиша:
Alt-C
Вызывает всплывающее меню с опциями „Замкнуть по U“ и „Замкнуть по V“. Поверхность становится замкнутой (закрытой) или незамкнутой (открытой) в соответствующем направлении.
Если поверхность является замкнутой, – последний ряд или столбец сетки её контрольных точек соединяется с первым. Цилиндр замыкается либо вдоль направления U, либо вдоль направления V, сфера же замкнута вдоль обоих направлений.
См. также
Настройки „цикличности“ также находятся во вкладке „Активный сплайн“ на N-панели.
Установить тип сплайна (set spline type)
Ссылка
- Режим (mode):
Режим редактирования (edit mode)
- Меню:
Эта функция работает только для кривых.
Показать/скрыть (show/hide)
Ссылка
- Режим (mode):
Режим редактирования (edit mode)
- Меню:
- Горячая клавиша:
H, Shift-H, Alt-H
Скрывает выделенные или невыделенные контрольные точки или отображает все скрытые ранее контрольные точки.
По умолчанию при проявлении контрольных точек, – они добавляются к выделению. Чтобы этого не произошло, снимите флажок „Выделить“ на панели настройки последней операции.
Привести в порядок (clean up)
Ссылка
- Режим (mode):
Режим редактирования (edit mode)
- Меню:
Эта функция работает только для кривых.
Удалить (delete)
Ссылка
- Режим (mode):
Режим редактирования (edit mode)
- Меню:
- Горячая клавиша:
X, Delete
Удаляет выделенные вершины (контрольные точки) или сегменты (линии) из поверхности. В обоих случаях выделенные элементы должны состоять из одного или нескольких полных рядов или столбцов поверхностной сетки.
- Вершины (vertices)
Удаляет выделенные контрольные точки. Образующийся разрыв заполняется новыми линиями сетки, сохраняя непрерывность поверхности.
- Сегменты (segments)
Удаляет линии и контрольные точки, располагающиеся между крайними выделенными контрольными точками. Образующийся разрыв не заполняется.
- Растворить вершины (dissolve vertices)
Эта функция работает только для кривых.
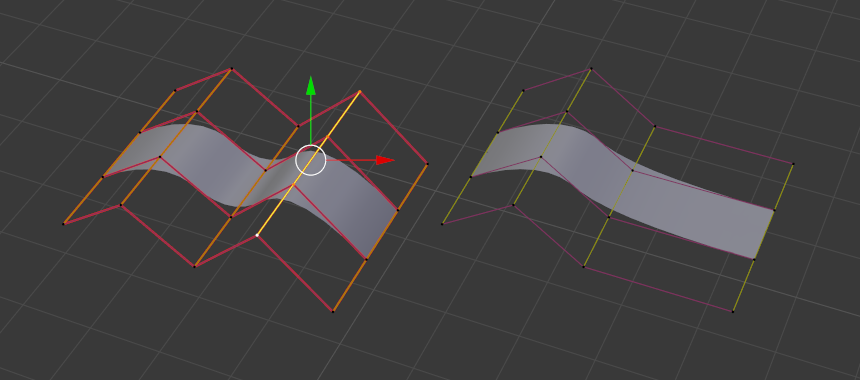
До и после удаления ряда контрольных точек.