选择 & 可见性
选择遮罩
If you have a complex mesh, it is sometimes not easy to paint on the intended vertices. Suppose you only want to paint on a small area of the Mesh and keep the rest untouched. This is where "selection masking" comes into play. When this mode is enabled, a brush will only paint on the selected vertices or faces. The option is available from the header of the 3D Viewport (see icons surrounded by the yellow frame):

You can choose between Face Selection masking (left button), Vertex selection masking (middle button), and Bone selection (right button). The latter is only available when the mesh has an Armature modifier.
选择遮罩与默认绘制模式相比具有一些优点:
即使修改器处于活动状态,也会显示原始网格边。
您可以选择或弃选面,而无需切换到编辑模式。
有关选择的详细信息
支持以下标准选择操作:
Alt-鼠标左键 -- 选择单个面
Shift-Alt-鼠标左键 -- 选择更多,或从已选项中移除。
A -- 所有面,A A 反选所有。
B -- 框选。
C -- 使用笔刷的圆形选框。
Ctrl-I -- 反选。
L -- 选择链接项(在鼠标光标下)。
Ctrl-L -- 选择关联项。
Ctrl-数字键盘加+ -- 扩展选择
Ctrl-数字键盘减- -- 收缩选择
Alt-鼠标左键 -- 顶点循环选择
顶点选择遮罩
参考
- 模式:
顶点和权重绘制模式
- 标题栏:
- 快捷键:
2
在此模式下,您可以选择一个或多个顶点,然后仅在所选内容上绘制。所有未选择的顶点都受到保护,防止意外更改。
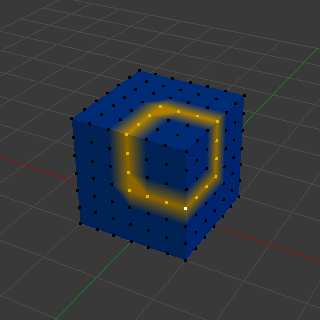
顶点选择遮罩。
面选择遮罩
参考
- 模式:
纹理、顶点和权重绘制模式
- 标题栏:
- 快捷键:
1
面选择遮罩 允许您选择面并将绘制工具限制在这些面上,这与顶点选择遮罩非常相似。
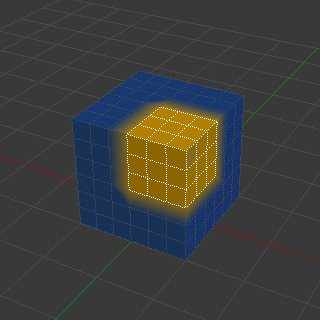
面选择遮罩。
隐藏/取消隐藏 面
参考
- 模式:
纹理、顶点绘制、权重绘制模式
- 菜单:
,,
- 快捷键:
Alt-H, H, Shift-H
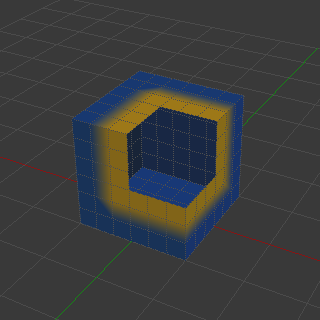
隐藏面。
可以暂时隐藏面,以便仅对网格的可见部分进行绘制。隐藏的面在重新显示之前无法绘制或选择。这在绘制时有助于隔离网格的特定区域。
H -- 隐藏当前选中的面。
Shift-H -- 隐藏所有未选中的面,从而突出显示当前选中的面。
Alt-H -- 显示所有隐藏的面。
隐藏/取消隐藏 顶点
您无法在顶点蒙版选择模式下直接隐藏选定的面。不过,在切换选择模式时,这些选中的元素会被转换。因此,一个常用的技巧是:
切换到面选择蒙版模式,将所选项转换为面。
接下来可继续优化选择,或直接隐藏面。
切换回顶点选择遮罩模式。
隐藏面将确保属于可见面的顶点保持可见。
剪裁区域
要进一步限制绘画区域,您可以使用 裁剪框。按 Alt-B 和 鼠标左键-拖出一个矩形区域。所选区域将被 "剪切" 为感兴趣的区域。3D 视口的其余部分将被隐藏。
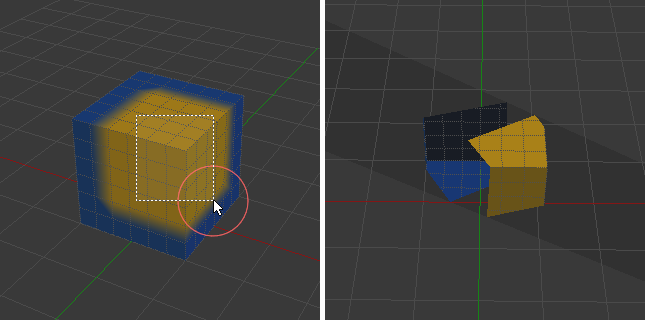
剪切区域用于为局部绘画选择关注的部分。
通过再次按 Alt-B 可以使整个网格再次可见。
使用视图的所有绘制工具都遵从此裁剪,包括框选,当然还有画笔描边等。
There are two helpful reminders that a Clipping Region is used:
The clipping region is drawn as a gray box in the 3D Viewport
The Text Info overlay will state that the perspective is "Clipped"
选择相连元素
参考
- 模式:
编辑模式
- 菜单:
- 快捷键:
Ctrl-L, Shift-L
Select geometry connected to already selected elements. This is often useful when a mesh has disconnected, overlapping parts, where isolating it any other way would be tedious. Pressing Shift-L will deselect linked any linked elements.
With L you can also select connected geometry directly under the cursor.