UV 操作
Blender 提供了多种 UV 贴图方法,从仅仅将网格顶点投射到平面上的简单贴图到更高级的方式。
展开
参考
- 编辑器:
3D 视图
- 模式:
编辑模式
- 菜单:
- 快捷键:
U
参考
- 编辑器:
UV 编辑器
- 模式:
编辑模式
- 菜单:
- 快捷键:
U
沿着选中的面的缝合边裁剪面,使其摊平,并将其平铺在 UV 贴图上。之前存在的 UV 坐标将被覆盖。适用于有机形状。
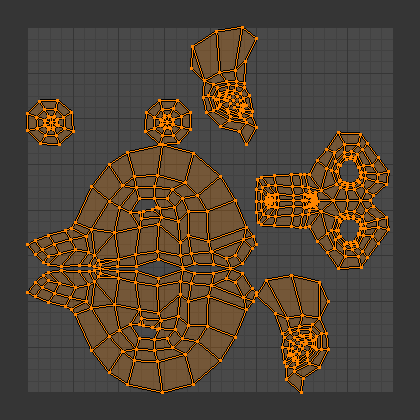
猴头的展开结果。
选项
通过调整上一步操作面板可以精细控制网格的展开方式:
- 方法
- 基于角度:
使用基于角度的扁平化(ABF)。这种方法能很好地呈现网格的二维效果。
- 共形:
Uses Least Squares Conformal Mapping (LSCM). This usually results in a less accurate UV mapping than Angle Based, but performs better on simpler objects.
- 最小拉伸:
Uses Scalable Locally Injective Mapping (SLIM). This tries to minimize distortion for both areas and angles.
- 填充洞面
在展开前先对网格进行虚拟填充,以更好地避免重叠和保持对称。
- 使用表面细分
使用表面细分修改器计算出的新顶点位置(而不是运行任何修改器之前的原始位置)。
- 原始边界
将孤岛展开至其原始边界,而非重新拼排。
- 校正高宽比例
调整 UV 贴图,以考虑与材质相关的图像的长宽比。这样可以确保在非正方形纹理上展开 UV 时能正确缩放。
- 迭代 最小拉伸
最小拉伸 法的迭代次数,每次迭代都会进一步减少失真。
- 无翻转 最小拉伸
禁止翻转面。如果存在钉固,允许翻转有时可减少失真。
- 重要性权重 最小拉伸
让您可以指定一个顶点组,手动影响 UV 贴图中某些面的大小。在 UV 贴图中,高权重顶点周围的面将比低权重顶点周围的面占用更多空间。
启用该选项后,还会出现两个选项:
- 权重组
要使用的顶点组的名称。
- 权重系数
用于乘以所有权重的全局系数。数值越大,高权重区域和低权重区域之间的差异就越大。
- 定距方法
表示参数 边距 的含义,该参数决定 UV 孤岛之间空白空间的大小。
- 已缩放
The Margin is a more or less arbitrary measure with no direct relation to the sizes of the UV islands or the texture.
- 相加
As above, but without the internally calculated scaling factor.
- 分数
边距 是 UV 边界的分数。这意味着,如果您有一个 1024x1024 的纹理,并将 边距 设置为 1/1024,那么每个 UV 孤岛周围将有 1 个像素的边距(各孤岛之间的距离不会超过 2 个像素)。
- 边距
孤岛之间留出多少空隙。由 定距方法 控制。
智能 UV 投射
参考
- 编辑器:
3D 视图、UV 编辑器
- 模式:
编辑模式
- 菜单:
- 快捷键:
U
检查选中的面之间的角度,沿着任何锐利的边进行分割,然后沿着平均法线投射每一组分离的面,并将其平铺在 UV 贴图上。您还可以设置缝合边来进行额外的分割。对于机械物件或建筑来说,这是一种很好的方法。
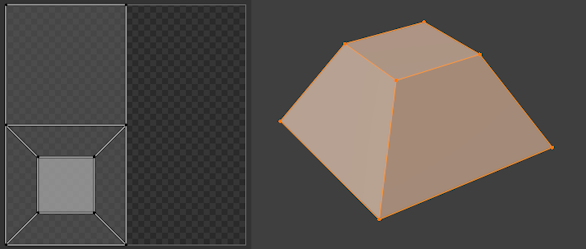
截顶金字塔上的智能 UV 投射。
选项
通过调整上一步操作面板可以精细控制网格的展开方式:
- 角度限制
The maximum allowed angle between the normals of adjacent faces before they're split off from each other. A low limit will create lots of small UV islands with little distortion, while a high limit will create a few large islands with potentially more distortion.
- 定距方法
孤岛边距 参数的含义,该参数决定 UV 孤岛之间空白空间的大小。
- 已缩放
The Island Margin is a more or less arbitrary measure with no direct relation to the sizes of the UV islands or the texture.
- 相加
As above, but without the internally calculated scaling factor.
- 分数
The Island Margin is a fraction of the UV unit square. This means that, if you have a 1024x1024 texture and set the Island Margin to 1/1024, each UV island will have a margin of 1 pixel around it (and islands will be no closer than 2 pixels to each other).
- 旋转方法
- 轴对齐
自动旋转,以避免浪费空间。
- 轴对齐 (水平)
旋转孤岛以水平对齐。
- 轴对齐 (垂直)
旋转孤岛以垂直对齐。
- 孤岛边距
孤岛之间留出多少空隙。由 定距方法 控制。
- 区域权重
如果取值为 0,每个面群组的投影矢量只是其面法线的平均值。如果取值为 1,则是根据面的面积加权后的平均值。其他值则介于两者之间。
- 校正高宽比例
调整 UV 贴图,以考虑与材质相关的图像的长宽比。这样可以确保在非正方形纹理上展开 UV 时能正确缩放。
- 缩放至边界框
拉伸生成的 UV 贴图以填充整个纹理。
光照贴图拼排
参考
- 编辑器:
3D 视图、UV 编辑器
- 模式:
编辑模式
- 菜单:
- 快捷键:
U
在 UV 贴图上分别放置每个选定的面。光照贴图通常用于在纹理中烘焙光照信息,以便在实时渲染中使用 -- 因此,它们会优先使用尽可能多的纹理,通常会导致 UV 贴图断开和扭曲,不适合手动贴图工作。
选项
通过调整上一步操作面板可以精细控制网格的展开方式:
沿活动四边面展开
参考
- 编辑器:
3D 视图、UV 编辑器
- 模式:
编辑模式
- 菜单:
- 快捷键:
U
从活动四边形开始,递归地将其相邻且选定的网格四边形连接到其预先存在的 UV 四边形上。非四边形面将被忽略。
Note
由于活动四边形的 UV 布局保持不变,因此在运行此展开操作之前,通常需要确保它在 UV 贴图中的形状与网格上的形状相同(例如,只在该面上运行其他类型的展开)。否则,变形将扩散到所有其他面。
Note
所得的 UV 贴图可能会超出范围。您可以通过手动缩小或使用拼排孤岛来解决这个问题。
选项
通过调整上一步操作面板可以精细控制网格的展开方式:
- 边长模式
如何计算新附加四边形的 UV 边长度。
- 均匀
为每条新 UV 边赋予与其延伸的 UV 边相同的长度,无论其在网格上的长度如何。
- 长度
为每条新 UV 边赋予与其在网格上的长度成正比的长度。
- 平均长度
为每条新 UV 边指定一个长度,该长度与网格中对应的并排边中的平均边长度成比例。
立方投影
参考
- 编辑器:
3D 视图、UV 编辑器
- 模式:
编辑模式
- 菜单:
- 快捷键:
U
将每个选中的面投影到虚拟立方体最合适的一面,然后将所有这些面重叠放置在 UV 贴图中。如果不想让它们重叠,可以使用拼排孤岛。
立方体居中的位置是变换轴心点,并与网格的局部轴对齐。
选项
通过调整上一步操作面板可以精细控制网格的展开方式:
柱形投影
参考
- 编辑器:
3D 视图、UV 编辑器
- 模式:
编辑模式
- 菜单:
- 快捷键:
U
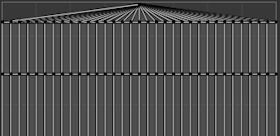
将所选面投影到一个虚拟圆柱体上,然后展开该圆柱体。该柱体的中心是变换轴心点,通常是选定面的平均位置;但是,您也可以使用 3D 游标将其移动到其他位置。
选项
通过调整上一步操作面板可以精细控制网格的展开方式:
- 方向、对齐
圆柱体中心轴的方向。
- 赤道视图
使用与 3D 视口中的查看方向垂直的轴。如果 对齐 为 ZX 极轴,则使用查看平面的垂直轴;如果为 ZY 极轴,则使用水平轴。
- 查看极向轴
使用与 3D 视口中的观察方向平行的轴。根据 对齐,圆柱体将绕轴旋转 90°,UV 贴图将水平移动四分之一。
- 对齐至物体
使用物体的局部 Z 轴。根据 对齐,圆柱体将绕轴旋转 90°,UV 贴图将水平移动四分之一。
- 极点
如何处理位于圆柱体中轴线上的顶点。
- 夹捏
Place all UV versions of the vertex at the same U coordinate. This tends to result in heavily distorted UV faces.
- 扇形
Place each UV version of the vertex at a U coordinate that minimizes distortion.
球形投影
参考
- 编辑器:
3D 视图、UV 编辑器
- 模式:
编辑模式
- 菜单:
- 快捷键:
U
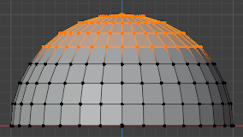
将所选面投射到虚拟球体上,然后将球体压平,就像世界地图一样:纬度线垂直,经度线间隔均匀。这对于绘制眼睛或行星等球体形状的纹理非常有用。
球体的中心是变换轴心点,通常是所选面的平均位置;但是,您也可以使用 3D 游标将其移动到其他位置。

等距柱状投影图像搭配球面投射使用。
选项
通过调整上一步操作面板可以精细控制网格的展开方式:
- 方向、对齐
球体垂直轴的方向。
- 赤道视图
使用与 3D 视口中的查看方向垂直的轴。如果 对齐 为 ZX 极轴,则使用查看平面的垂直轴;如果为 ZY 极轴,则使用水平轴。
- 查看极向轴
Use an axis that's parallel to the viewing direction in the 3D Viewport. Depending on Align, the sphere will be rotated by 90° around its vertical axis and the UV map will be shifted horizontally by a quarter.
- 对齐至物体
Use the object's local Z axis. Depending on Align, the sphere will be rotated by 90° around its vertical axis and the UV map will be shifted horizontally by a quarter.
- 极点
How to handle vertices that lie on the sphere's vertical axis. (See 柱形投影 for an example.)
- 夹捏
Place all UV versions of the vertex at the same U coordinate. This tends to result in heavily distorted UV faces.
- 扇形
Place each UV version of the vertex at a U coordinate that minimizes distortion.
- 保留缝合边
在投影前先沿着网格的缝合边将其切分。
- 校正高宽比例
调整 UV 贴图,以考虑与材质相关的图像的长宽比。这样可以确保在非正方形纹理上展开 UV 时能正确缩放。
- 裁剪至边界框
将任何超出边界的 UV 移至最近的边界。
- 缩放至边界框
拉伸生成的 UV 贴图以填充整个纹理。
从视角投影
参考
- 编辑器:
3D 视图
- 模式:
编辑模式
- 菜单:
- 快捷键:
U
将所选面投射到视图平面上。UV 贴图实质上是网格的线框图像,以当前视角在 3D 视口中拍摄。如果使用真实物体的图片作为纹理,可使用此选项。在模型向后远离的区域会出现拉伸。
选项
通过调整上一步操作面板可以精细控制网格的展开方式:
从视角投影(限界)
参考
- 编辑器:
3D 视图
- 模式:
编辑模式
- 菜单:
- 快捷键:
U
与从视角投影相同,但默认激活了 缩放至边界框。
重置
参考
- 编辑器:
3D 视图、UV 编辑器
- 模式:
编辑模式
- 菜单:
- 快捷键:
U
重置每个选定面的 UV 布局,以填充整个 UV 区域。