创建元骨骼
从 菜单添加一个骨骼。
进入骨架编辑模式,通过示例或者 Rigify 类型建立元骨骼。
定义 Rigify 骨骼集合界面、配色集 和选择集。
在骨架属性面板中点击 生成 按钮来生成骨架。
Rigify 如何工作
- Rigify 元骨骼分为多个子绑定
元骨骼由骨链组合而成,一个骨链由 连接 属性标识定义,骨链通过在不使用 连接 属性的情况下使用父子进行连接,可以将它们进一步连接在一起(例如在父子关系时使用 保持偏移 选项)。
- 子骨骼链的第一个骨骼设置自定义属性
骨链的第一个骨骼拥有自定义属性,Rigify 自定义属性定义子骨骼类型,在绑定生成时 Rigify 会确定创建哪些小部件和形变骨骼,处理从每个骨链的第一个骨骼到最后一个骨骼的元骨骼。
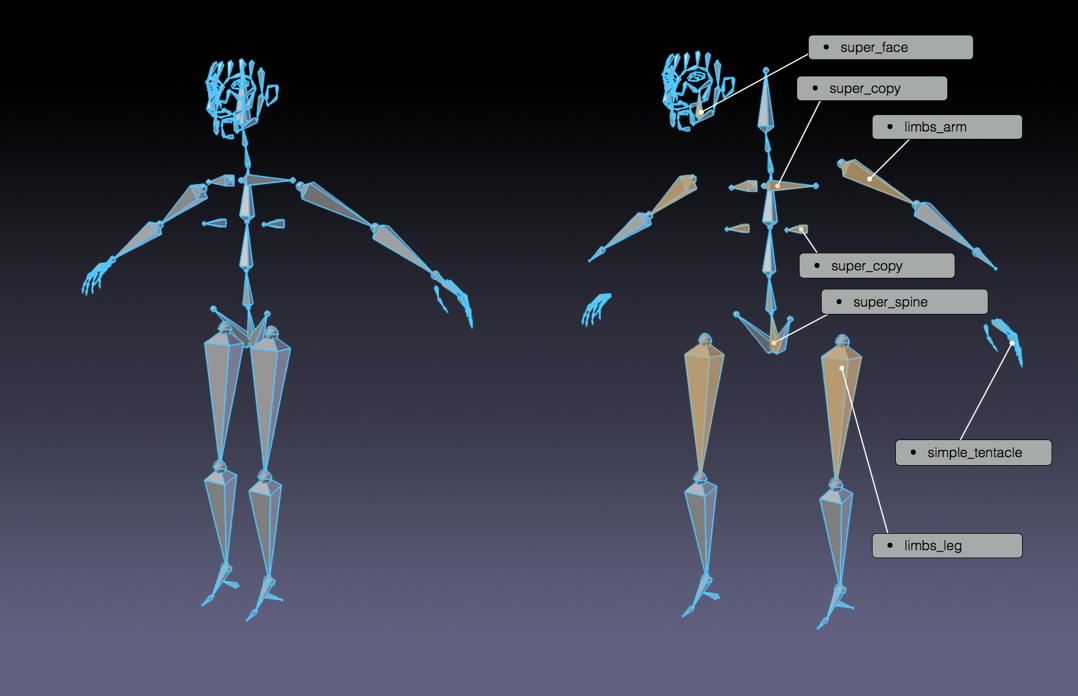
按样本拆分的人类元骨骼。
- 创建新的元骨骼组装子绑定范例
由于元骨骼只是子绑定的集合,因此可以以不同的方式组装子绑定来构建新的元骨骼。这样,可以从相同的绑定块中构建无限数量的元骨骼。

按样本拆分的猫元骨骼。
- 所有的结构,形变骨骼和小部件,只需简单的点击即可创建
元骨骼相比常规可视骨骼包含更多的信息,实际上,在生成时 Rigify 将识别每个子绑定类型,并根据所选选项,只需一次点击即可创建所有复杂的控件、开关和形变骨骼。
创建一个新的元骨骼
添加一个新骨架物体
参考
- 模式:
物体模式
- 菜单:
- 快捷键:
Shift-A
从头开始构建您自己的元骨骼,需要一个骨架物体来使用。只需从 添加 菜单中添加一个骨骼。
Tip
在这个阶段,将新添加的骨架命名为 metarig 是个好主意。你可以随时做(或者根本不做),但建议在继续之前做,这样在编辑元骨骼结构时,需要使用哪个骨架时就会很清楚了。
编辑骨架
现在有一个骨架物体用于工作 -- 选中骨架 -- 进入骨架编辑模式。在编辑模式下从头开始构建元骨骼可以通过两种方式搞定:
添加绑定范例。
创建骨骼链。
添加范例 (基础)
在编辑模式下添加预定义范例是开始构建元骨骼的好方法,通过这种方式,您可以熟悉可用的构建块以及如何使用它们。要添加绑定范例,请执行以下操作:
进入骨架标签。
向下滚动到 Rigify 面板。
从列表中选择一个范例。
点击 添加范例 按钮。
编辑骨骼位置以匹配你的角色。
列表可用范例可查看 绑定类型 页面。
使用绑定类型(高级)
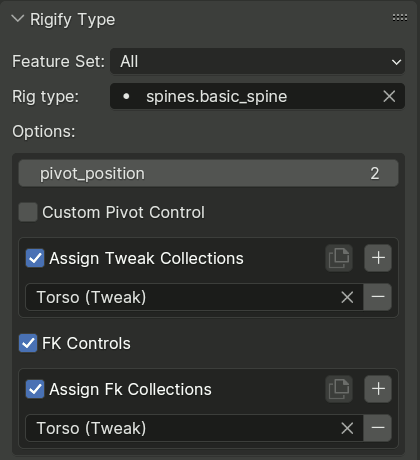
想要完全控制,你可以进入姿态模式使用骨骼属性中的 Rigify类型 面板,子骨骼类型可以随意分配,只要更改选项即可。
更多关于子骨骼绑定类型和选项,可查看 绑定类型 页面。
在面板的上部,您会找到一个用于指定激活骨骼的rig类型的字段。下拉列表可以根据其所属的 功能集 进行筛选。
在下面,如果出现与所选绑定类型相关的选项,您可以更改。
骨骼集合引用
某些绑定类型生成的许多控制骨骼拥有参考的选项 骨骼集合。这些参考列表具有标准 UI 且有以下特点:
控制是否使用引用的复选框。
一个按钮,从活动项引用列表内容拷贝到所有选定的骨骼。
一个加号按钮,用于向列表添加新的引用。
一个引用列表,每个条目都有一个字段指定目标集合,还有一个按钮从列表中删除条目。
Note
每个子绑定都需要一定的骨骼数量作为输入。如果您不确定如何使用绑定类型属性,请将范例骨骼添加到骨架中,以查看应如何使用。
保存的骨骼属性
元骨骼的某些属性通常会复制到生成的绑定控制器、形变和机制骨骼中。
确切的子集取决于子绑定和特定生成的骨骼,即使子绑定保留了同一子集中的其他属性,它也可能覆盖某些属性,但存在某些共同模式:
- 父子设置
该子集包含父级 ORG 骨骼,使用连接、使用继承旋转、使用本地位置和继承比例。
它通常被复制到变形骨骼、FK控制器,以及其他情况,如子绑定没有理由完全覆盖它们。
- 柔性骨骼设置 (编辑模式)
包括分段计数,顶点映射模式,淡入/淡出,滚入/滚出,首端弯曲/尾端弯曲,首端缩放/尾端缩放。
分段计数通常通过子绑定选项覆盖,但通常复制其他设置以按原样变形骨骼。
- 转换设置
包括旋转模式,姿态模式旋转值和通道锁定。
这些设置通畅会复制到 FK 控件。
- 自定义属性
通常复制到某个基于元骨骼(主要是 FK)生成的控制器。访问该属性的内骨架驱动器将被重新定向到复制的实例。
- 自定义小部件
通常复制到基于元骨骼生成的控件之一(主要是 FK),如果指定,则禁止自动生成骨骼小部件。
自定义根骨骼
如果元骨骼包含一个名为 root 的骨骼,则它将用作根控制骨骼,而不是创建一个新的骨骼。这允许更改根骨骼的静止位置、指定自定义部件或向骨骼添加自定义属性。
自定义根骨骼必须无父级,并使用 basic.raw_copy 子绑定类型或置空。
配色集
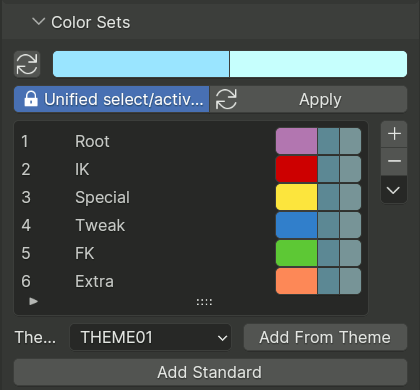
配色集面板用于定义最终绑定的骨骼配色。列表中的颜色可以与相关面板中的骨骼集合相关联。
“配色集”面板的前两行用于定义骨骼颜色的一般行为。通常,颜色主题使用颜色渐变来定义不同的骨骼状态:默认、选定和活动。当在同一绑定中使用多个颜色主题时,识别哪个骨骼被选择或处于活动状态可能会很棘手,因为每种颜色都有其相应的状态。
要覆盖此行为,Rigify 将使用相同的颜色统一活动状态和选定状态。这由以下两个值定义:
- 统一的 选定/活动颜色
当此选项处于活动状态时,在列表中添加骨骼组将始终保持颜色一致。当从主题添加配色方案时,配色方案将按原样加载。单击 应用 按钮,强制系统统一选定和活动的颜色。
- 选定/活动 颜色
这两个颜色字段分别定义了 选定 和 活动 颜色。默认情况下,Rigify 从用户在 Blender 首选项中定义的主题中读取这些颜色。这样,选定/活动 颜色在 UI 中始终具有可预测和一致的行为。您可以通过单击相关颜色字段来定制颜色。要将它们重置为 Blender 当前主题值,只需单击带有更新图标的按钮。
通过单击 + 或 - 按钮可以添加和删除配色集。通过单击 - 按钮下方的三角菜单,可以找到一次删除所有颜色集的按钮。
要将预定义的 Rigify 默认配色方案(如图所示)中的颜色添加到列表中,请单击 添加标准 按钮。
要添加具有自定义配色方案的特定主题,请从列表中选择它,然后单击 从主题添加 按钮。
骨骼集合 UI

骨骼集合 用于将相关骨骼打组在一起,以便它们可以一起隐藏或显示。
Rigify 可以利用集合为最终绑定生成额外的功能和用户界面。一个用按钮生成的名为 绑定层 的面板,用于隐藏集合并以直观的布局排列。
骨骼集合 UI 面板允许配置生成面板的布局,以及为骨骼集合指定一些其他设置,例如要使用的颜色集。
面板顶部被一个列表占据,该列表复制了主骨骼集合列表,但显示了其他属性,如颜色集、集合是否有按钮或是否生成选择集。
- 验证集合引用
某些子绑定类型在其属性中具有 引用 的骨骼集合。Rigify 的引用机制对集合重命名是稳定的,但删除集合或合并骨架可能会导致引用失效。
此按钮运行一次验证并规范所有集合引用的扫描,报告任何错误,并减少后续因用户操作导致中断的可能性。
每次生成绑定时,也会自动执行此扫描。
Warning
为了避免断裂,应在连接两个元骨骼骨架之前和之后立即使用此操作。更具体地说,它必须确保在重命名集合和加入集合的操作之间完成。
- 配色集
指定 配色集 用于此集合中的骨骼。如果骨骼属于多个集合,通常位于列表中较早位置的集合具有优先级。
- 添加选择集
指定是否为此集合生成选择集。
- UI 行
若非零,则指定 绑定层 的那一行面板应包含控制此集合可见性的按钮。当为零时,不会生成任何按钮,集合也会被隐藏。
- UI 标题
此字段可用于覆盖 UI 按钮上使用的标题,使其与真实的集合名称不同。与集合名称不同,UI按钮标题不使用唯一名,因此可以通过依赖面板中的上下文提示来减少混乱。
UI 布局子面板
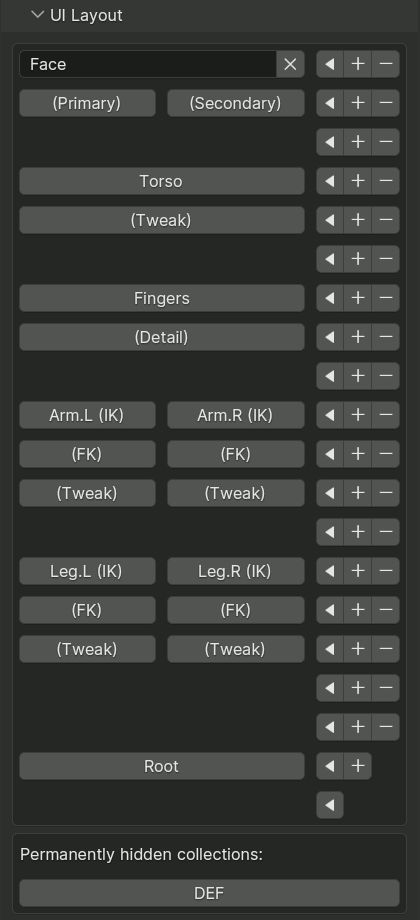
UI 布局子面板为生成的UI面板的布局提供了一个所见即所得编辑器(如上述 UI 行和 UI 标题设置所定义)。
每行末尾包含三个按钮:
- 箭头
将活动集合按钮移动到此行。
- 加号+
在当前行之前插入新的行。
- 减号-
删除当前行并将所有按钮向上移动。
在编辑控制按钮的左侧,行显示与集合对应按钮,与最终 UI 相同,只不过点击这些按钮是选择集合,而不是隐藏或显示。
对于活动集合,选择按钮被替换为用于编辑 UI 标题的输入字段,以及用于从 UI 取消分配集合的 X 按钮。
对于未分配给 UI 的任何集合,其选择按钮将显示在子面板底部的单独部分中。
生成绑定时,如有必要,将自动添加 Root 集合或为其分配一个 UI 按钮。如果需要,可以手动将 UI 按钮分配给内部 ORG、DEF 和 MCH 集合。
Tip
空白行在最终界面中看起来要薄得多,因为它们不必包含编辑按钮,并且可以用作逻辑分隔符。
动作
动作 约束允许根据其他骨骼的变换,将动作定义的姿态应用到骨骼上。这需要为每一个受动作影响的骨骼添加约束,这样做非常繁琐。因此,Rigify 包含一个系统,可以通过 动作 面板 自动完成这个过程。
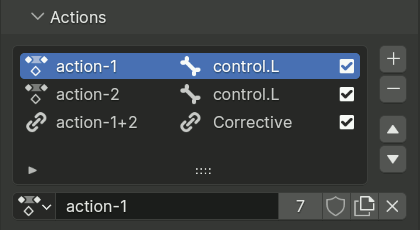
该面板定义了要应用于生成的绑定骨骼的动作列表。每个动作只能被列一次。
列表条目显示了动作的名称、触发器(骨骼或由另外两个驱动的纠正动作),以及一个复选框,该复选框可用于暂时禁用将此动作应用于绑定。条目开头的图标从动作图标更改为链接图标,以突出显示依赖于活动普通动作的纠正动作,或活动纠正动作使用的普通动作。
Note
The Action constraints are added to the bones in such an order as to exactly reproduce the intended deformation, assuming the actions were created (posed and keyframed) in the order listed.
普通动作
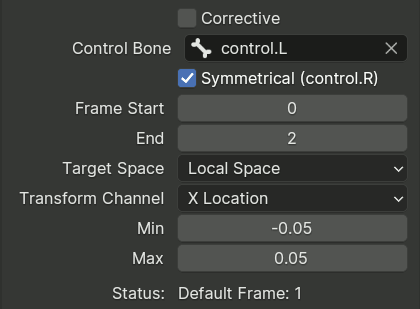
普通动作是基于生成绑定的特定控制骨骼的转换应用的。它们具有以下属性:
- 控制骨骼
指定驱动动作的骨骼。
- 对称
If the control bone has a suffix that specifies that it belongs to the left or right side, this option can be enabled to automatically apply symmetry.
启用后,动作中的左侧骨骼关键帧将由左侧控件控制,右侧骨骼关键帧由右侧控件控制。没有方向后缀的骨骼被认为属于角色的中心。它们被绑定了两个影响为 0.5 的动作约束,由每个控制骨骼控制。
- 起始帧 & 结束帧
创建的约束将使用指定的动作帧范围。
- 目标空间、变换通道
指定目标骨骼应使用的坐标空间和变换通道。
- 最小值,最大值
Specifies the range of the transformation channel values that is mapped to the specified action frame range.
- 默认帧
显示动作中映射到变换通道默认值(缩放为 1,否则为 0)的帧,该值根据指定的范围值计算得出。
纠正动作
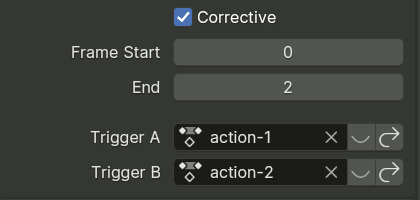
矫正动作是基于其它两个来自列表的动作应用的,当它们一起使用时被用来改善姿态。
- 起始帧 & 结束帧
创建的约束将使用指定的动作帧范围。
- 触发 A 和 B
Specifies the two actions that control the correction. The interface rows contain buttons to show the settings for that action, or jump to it in the list.
The progress of the corrective action from the start to the end frame is calculated as the product of the progress values of the two trigger actions. Thus, the start frame is applied when either of the triggers is at the start frame, and the end frame is used when both are at their end frame.
Corrective actions must be below their triggers in the list, which is enforced via an implicit reorder even if violated.
Tip
Corrective actions behave in the most intuitive way when both triggers have the Default Frame equal to Start Frame. To create a corrective action in such case:
Create the two trigger actions, add them to the panel and generate the rig.
Pose your controls so that both trigger actions are fully activated to the end frame.
Pose and keyframe the necessary corrections in the end frame of the new action, while keying the start frame to the neutral values.
Add the newly created action to the end of the list in the panel and configure its settings.