笔刷设置
每种模式和笔刷都有独特的笔刷设置。但也有很多重叠或相似的设置。本页将详细解释各种笔刷都使用的通用设置和特定模式设置。
对笔刷资产设置的更改是临时性的,在 Blender 关闭时将被丢弃。要保留设置,请使用 保存对资产的更改 将其保存到当前活动的笔刷资产中,或使用 复制资产 创建一个新的笔刷资产,请参阅资产操作。在 Blender 保持打开的状态下加载不同的文件不会丢弃设置。
统一设置
部分参数(如尺寸、强度、颜色)通过 标识,支持以逐个模式设置替代单独笔刷设置。这些参数在特定模式(如雕刻模式)下对所有笔刷共享,但不会覆盖单个笔刷的独立设置值。
通用
- 尺寸
此选项控制笔刷的大小,以像素为单位。F 键允许您通过从左到右拖动鼠标来交互式地改变笔刷大小,然后按 鼠标左键 接受。同时,笔刷的纹理将在圆圈内显示。您也可以使用数字键输入大小。
可以分别使用 [ 和 ] 来减少/增加尺寸。
- 尺寸单位 雕刻模式
控制笔刷 尺寸 的测量方式。
- 视图:
尺寸 是根据光标在显示器上的显示方式(即 “屏幕空间”)来测量的。
- 场景:
尺寸 是根据真实世界单位进行测量的。这意味着笔刷尺寸保持恒定,不受视口缩放操作的影响。单位类型和缩放比例可在场景单位设置中配置。
- 强度
For painting brushes the Strength defines the maximum effect of each brush stroke. For example, higher values cause a Paint brush to give each stroke a higher opacity. The opacity is never stronger than the set Strength, no matter how often the same surface is painted during the same stroke.
For sculpting brushes on the other hand the Strength relates to how strong each step of the stroke is, resulting in a slower/faster buildup towards the full brush effect during the stroke.
You can change the brush strength interactively by pressing Shift-F and then moving the brush and then LMB. You can also enter the strength numerically with the number keys.
- 混合
设置颜色或数值应用于目标颜色属性、顶点组或图像纹理的方式。请参阅颜色混合模式。
添加 Alpha:使绘制处的图像更加不透明。
擦除 Alpha:使绘制的图像透明,让背景颜色和低层级的纹理显示出来。当您 “绘制” 时,会显示虚拟的棋盘背景。使用绘图板笔的橡皮擦末端将切换到该模式。
Tip
为了能在图像编辑器中见到橡皮擦和添加 Alpha 混合模式的效果,显示通道必须设置为 颜色 和 Alpha 或 Alpha.透明(无 alpha)区域将显示为方格背景。
- 权重 权重绘制
应用于顶点组的权重值。
使用 Shift-X 对单击顶点的权重值进行采样。Shift-Ctrl-X 可以让您选择要采样的组。
- 方向 Ctrl 雕刻模式
笔刷方向切换,添加 向画笔提升几何体,减法 将几何体从画笔中降低。在雕刻时,可以使用 Ctrl 切换此设置。
- 法向半径 雕刻模式
Determines the ratio of how much the brush radius is used to sample the normal direction of the sculpt plane of the brush. For example, a smaller Normal Radius will lead to drastic changes in the brush orientation, like for following the contours of hard surface meshes more closely. A large Normal Radius will lead to smoother changes in orientation, like for building overall forms on organic sculptures.
- 区域半径
The ratio between the brush radius and the radius that is going to be used to sample the area plane depth.
- 倾斜强度 雕刻模式
Determines how much the tilt of the user's tablet pen affects the brush normal. Negative values correspond to inverting the direction of the tilt.
- 硬度 雕刻模式
画笔脱落的距离从画笔的边缘开始。
- 梢部圆度
The factor to control how round the brush is. A value of zero will make the brush square. Note, the Brush Falloff is only applied to the rounded portions of the brush.
- 自动光滑 雕刻模式
设置要应用于每个笔刷的平滑量。
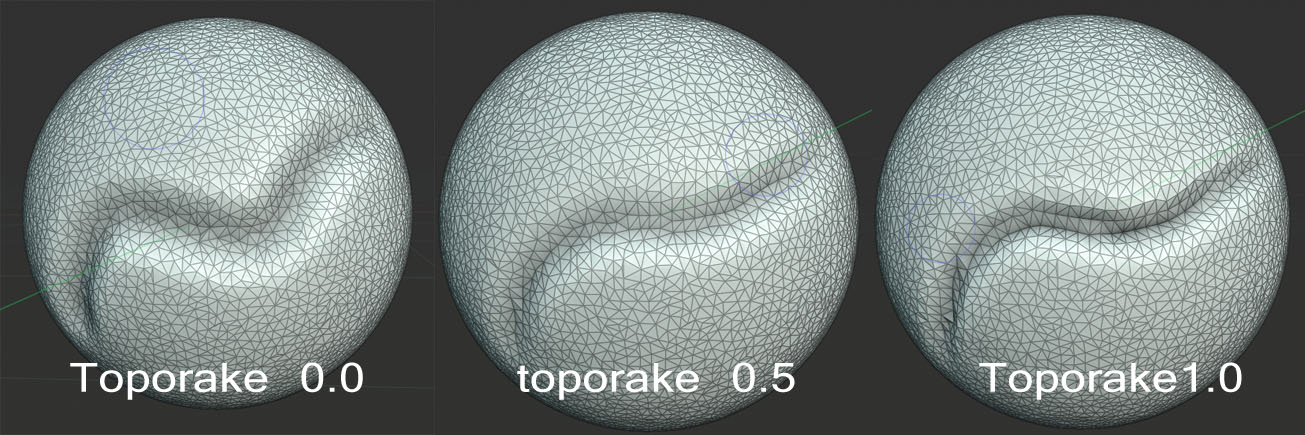
- 拓扑耙 雕刻模式
The higher this setting is set, the more Dyntopo aligns mesh edges to the brush direction while tessellating the surface. This generates cleaner edge flow to help define sharp features. Topology Rake can have a severe performance impact so it works best on low-poly meshes.
- 法线权重 Ctrl 雕刻模式
沿着表面法线限制笔刷运动。特别适用于 抓起 笔刷,可以通过按住 Ctrl 暂时启用。例如当设置 法线权重 时,抓起 笔刷可以使用推动将凹陷(孔)推入网格。
适用于 Grab 和 Snake Hook 笔刷。
- 平面偏移 雕刻模式
平面笔刷的偏移(黏塑、填充、平化、刮削)通过均化上方或下方的面来移动找到的平面。
- 平面修剪 雕刻模式
能够限制平面笔刷作用的距离。如果启用了修剪,则在雕刻过程中忽略距离偏移平面更远的顶点。
- 夹捏/放大 雕刻模式
在描画过程中将网格推向或远离笔刷中心。
- 变形目标
画笔的变形将如何影响物体。
- 几何数据:
直接变形几何体。
- 布料模拟:
在对网格进行变形的同时应用布料模拟。
高级
- 笔刷类型
Defines the basic behavior and the available settings. Through the settings of a brush type, brushes can be created that produce vastly different effects.
The Essentials asset library contains brushes for each of the brush types. Their preview image and description should give a good idea of the effect the brush produces, with the particular combination of brush type and settings. Because of this, they are usually the more useful starting point for custom brushes than the mere brush type is, which is why the brush type is part of the Advanced brush settings.
Brushes and Brush Types of each mode:
- 影响 Alpha 仅限二维绘制
禁用此功能后,可以防止在绘制时更改 alpha 通道(仅在 3D 视口中)。
- 抗锯齿 仅限二维绘制
在画笔周围切换抗锯齿,如果您正在使用像素图案或低分辨率纹理,这非常有用。
- 累积
导致笔触在顶部彼此累积。
- 仅前面的面
启用时,画笔只影响面向视图的顶点。
- 雕刻平面 雕刻模式
使用此菜单可以设置进行雕刻的平面。换句话说,顶点将移动的主方向。
- 区域面:
运动发生在以笔刷区域内所有活动顶点的平均法线方向。从本质上讲,这意味着方向取决于笔刷下方的表面。
- 视图面:
在当前 3D 视口的平面上进行雕刻。
- X, Y, Z 平面:
运动发生在全局轴之一的正方向上。
- 原始的 -- 法向 雕刻模式
锁定状态下,将持续使用笔画起始处表面的法线方向,而非光标当前所在位置的表面法线。
- 原始 -- 平面 雕刻模式
锁定状态下,将持续使用笔画起始处表面的平面原点,而非光标当前所在表面的平面。
自动遮罩
雕刻模式
笔刷设置中的自动蒙版切换与雕刻模式中的相同。不同的是,这些切换可以根据笔刷进行自定义,以创建特定的笔刷行为。
See also
更多有关自动遮罩切换的信息请参阅自动遮罩章节。
拾色器
颜色
笔刷有两种颜色,可以使用拾色器进行设置:
主色:默认情况下用于绘制的活动颜色。
二次色:可快速访问的备用颜色。
默认情况下,绘画使用主色。在绘画时按住 Ctrl 可以临时使用二次色。也可以使用切换颜色随时交换这两种颜色。
Tip
按 Shift-X 可在鼠标光标位置采样颜色。
按下 Shift-Ctrl-X 可采样 合并的视口颜色,包含灯光、着色及所有可见层。
采样颜色将作为当前绘制笔刷的主色。
- (切换颜色) X
切换颜色和背景色。
- (使用统一颜色)
在所有画笔上使用相同的画笔颜色。
Note
请注意,在 sRGB 工作空间中的顶点绘制,相同颜色的 RGB 表示形式在绘制工具和线性空间中的材质之间会有所不同。
渐变
可将渐变用作色源。
- 渐变颜色
用颜色渐变部件来定义渐变的颜色。
- 模式
- 压力:
将根据数位笔压力从颜色渐变中选取颜色。
- 钳制:
将根据 渐变间隔 沿着笔画改变颜色,指定颜色渐变的最后一种颜色为 钳制 色。
- 重复:
与 钳制 类似。在最后一个渐变色后,颜色将重置为第一个渐变色。
随机化颜色
笔刷颜色随机变化,使笔画更自然、多变。适用于手绘纹理或添加细微的不规则效果。
随机性可独立影响色相、饱和度和色值。每个通道还支持压感和基于笔画的随机性。
- 色相
对笔刷颜色的色相进行随机变化的量。
- (笔画随机)
在每一笔画中使用单个随机色相,而不是在笔画内不断变化。
- (使用压感)
根据笔的压力调节色相变化。
- 饱和度
对笔刷颜色的饱和度进行随机变化的量。
- (笔画随机)
在每一笔画中使用单个随机饱和度,而不是在笔画内不断变化。
- (使用压感)
根据笔的压力调节饱和度变化。
- 数值
对笔刷颜色的色值(明度)进行随机变化的量。
- (笔画随机)
在每一笔画中使用单个随机色值,而不是在笔画内不断变化。
- (使用压感)
根据笔的压力调节色值变化。
调色板
调色板可以存储画笔颜色以便再次使用。这在使用多种颜色绘制时很有用。
- 调色板
从数据块菜单选择调色板。
- (新建调色板颜色)
将当前画笔的主要 颜色 添加到调色板。
- (删除调色板颜色)
从调色板中删除当前选定颜色。
- / (移动调色板颜色)
将选中颜色向上/下移一位。
- (排序依据)
按色相、饱和度、明度、亮度对颜色进行排序。
- 颜色列表
调色板的每个颜色都显示在列表中。单击颜色会将画笔的主要 颜色 更改为该颜色。