Clip de selector multicámara
El clip de selector multicámara es utilizado para la edición multicámara. La edición multicámara consiste en el montaje de una escena grabada mediante múltiples cámaras desde distintos ángulos.
Flujo de trabajo
El proceso de edición multicámara puede ser sencillo en el editor de video si está configurado correctamente. La siguiente guía muestra los pasos básicos para configurar un flujo de trabajo básico de edición multicámara.
First you are going to want to add in each of your video strips.
Next, you will want to sync all your cameras by either using Audio Waveforms or by the movement of objects.
Truco
To make syncing strips easier you can group cameras, their audio, and their effects together using Meta Strips.
Split the editor into many Previews, one for each input track. Then change the Display Channel of each of the previews to the channel number of the input track.
Agregar un clip de selector multicámara encima de todas las pistas de video.
Luego de completar estos pasos debería obtenerse algo similar a la siguiente imagen:
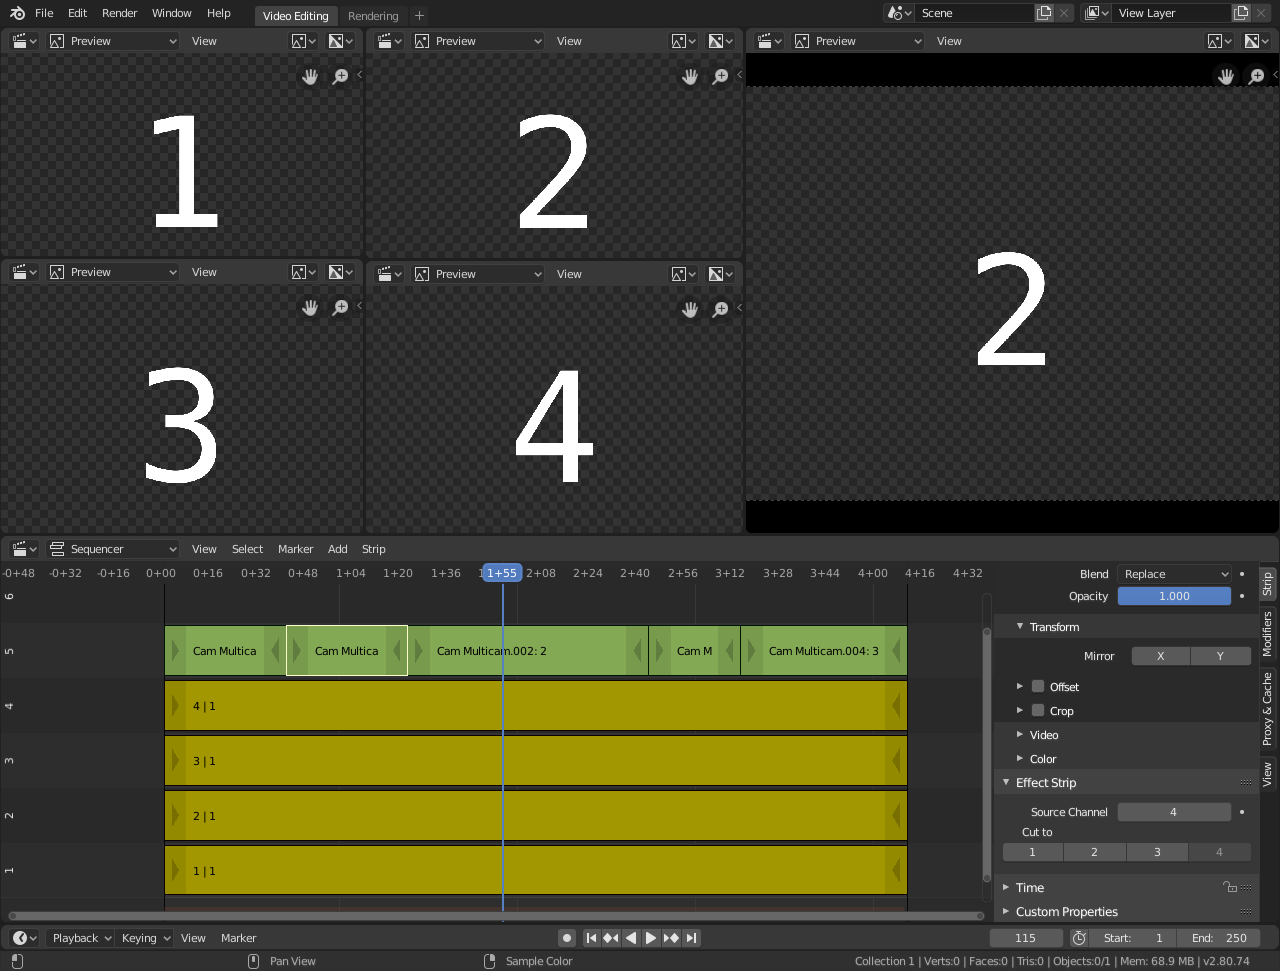
Configuración de edición multicámara.
Now select the Multicam strip, if you take a look at the strip options (in the Sidebar), you will notice, that Multicam is a rather simple effect strip: It just takes a selected channel as its input. That is all. The magic comes with the convenient keyboard layout.
When you select the Multicam strip, the keys 1 to 9 are mapped to the cut buttons. So, select the Multicam strip and start playback and press the keys for the correct input while watching the individual cameras.
You will end up with a small Multicam Selector strip for every cut.
In reality, it boils down to: watch a few seconds to see, what is coming, watch it again and do a rough cut using the number keys. Then fine-tune the placement by selecting the outer handles of two neighboring Multicam for A/B rolling.
Truco
To improve playback performance enable Proxies.
Opciones
- Source Channel
The channel which the Multicam Selector gets its input from.
- Cut To
Cuts the Multicam strip at the current frame and changes the Source Channel automatically to the selected channels.
Flujo de trabajo
First you are going to want to add in each of your video strips.
Next, you will want to sync all your cameras by either using Audio Waveforms or by the movement of objects.
Truco
To make syncing strips easier you can group cameras, their audio, and their effects together using Meta Strips.
Split the editor into many Previews, one for each input track. Then change the Display Channel of each of the previews to the channel number of the input track.
Agregar un clip de selector multicámara encima de todas las pistas de video.
Luego de completar estos pasos debería obtenerse algo similar a la siguiente imagen:
Configuración de edición multicámara.
Now select the Multicam strip, if you take a look at the strip options (in the Sidebar), you will notice, that Multicam is a rather simple effect strip: It just takes a selected channel as its input. That is all. The magic comes with the convenient keyboard layout.
When you select the Multicam strip, the keys 1 to 9 are mapped to the cut buttons. So, select the Multicam strip and start playback and press the keys for the correct input while watching the individual cameras.
You will end up with a small Multicam Selector strip for every cut.
In reality, it boils down to: watch a few seconds to see, what is coming, watch it again and do a rough cut using the number keys. Then fine-tune the placement by selecting the outer handles of two neighboring Multicam for A/B rolling.
Truco
To improve playback performance enable Proxies.