Opciones de pincel
Each mode and brush has unique brush settings. But there is also a lot of overlap or similar settings. This page explains general and mode specific settings that are used across various brushes in more detail.
Changes to the settings of a brush asset are temporary and will be discarded when Blender is closed. To preserve settings, save them to the currently active brush asset using Save Changes to Asset, or create a new brush asset using Duplicate Asset, see Asset Operators. Loading a different file while Blender remains open does not discard the settings.
Unified Settings
Some settings (e.g. size, strength, color), indicated with , allow for using a per-mode setting instead of the individual brush setting. These settings are shared across all brushes of a given mode (e.g. Sculpt Mode) but do not overwrite the individual brush value.
General
- Tamaño
This option controls the size of the brush, measured in pixels. F allows you to change the brush size interactively by dragging the mouse from left to right and then LMB to accept. Meanwhile the texture of the brush will be visible inside the circle. You can also enter the size numerically with the number keys.
The size can be decreased/increased using [ and ] respectively.
- (Presión a tamaño)
Adjusts the size based on the stylus pressure when using a Graphics Tablet.
- (Use Unified Size)
Use the same brush Size across all brushes.
- / (Expand/Collapse)
Show or hide the customizable pressure curve.
- Curva personalizada
By default this is a straight line with positive slope such that increased pressure results in a larger brush size.
Para los controles de la curva ver Control de curvas.
- Size Unit Sculpt Mode
Controls how the brush Size is measured.
- Vista:
The Size is measured based on how the cursor appears on the monitor i.e. «screen space».
- Escena:
The Size is measured based on real world units. This means that the brush size stays consistent, independently from zooming in and out in the viewport. The unit type and scaling can be configured in the Scene Units.
- Intensidad
For painting brushes the Strength defines the maximum effect of each brush stroke. For example, higher values cause a Paint brush to give each stroke a higher opacity. The opacity is never stronger than the set Strength, no matter how often the same surface is painted during the same stroke.
For sculpting brushes on the other hand the Strength relates to how strong each step of the stroke is, resulting in a slower/faster buildup towards the full brush effect during the stroke.
You can change the brush strength interactively by pressing Shift-F and then moving the brush and then LMB. You can also enter the strength numerically with the number keys.
- (Presión a intensidad)
Permitirá ajustar la intensidad basándose en la presión de la pluma, al usar una tableta gráfica.
- (Usar intensidad unificada)
Usará la misma Intensidad de pincel en todos los pinceles.
- / (Expand/Collapse)
Show or hide the customizable pressure curve.
- Curva personalizada
By default this is a straight line with positive slope such that increased pressure results in a stronger brush deformation.
Para los controles de la curva ver Control de curvas.
- Fundido
Set the way the color or value is applied over the targeted Color Attribute, Vertex Group or Image Texture. See Color Blend Modes.
Adicionar alfa: hará que la imagen se torne más opaca en donde sea pintada.
Erase Alpha: makes the image transparent where painted, allowing background colors and lower-level textures to show through. As you «paint», the false checkerboard background will be revealed. Using a tablet pen’s eraser end will toggle on this mode.
Truco
In order to see the effects of the Erase and Add Alpha mix modes in the Image Editor, the Display Channels must be set to Color & Alpha or Alpha. Transparent (no alpha) areas will then show a checkered background.
- Influencia modo Pintar Influencias
El valor de influencia que será aplicado al grupo de vértices.
Use Shift-X to sample the weight value of clicked vertex. Shift-Ctrl-X lets you select the group from which to sample from.
- Dirección Ctrl modo Esculpido
Brush direction toggle, Add raises geometry towards the brush, Subtract lowers geometry away from the brush. This setting can be toggled with Ctrl while sculpting.
- Radio de normal modo Esculpido
Determines the ratio of how much the brush radius is used to sample the normal direction of the sculpt plane of the brush. For example, a smaller Normal Radius will lead to drastic changes in the brush orientation, like for following the contours of hard surface meshes more closely. A large Normal Radius will lead to smoother changes in orientation, like for building overall forms on organic sculptures.
- Radio de área
The ratio between the brush radius and the radius that is going to be used to sample the area plane depth.
- Tilt Strength Sculpt Mode
Determines how much the tilt of the user’s tablet pen affects the brush normal. Negative values correspond to inverting the direction of the tilt.
- Dureza modo Esculpido
How close the brush falloff starts from the edge of the brush.
- Redondez punta
The factor to control how round the brush is. A value of zero will make the brush square. Note, the Brush Falloff is only applied to the rounded portions of the brush.
- Suavizado automático modo Esculpido
Sets the amount of smoothing to be applied to each stroke.
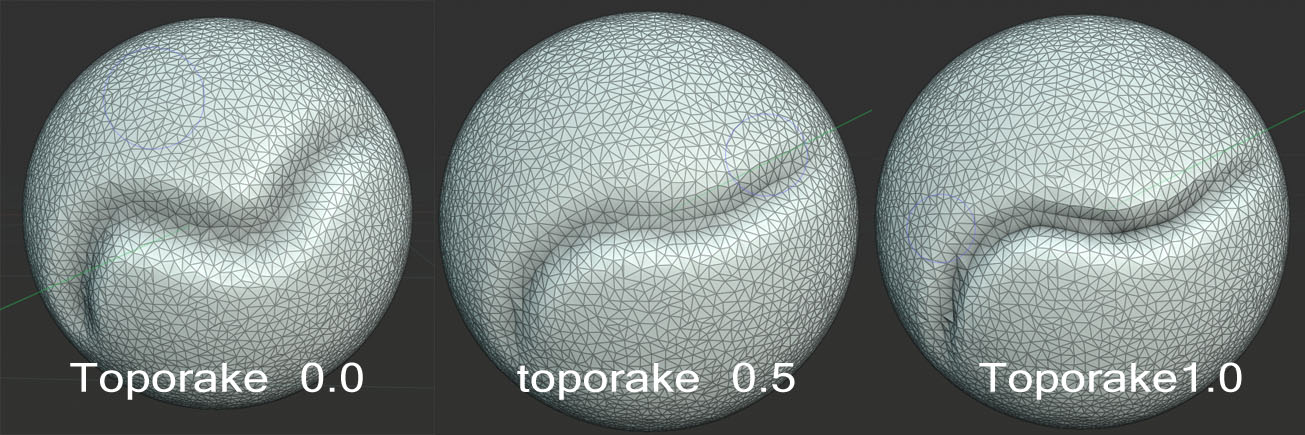
- Arrastre de topología modo Esculpido
The higher this setting is set, the more Dyntopo aligns mesh edges to the brush direction while tessellating the surface. This generates cleaner edge flow to help define sharp features. Topology Rake can have a severe performance impact so it works best on low-poly meshes.
- Influencia normal Ctrl modo Esculpido
Constrains brush movement along the surface normal. Especially useful with the Grab brush, can be temporarily enabled by holding Ctrl. E.g. Grab brush can be used to push a depression (hole) into the mesh when Normal Weight is set.
Applies to Grab and Snake Hook brushes.
- Desplazar plano modo Esculpido
Offset for planar brushes (Clay, Fill, Flatten, Scrape), shifts the plane that is found by averaging the faces above or below.
- Recortar plano modo Esculpido
Ability to limit the distance that planar brushes act. If trim is enabled vertices that are further away from the offset plane than the trim distance are ignored during sculpting.
- Pellizcar/Magnificar modo Esculpido
Pushes the mesh towards/away from the brush center during the stroke.
- Objetivo de deformación
How the deformation of the brush will affect the object.
- Geometría:
Deform the geometry directly.
- Simulación de ropa:
Deform the mesh while a cloth simulation is applied to it at the same time.
Avanzado
- Tipo de pincel
Definirá el tipo básico de comportamiento, así como las opciones disponibles. Mediante las opciones de cada tipo de pincel, será posible crear pinceles para producir efectos radicalmente distintos.
La biblioteca de recursos Esenciales contiene pinceles para cada uno de los tipos de pincel disponibles. Sus miniaturas, así como sus descripciones, deberían proporcionar una buena idea del efecto producido por cada pincel, mediante combinaciones particulares de tipos de pincel y sus opciones. Por esto, serán un mejor punto de partida para crear pinceles personalizados, que simplemente comenzar con un tipo de pincel; razón por la cual el Tipo de pincel se encuentra oculto dentro de las opciones Avanzadas de un pincel.
Pinceles y Tipos de pincel de cada modo:
- Afectar alfa sólo en pintura 2D
When this is disabled, it prevents changes to the alpha channel while painting (Only in 3D Viewport).
- Suavizado de bordes sólo en pintura 2D
Toggles Anti-Aliasing around the brush, this is useful if you are working with pixel art or low resolution textures.
- Acumular
Causes stroke dabs to accumulate on top of each other.
- Sólo caras frontales
When enabled, the brush only affects vertices that are facing the viewer.
- Plano de esculpido modo Esculpido
Usar este menú para definir el plano en el que tendrá lugar el esculpido. En otras palabras, la dirección principal en que se moverán los vértices.
- Plano del área:
The movement takes place in the direction of average normal for all active vertices within the brush area. Essentially, this means that the direction is dependent on the surface beneath the brush.
- Plano de la vista:
Sculpting in the plane of the current 3D Viewport.
- Plano X, Y, Z:
The movement takes place in the positive direction of one of the global axes.
- Original – Normal Sculpt Mode
When locked it keeps using the normal of the surface where stroke was initiated, instead of the surface normal currently under the cursor.
- Original – Plane Sculpt Mode
When locked keep using the plane origin of surface where stroke was initiated, instead of the surface plane currently under the cursor.
Autoenmascarar
Sculpt Mode
The auto-masking toggles in the brush settings are the same as the sculpt mode auto-masking settings. The difference is that these toggles can be customized per brush to create specific brush behaviors.
Ver también
Para más información sobre las opciones de autoenmascaramiento, ver Autoenmascarar.
Selector de color
Color
Los pinceles tienen dos colores, que podrán ser definidos mediante el uso del Selector de color:
Primary Color: The active color used for painting by default.
Secondary Color: An alternate color that can be quickly accessed.
By default, painting uses the primary color. The secondary color can be used temporarily by holding Ctrl while painting. The two colors can also be swapped at any time using Swap Colors.
Truco
Press Shift-X to sample a color at the mouse cursor position.
Press Shift-Ctrl-X to sample the merged viewport color, including lighting, shading, and all visible layers.
The sampled color becomes the primary color of the active Paint brush.
- (Swap Colors) X
Swaps the primary and secondary colors.
- (Usar el color unificado)
Use the same brush color across all brushes.
Nota
Note that Vertex Paint works in sRGB space, and the RGB representation of the same colors will be different between the paint tools and the materials that are in linear space.
Gradiente
A gradient can be used as a color source.
- Gradiente
The Control de rampa de color to define the gradient colors.
- Modo
- Presión:
Will choose a color from the color ramp according to the stylus pressure.
- Limitar:
Will alter the color along the stroke and as specified by Gradient Spacing option. With Clamp it uses the last color of the color ramp after the specified gradient.
- Repetir:
Similar to Clamp. After the last color it resets the color to the first color in the color ramp and repeats the pattern.
Randomize Color
Applies random variation to the brush color for more natural and varied strokes. Useful for hand-painting textures or adding subtle irregularities.
The randomness can affect hue, saturation, and value independently. Each channel also supports pressure sensitivity and stroke-based randomness.
- Tono
Amount of random variation applied to the hue of the brush color.
- (Stroke Random)
Apply a single random hue per stroke instead of varying continuously during the stroke.
- (Usar presión)
Modulate hue variation based on pen pressure.
- Saturación
Amount of random variation applied to the saturation of the brush color.
- (Stroke Random)
Apply a single random saturation per stroke instead of varying continuously during the stroke.
- (Usar presión)
Modulate saturation variation based on pen pressure.
- Valor
Amount of random variation applied to the value (brightness) of the brush color.
- (Stroke Random)
Apply a single random value per stroke instead of varying continuously during the stroke.
- (Usar presión)
Modulate value variation based on pen pressure.
Paleta de color
Las Paletas de Colores son una forma de almacenar el color de un pincel para que pueda utilizarse más adelante. Esto es útil al trabajar con varios colores a la vez.
- Paleta
Un Menú de bloque de datos para seleccionar una paleta.
- (New Palette Color)
Agrega el Color primario del pincel actual a la paleta.
- (Delete Palette Color)
Elimina el color seleccionado actualmente de la paleta.
- / (Move Palette Color)
Mueve el color seleccionado una posición hacia arriba/abajo.
- (Sort By)
Ordena los colores por Tono, Saturación, Valor y Luminancia.
- Lista de colores
Cada color que perteneciente a la paleta se presenta en una lista. Haciendo clic sobre un color cambiará el Color principal del pincel a ese color.