Luces
Referencia
- Panel:
y
Opciones en común
- Tipo
Define el tipo de luz.
- Temperatura
Blackbody temperature in Kelvin, for natural light emission colors.
- Color
Tinte de color de la luz emitida.
- Exposición
Multiply the light intensity by \(2^{exposure}\). This makes it easy to control a large range of intensities with a single slider.
- Normalizar
By default, the total power of the light remains the same when the light size and shape changes. By disabling this option, more light will be emitted when making the light bigger.
Opciones de motores de procesamiento
Punto
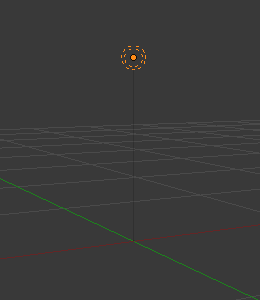
Luz de tipo Punto.
La luz de tipo Punto es una luz omnidireccional que se emite desde un punto, esto es, un punto que irradia luz con la misma intensidad en todas direcciones. Es representada como un punto rodeado por un círculo. Al ser una fuente lumínica puntual, la dirección de la luz que incida sobre la superficie de los objetos estará determinada por la línea que una a la luz con el punto de la superficie del objeto que está siendo iluminado. Podrá ser usado como un forma simple de representar a una lamparilla de luz.
La intensidad y energía de la luz decaerá (entre otras variables) en función de la distancia entre la luz y el objeto iluminado. En otras palabras, las superficies que se encuentren más alejadas serán iluminadas con menor intensidad.
- Potencia
Power of the light. Higher values increase the intensity of the light. Negative values can be set, but should be avoided for predictable and physically based result.
- Radio
En caso de ser mayor de cero, la luz se emitirá desde una superficie esférica del radio especificado. Cuanto mayor sea el radio de una luz, más suave serán las sombras proyectadas y los brillos especulares de la misma; también lucirán más atenuadas, debido a que su potencia de emisión quedará distribuida en un área de mayor tamaño.
- Decaimiento suave
Aplicará un decaimiento para evitar bordes definidos, cuando la geometría de la luz se intersecte con otros objetos.
Foco
Una luz de tipo Foco emitirá un haz de luz de forma cónica, desde la cúspide del cono y en una cierta dirección específica.
- Potencia
Power of the light. Higher values increase the intensity of the light. Negative values can be set, but should be avoided for predictable and physically based result.
- Radio
En caso de ser mayor de cero, la luz se emitirá desde una superficie esférica del radio especificado. Cuanto mayor sea el radio de una luz, más suave serán las sombras proyectadas y los brillos especulares de la misma.
- Decaimiento suave
Aplicará un decaimiento para evitar bordes definidos, cuando la geometría de la luz se intersecte con otros objetos.
Forma del haz
Al modificarse las opciones del foco, también cambiará la apariencia de la luz al ser mostrada en la Vista 3D.
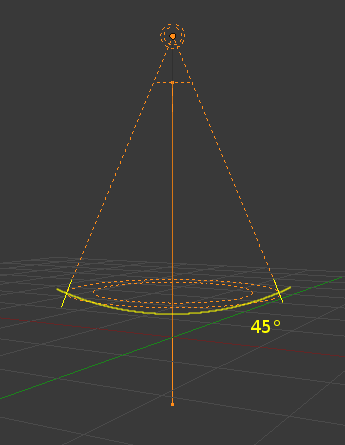
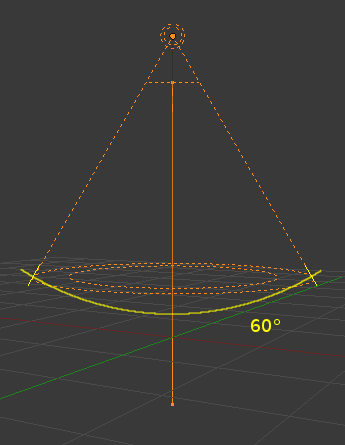
- Ángulo
The size of the outer cone of a spot light, which determines how wide the light spreads. A smaller angle produces a narrow, focused beam, while a larger angle results in a wider, softer illumination area.
This value represents the angle at the top of the light cone in degrees, and can range from 1.0° (narrow beam) to 180.0° (very wide beam).
- Fundido
El deslizador Fundido controlará el cono interior del foco. El valor podrá estar entre 0.0 y 1.0. El valor será proporcional y representará la cantidad de espacio ocupado por el cono interior, dentro del Tamaño del cono exterior.
La línea limítrofe del cono interior indica el punto en el que la luz proveniente del foco comenzará a difuminarse; antes de este punto la luz tendrá una intensidad mayormente igual a la intensidad completa. Cuanto mayor sea el valor de Fundido más difusos serán los bordes del cono y más pequeña será el área circular del cono interior (a medida que comience a difuminarse antes).
Para lograr que el foco tenga una tasa de decaimiento más definida y, por lo tanto, bordes menos difuminados, disminuir el valor de Fundido. Colocarle un valor de 0.0 producirá bordes muy definidos del cono de iluminación, sin transición alguna entre la luz y la sombra.
La tasa de decaimiento del foco es una relación entre los valores de Fundido y Tamaño; cuanto mayor sea la diferencia entre ambos, más gradualmente se fundirá la luz entre Fundido y Tamaño.
Fundido y Tamaño sólo controlarán la apertura y suavidad (decaimiento «radial») del cono del foco; no controlarán sin embargo la suavidad de sus sombras, tal como se muestra abajo.

Imagen procesada, mostrando un foco con un cono de bordes suaves y la sombra definida del objeto.
En la imagen de arriba se puede notar cómo la sombra del objeto tiene bordes definidos, resultado del trazado de rayos, mientras que los bordes del cono del foco están difuminados. En caso de que se deseara que otros elementos proyectaran sombras de bordes suaves dentro del área del foco, se necesitarán alterar las opciones de sombras.
- Mostrar cono
Mostrará un cono semitransparente en la Vista 3D, para ayudar a visualizar qué objetos quedarán contenidos dentro del mismo.
Área
La luz de área permitirá simular una iluminación proveniente desde un emisor superficial (o cuasi superficial). Por ejemplo, la pantalla de un TV, luces de neón, una ventana o un cielo nuboso, son algunos de los tipos de iluminación que es posible representar mediante este tipo de luz. La luz de área producirá sombras con bordes difuminados, producto del muestreo de la luz a lo largo de una cuadrícula de un tamaño definido por el usuario. Esto, en contraste directo con las luces artificiales de tipo puntual, que producen bordes definidos.
- Potencia
Power of the light. Higher values increase the intensity of the light. Negative values can be set, but should be avoided for predictable and physically based result.
- Forma
La forma de la luz.
- Rectángulo:
La forma de la luz puede ser descripta como un rectángulo y cambiada mediante los valores «X» e «Y».
- Cuadrado:
La forma de la luz puede ser descripta como un cuadrado y cambiada mediante la opción Tamaño.
- Disco:
La forma de la luz puede ser descripta como un disco y cambiada mediante la opción Tamaño.
- Elipse:
La forma de la luz puede ser descripta como una elipse y cambiada mediante los valores «X» e «Y».
Truco
Escoger la forma apropiada para una luz de área mejorará la credibilidad de una escena. Por ejemplo, si se tuviera una escena de interiores y se deseara simular luz entrando a través de una ventana. Sería posible colocar una luz de área de forma Rectangular en la ventana (vertical) o si fuera para luces de tipo neón (horizontal), con unas proporciones correctas entre Tamaño X y Tamaño Y. Para simular luz emitida por una pantalla de TV, sería mejor una luz de área vertical de tipo Cuadrado, en la mayoría de los casos.
- Tamaño / Tamaño X / Tamaño Y
Dimensiones del Cuadrado o Rectángulo.
Sol
Una luz de tipo Sol proporcionará luz de intensidad constante, emitida en una única dirección desde un lugar infinitamente lejano. Podrá resultar muy útil para simular la iluminación uniforme de un espacio abierto en un día despejado. En la Vista 3D, la luz de tipo Sol será representada por un punto negro rodeado de un círculo con rayos saliendo de él, más una línea punteada indicando la dirección de la luz.
Nota
Esta dirección podrá ser cambiada rotando la luz, como cualquier otro objeto, sin embargo como la luz es emitida desde una ubicación considerada como infinitamente lejana, la posición de la luz de tipo Sol no afectará el resultado de su iluminación.
- Intensidad
Strength of the lights. See more details at Power of Lights.
- Ángulo
El tamaño del Sol de acuerdo a su diámetro angular visto desde la Tierra.
Potencia de las luces
When Normalize is enabled, the power of sun lights is specified in Watts per square meter. The power of point lights, spot lights, and area lights is specified in Watts.
But this is not the electrical Watts that consumer light bulbs are rated at. It is Radiant Flux or Radiant Power which is also measured in Watts. It is the energy radiated from the light in the form of visible light.
En caso de que se desee definir la potencia a valores del mundo real, deberá convertirse el wattaje de la lamparilla incandescente o LED doméstica a valores de flujo radiante, aunque este no será un procedimiento sencillo. El wattaje marcado en las lamparillas domésticas se refiere a la potencia eléctrica necesaria para alimentarlas. (Las lámparas LED tienen una «equivalencia en Watts» que no representa ni a la potencia eléctrica necesaria, ni a la cantidad de luz que emiten). Algunas lámparas domésticas especifican también la cantidad de lúmenes o flujo luminoso, lo que representa al flujo radiante ponderado según las longitudes de onda percibidas por el ojo humano.
Para ahorrarle al usuario tener que hacer la conversión, se presenta aquí una tabla con los valores típicos de potencia para luces de tipo punto, foco y área:
Luz real |
Potencia |
Tipo de luz sugerido |
|---|---|---|
Vela |
0.05 W |
Punto (o Apuntar) |
Lámpara LED de 800 lm |
2.1 W |
Punto (o Apuntar) |
Lámpara de 1000 lm |
2.9 W |
Punto (o Apuntar) |
Luminaria PAR38 de 1500 lm |
4 W |
Área (Disco) |
Tubo fluorescente de 2500 lm |
4.5 W |
Área (Rectángulo) |
Foco automóvil de 5000 lm |
22 W |
Foco, apertura 125° |
Y una tabla con valores típicos de Potencia para luz de Sol:
Tipo de Sol |
Intensidad |
|---|---|
Cielo despejado |
1000 W/m2 |
Cielo nuboso |
500 W/m2 |
Cielo nublado |
200 W/m2 |
Luz de Luna |
0.001 W/m2 |
These values will produce much brighter or dimmer lights than you would expect, because our eyes adapt while a render engine does not. So to compensate, adjust the Exposure in .
Para obtener resultados realistas, recordar configurar también el tamaño y el color de la luz a valores realistas. El color de las luces también influenciará qué tan brillantes lucirán en el sistema de visión humano. A potencia constante, una luz verde lucirá muy brillante, una roja más oscura y una azul más oscura aún. Así, será posible compensar mediante el uso de la potencia estas diferencias perceptuales.