Copy Global Transform
Permitirá copiar y pegar transformaciones de objetos y huesos de manera sencilla.
Al copiar, la transformación será colocada (en espacio global) en el portapapeles. Desde allí podrá ser luego copiada a cualquier objeto o hueso, en el fotograma actual o en otro distinto.
Dado que la transformación estará almacenada como texto en el portapapeles, será posible pegarla mediante un programa de mensajería, para enviársela a otra persona.
Habilitación del complemento
Abrir Blender e ir a la sección Complementos de las Preferencias.
Buscar «Copy Global Transform» y marcar la casilla de verificación Habilitar extensión.
Interfaz
Ubicado en la pestaña .
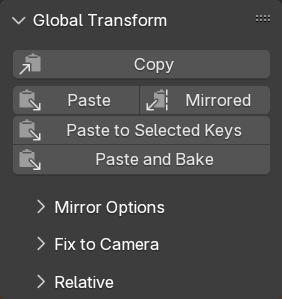
La imagen de la derecha muestra las funciones principales del panel Transformaciones globales. Los paneles que aparecen colapsados serán descriptos debajo, en sus secciones propias.
Descripción
- Copiar
Inspeccionará el objeto activo (en modo Objeto) o el hueso (en modo Pose) y colocará sus transformaciones globales actuales en el portapapeles como una matriz.
- Pegar
Aplicará las transformaciones globales previamente copiadas al objeto o hueso activo. Esto modificará sus propiedades de posición, rotación y escala.
- Simetrizada
Igual que la opción “Pegar” de arriba, pero simetrizado las transformaciones con respecto a otro objeto o hueso indicado. Esto podrá resultar útil, por ejemplo, para copiar la posición de un pie al otro. Ver Opciones de simetría debajo.
- Pegar en claves seleccionados
Pegará, tal como se describe más arriba, generando claves automáticos para actualizar uno o más fotogramas. La selección de claves será usada para indicarle a Blender en qué fotogramas deberá ocurrir esto; sin embrago esto no determinará qué canales de transformación recibirán nuevos claves. Éstos serán determinados por el conjunto de claves activo.
- Pegar y capturar
Casi idéntico a Pegar en claves seleccionados. Aunque, en vez de solamente pegar en los claves seleccionados, Pegar y capturar pegará y generará claves automáticos en cada fotograma, desde el primer clave seleccionado hasta el último.
Opciones de simetría
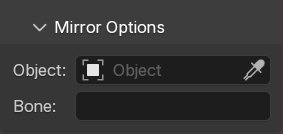
Permitirá que las transformaciones copiadas sean simetrizadas en relación a un objeto o un hueso. Esto requerirá elegir primero un objeto o hueso de simetría.
- Esqueleto + hueso
Al escoger un Esqueleto como objeto de simetría, se mostrará un selector de huesos. Será posible usarlo para escoger un hueso del esqueleto seleccionado para ser usado como objeto de simetría.
- Sólo un hueso
En caso de que no se escogiera ningún objeto de simetría, aún será posible escoger el nombre de un hueso. Éste será usado para simetrizar con respecto al esqueleto activo. Esto podría resultar útil para simetrizar transformaciones de huesos, en relación al hueso del “pecho” del personaje activo.
- Sólo un objeto
Permitirá simetrizar con respecto al objeto escogido.
Luego de pegar la transformación usando el botón Simetrizada, será posible escoger los ejes de simetría desde el panel Ajustar última operación.
Fijar a cámara
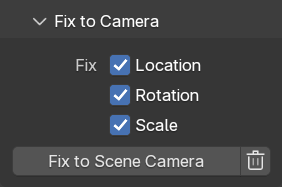
También conocido como «capturar para la cámara», este operador asegurará que los objetos/huesos seleccionados permanezcan estáticos (en relación con la cámara) en los fotogramas que no contengan claves.
Esto se logrará mediante la generación de nuevos claves. Éstos serán de tipo tipo “Generado” para que permanezca claro qué claves fueron creados de forma manual y cuales fueron generados automáticamente. De esta manera será posible volver a ejecutar la herramienta para regenerar estos últimos.
Asegurarse de que la animación esté animada usando una interpolación constante. Si este no fuera el caso, capturar la animación (al menos sus canales de transformación). Esta herramienta no funcionará con el modificador de curvas-f «Interpolación escalonada».
Escoger qué canales (Posición/Rotación/Escala) se desea fijar a la cámara. En caso de no estar seguro, dejarlos todos activos.
Pulsar el botón Fijar a cámara de la escena.
Para deshacer el efecto del operador «Fijar a cámara», hacer clic en el ícono de la papelera. Esto eliminará todos los claves generados, tanto en el rango de la escena, como en el de previsualización.
Esta herramienta opera en el rango de fotogramas de la escena o en el rango de previsualización, si estuviera activo. Los claves por fuera de dichos rangos serán ignorados, tanto al fijar a la cámara, como al eliminar los claves generados.
Advertencia
Esta herramienta asumirá que todos los claves de tipo “Generado” son iguales. Por lo tanto, los sobrescribirá (o eliminará, dependiendo del botón presionado) a todos.
Copiado y pegado relativo
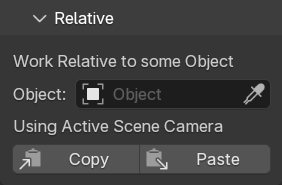
El panel «Relativo» tiene botones de copiar/pegar que funcionan de manera relativa a un objeto seleccionado. Al copiar, se determinarán las transformaciones en espacio global, y luego serán ajustadas para ser relativas a las transformaciones globales del objeto escogido. Al pegar, esto sucederá pero en reversa.
En caso de que no se hubiera escogido ningún objeto, la operación de copiar/pegar se producirá relativa a la cámara activa de la escena. Se usará la cámara que se encuentre como activa en cada momento, por lo que al pegar podría ser distinta que al copiar. Esto podrá ser de ayuda para mantener a un objeto visualmente en el mismo lugar al cambiar de cámara activa o al cambiar entre distintas escenas.
Limitaciones
Al pegar transformaciones, se modificará la posición, rotación y escala del objeto o hueso. Esto significa que al copiar una transformación sesgada, el sesgo se perderá.
En caso de que hubieran restricciones en el objeto o hueso, la transformación visual resultante podría no ser la misma que la que se pega. Por ejemplo: en caso de que se tuviera una restricción que agregara una rotación, siempre adicionará esa rotación a las transformaciones pegadas.
Ver también
Biblioteca de poses, para ver una manera de administrar y compartir poses completas.
Referencia
- Categoría:
Animación
- Descripción:
Complemento sencillo para copiar transformaciones en espacio global.
- Posición:
- Archivo:
copy_global_transform.py
- Autor:
Sybren A. Stüvel
- Encargado:
Sybren A. Stüvel
- Licencia:
GPL 2+
- Nivel de soporte:
Oficial
- Notas:
Este complemento viene incorporado con Blender.