Introducción

This section describes the various tools for selecting mesh elements.

Ver también

The Selección page contains information about selecting in general.

Modos de selección

Referencia

Modo:

Modo Edición

Menú:

Encabezado de la Vista 3D ‣ Modo de selección

Atajo:

1, 2, 3 (Shift Multiple Selection Modes, Ctrl Expand/Contract Selection)

In Edit Mode, there are three different selection modes: Vertex, Edge, and Face. To switch to a different mode, click the button in the 3D Viewport’s header or press the shortcut key.

../../../_images/modeling_meshes_selecting_introduction_mode-buttons.png

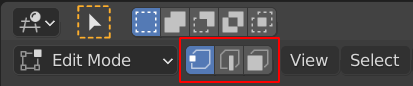
Selection mode buttons
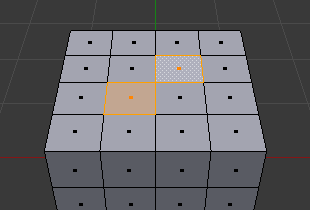
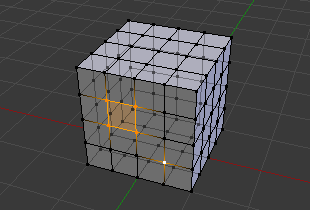
Vertex 1

In this mode, vertices are shown as points. Unselected vertices are shown in black, selected vertices in orange, and the active vertex in white.
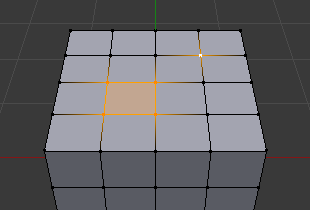
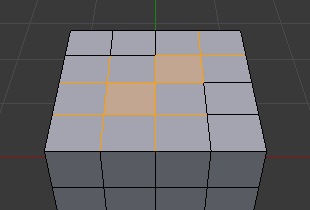
Edge 2

In this mode, the vertices are not shown. Unselected edges are shown in black, selected edges in yellow, and the active edge in white.
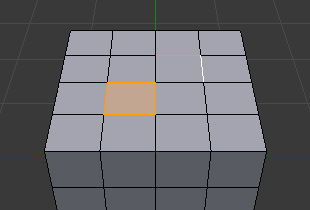
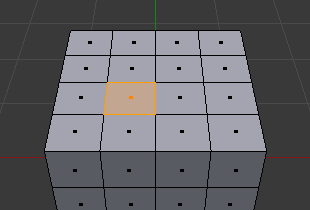
Face 3

In this mode, selected faces are shaded in orange, and the active face additionally has a white border.

../../../_images/modeling_meshes_selecting_introduction_vertex-mode-example.png

Ejemplo del modo Vértice.

../../../_images/modeling_meshes_selecting_introduction_edge-mode-example.png

Ejemplo del modo Borde.

../../../_images/modeling_meshes_selecting_introduction_face-mode-example.png

Ejemplo del modo Cara.

Switching Selection Mode

When switching modes in an «ascending» way – from Vertices to Edges or from Edges to Faces – the selected elements from the old mode will only stay selected if they form a complete element in the new mode.

For example, if all four edges of a face are selected, switching from Edges to Faces will keep the face selected. However, any edges that do not form a complete face will be deselected.

../../../_images/modeling_meshes_selecting_introduction_edge-mode-example.png

Selection in Edge mode.

../../../_images/modeling_meshes_selecting_introduction_face-mode-switched-from-edge.png

Cambiando al modo Cara.

When switching in a «descending» way, on the other hand, all elements stay selected. For example, if you selected a face and switch to Edge mode, all four of its edges will be selected.

Modos de selección múltiple

It’s possible to enable multiple modes at the same time by holding Shift while switching.

Expandir / contraer la selección

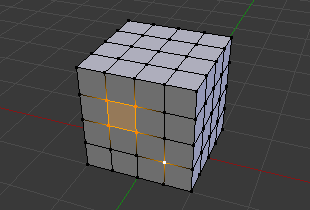
When holding Ctrl while switching to a «higher» mode, the selection will be expanded, fully including elements of the new mode that were only partially included before.

../../../_images/modeling_meshes_selecting_introduction_vertex-mode-example.png

Selection in Vertex mode.

../../../_images/modeling_meshes_selecting_introduction_edge-mode-expanding-from-vertex.png

Switching to Edge mode while holding Ctrl.

Holding Ctrl while switching to a «lower» mode does the opposite: it contracts the selection, deselecting elements in the new mode that have any unselected neighbors.

Rayos X

The X-Ray shading mode makes it possible to not just to see occluded geometry, but also select it. As a side effect, it’s no longer possible to select faces by clicking anywhere on their surface; instead, click the selection dot in their center.

../../../_images/modeling_meshes_selecting_introduction_limit-selection-to-visible-off.png

Rayos-X activados.

../../../_images/modeling_meshes_selecting_introduction_limit-selection-to-visible-on.png

Rayos-X desactivados.

Menú Seleccionar

Todos A

Seleccionar todo.

Ninguno Alt-A

Deseleccionar todo.

Invertir Ctrl-I

Select the geometry that’s not selected, and deselect the geometry that is.


Seleccionar (Marco) B

Selección de tipo marco interactiva.

Seleccionar (Círculo) C

Selección de tipo círculo interactiva.

Seleccionar (Lazo)

Selección interactiva de forma libre.


Select Mirror Shift-Ctrl-M

Flips the selection to the opposite side of the mesh.

Select Random

Selecciona un grupo aleatorio de vértices, bordes o caras, en función de un valor porcentual.

Checker Deselect

Deselects alternating elements relative to the active one.


Más / Menos
More Ctrl-NumpadPlus

Grows the selection to include the elements at its border.

Less Ctrl-NumpadMinus

Shrinks the selection to exclude the elements at its border.

Next Active Shift-Ctrl-NumpadPlus

Selects the element that «logically follows» the two most recently selected ones.

Previous Active Shift-Ctrl-NumpadMinus

Deselects the last selected element and makes the next-to-last one active again.


Select Similar Shift-G

Selects elements similar to the current selection.

Seleccionar por condición

Selects geometry that meets certain undesirable conditions.

Seleccionar por vínculo
Linked

Selects all elements that are connected directly or indirectly to the current selection.

Shortest Path

Selects the elements that lie on the shortest path between the two most recently selected ones.

Linked Flat Faces

Grows the selection to include the faces that are (approximately) coplanar with the currently selected ones.

Seleccionar bucles
Edge Loops

Selects the edges that lie in the same edge loop as the currently selected ones.

Edge Rings

Selects the edges that lie in the same edge ring as the currently selected ones.

Select Loop Inner-Region

Selects the faces that are enclosed by the currently selected boundary edges.

Select Boundary Loop

Replaces the current face selection by an edge selection of its boundaries.

Sharp Edges

Selects edges at sharp corners.

Side of Active Vertex Mode

Selects all the vertices that are (for example) to the right of the active vertex.

By Attribute

Selects the elements for which the currently active attribute has a value of True.

Problemas conocidos

Mallas densas

When selecting a region with Box/Circle/Lasso Select in a dense mesh with X-Ray disabled, not all vertices in the region may get included due to overlapping. Should this happen, please zoom in or enable X-Ray as a workaround.

Enégonos en el modo de selección de Caras

../../../_images/modeling_meshes_selecting_introduction_face-mode-ngon-visual-problem.png

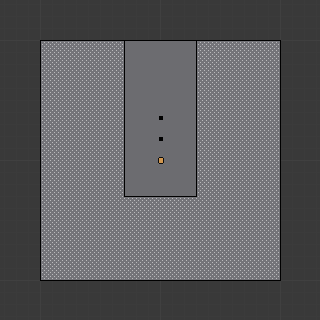
N-gon having its selection dot inside another face.

The face selection dot in the X-Ray and Wireframe shading modes is simply placed in the center of the face, which may not be on the face’s surface in the case of concave n-gons. This can make it harder to find the dot, especially if another face sits in the cavity.