Uso básico
Generación básica de sistemas de control
Agregar una estructura de metarig desde el menú .
Editar la posición de los huesos para que coincidan con la geometría del personaje.
En las propiedades del esqueleto hacer clic en el botón Generar sistema de control para generar un sistema de control.
Adición de un metarig predefinido
Referencia
- Modo:
Modo Objeto
- Menú:
- Atajo:
Mayús-A
Rigify almacena toda la información requerida para generar los complejos sistemas y mecanismos de control en esqueletos más simples, llamados «metarigs».
Los metarigs predefinidos pueden ser hallados en el menú Agregar –> Esqueleto. Los tipos de metarig disponibles actualmente son:
Humano básico (no incluye rostro ni dedos)
Cuadrúpedo básico
Humano
Gato
Lobo
Caballo
Tiburón
Edición de la posición de los huesos
Para que coincidan correctamente con el personaje, los huesos del metarig deberán ser movidos a las posiciones correctas. Esto podrá ser conseguido de dos maneras diferentes: en el modo Pose o en el modo Edición.
Nota
Rigify asume que 1 unidad corresponde a 1 metro. Por lo tanto un humano medirá aproximadamente 2 unidades de altura. Si el personaje estuviera en una escala diferente y se estuviera más familiarizado con el modelado que con la creación de sistemas de control de animación, se sugiere escalarlo a las dimensiones esperadas por Rigify antes de posicionar los huesos del metarig. En caso de escalar la geometría del personaje, se sugiere primero aumentar la escala del personaje en modo Objeto, luego aplicar la escala de la geometría usando el operador Aplicar escala.
Consejos de alineación para el Humano de Rigify
Extremidades: Mantener las piernas tan verticales como sea posible en la vista frontal (El Humano de Rigify funcionará mejor en casos predecibles). Dar a las rodillas y codos un ligero ángulo de flexión (Rigify necesitará saber hacia adónde deben apuntar las rodillas y los codos).
Torso: Mantener la columna vertebral tan vertical como sea posible en la vista frontal (El Humano de Rigify funcionará mejor en casos predecibles). El último hueso de la columna vertebral será considerado la cabeza. De forma predefinida, los siguientes dos huesos (desde abajo hacia arriba) serán considerados los huesos del cuello. Se sugiere mantener los huesos del cuello tan alineados como sea posible durante su edición.
Rostro: Posicionar los huesos del rostro puede ser complicado si no se contara con experiencia previa editando huesos, además éstos casi no tendrán utilidad en caso de que esté planeado realizar la animación facial a través de Formas clave. Se deberá considerar la eliminación de las características del rostro del personaje si éstas no fueran realmente necesarias. En caso de que el rostro no fuera necesario, todos sus huesos podrán ser borrados. De forma predefinida, todos los huesos del rostro se encontrarán dentro de la colección de huesos Face del esqueleto. Esto podrá hacerse en el modo Edición, visualizando sólo esa colección, seleccionando todo su contenido y, luego, borrando los huesos.
Si se deseara escalar todos los huesos del rostro al mismo tiempo, considerar escalar el hueso maestro del rostro, en modo Pose (ver el método de coincidencia en modo Pose). El hueso principal del rostro estará ubicado en la misma posición que el hueso de la cabeza. Para seleccionarlo fácilmente, ocultar todas las otras colecciones de huesos.
Para más consejos, ver la Guía de posicionamiento.
Coincidencia en modo Pose (básico)
Ingresar al modo Pose del metarig. Rotar, escalar y mover los huesos hasta la posición correcta. Cuando los huesos estén en las posiciones correctas (siempre en el modo Pose), utilizar Aplicar –> Aplicar pose como pose de reposo.
Nota
Los huesos conectados no podrán ser movidos en modo Pose. Podrán escalarse los huesos superiores para que coincidan con la longitud general y luego refinar la escala de los huesos subordinados. Para información más detallada sobre los modos de los esqueletos, consultar la sección Esqueletos </animation/armatures/bones/editing/introduction>.
Coincidencia en modo Edición (avanzado)
Se sugiere realizar algunos ajustes básicos a la configuración de visualización del esqueleto antes de ingresar al modo Edición.
Con el metarig seleccionado, ir a Propiedades y hacer clic en la pestaña Objeto. Desplazarse hasta el panel Presentación en vistas y habilitar En frente, y en la opción Mostrar como seleccionar Estructura. De esta forma, los huesos siempre serán dibujados en modo estructura y por sobre la geometría.
Posteriormente, siempre en el editor de Propiedades, hacer clic en la pestaña Esqueleto y en el panel Presentación en vistas marcar la opción Ejes. De esta forma, se podrán visualizar los ejes locales de rotación de los huesos durante el proceso de edición.
Para información más detallada sobre los modos de visualización de los esqueletos, consultar la sección del panel Presentación en vistas.
Generación del sistema de control
Una vez que los huesos se encuentren en las posiciones correctas, volver al modo Objeto, ir a la pestaña Esqueleto, desplazarse hacia su parte inferior y hacer clic en el botón Generar sistema de control para finalizar la creación del sistema de control. El proceso de generación podrá insumir desde algunos pocos segundos hasta un minuto, dependiendo de la complejidad del sistema de control y de las especificaciones de hardware del equipo usado. En caso de que el sistema de control generado necesitara retoques, será posible modificar el metarig como sea necesario y, luego, hacer clic nuevamente vez sobre el botón Regenerar sistema de control. Si ya existiera un sistema de control, Rigify simplemente lo sobrescribirá, reteniendo a todos tus modificadores y restricciones y, en caso de que fuera posible, todas las características previamente generadas.
Para más información acerca de opciones adicionales de generación, ver la sección Generación avanzada de sistemas de control.
Truco
En caso de que el metarig usara el control de rostro obsoleto, será posible utilizar el botón Actualizar control de rostros que aparece arriba del botón Generar sistema de control para actualizar de forma automática al nuevo sistema modular de control de rostros.
La actualización preservará compatibilidad con la deformación con esqueletos ya existente, sin embargo las poses y animaciones existentes muy probablemente no serán compatibles, debido a cambios sutiles en el comportamiento de los controles.
Nota
Para hacer que la sobrescritura del sistema de control funcione como se espera, será necesario tener visibles tanto al sistema de control, como al metarig, antes de la regeneración. En casos sencillos, Rigify intentará volver a mostrarlos aunque, en caso de no lograrlo, la regeneración será cancelada.
Advertencia
Al igual que con todos los complementos de Python, la interfaz de Blender podrá actualizarse hasta que la ejecución del script de Python no finalice. Se deberá esperar a que el sistema de control aparezca para ver el resultado.
Advertencia
Rigify está diseñado asumiendo un flujo de trabajo en donde el metarig se mantenga disponible para permitir la regeneración del sistema de control principal, cuando sea necesario realizar cambios al mismo. Tanto la eliminación del metarig luego de que el sistema de control principal haya sido generado, como la modificación sustancial del sistema de control generado, están desaconsejados: esto tornará imposible la introducción de las nuevas características agregadas en posteriores versiones de Rigify o adaptarlo fácilmente a cambios disruptivos en versiones posteriores de Blender. En general, se proporcionarán scripts de actualización automática de versiones para los metarigs cuando esto sea necesario; pero no así de los sistemas de control generados.
Enlace entre geometría y sistema de control
Para enlazar la geometría al sistema de control, será posible utilizar las herramientas usuales. Sin embargo, resultará útil conocer algunas cosas:
Todos los huesos deformantes se encontrarán en la colección de huesos DEF.
Los huesos de ojos y dientes del rostro antiguo no eran deformantes. Se supone que la geometría de los ojos y los dientes fuera enlazada utilizando restricciones Subordinar.
Por lo general, la deformación de un esqueleto con influencias automáticas funciona realmente bien, en caso de haber ubicado los huesos correctamente (y cuando exista suficiente geometría como para hacer el trabajo).
Para una información más detallada acerca de las colecciones de huesos, el modificador Esqueleto y la pintura de influencias, ver las secciones correspondientes del manual de Blender.
Generación avanzada de sistemas de control
Características de las opciones avanzadas
Al usar las opciones del sub panel Avanzado, será posible:
Generar más de un sistema de control por escena.
Actualizar o redefinir un sistema de control específico.
Forzar la sobrescritura de objetos de control previamente generados.
Elegir si usar duplicados vinculados para los controles de los lados izquierdo y derecho.
Ejecutar un script desde un bloque de datos, luego de la regeneración.
Sub panel Avanzado
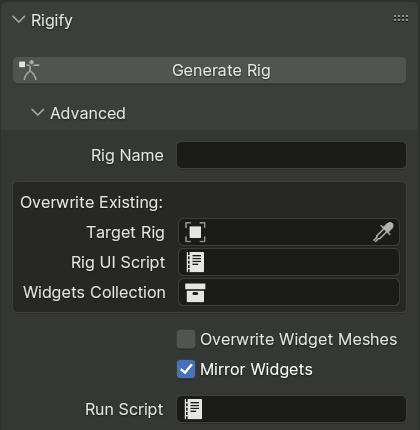
Las opciones avanzadas de generación de sistemas de control se encuentran, de manera predefinida, ocultas dentro de un sub panel. Hacer clic sobre la línea Avanzado para abrirlo.
Algunas de las opciones será establecidas de manera automática por Rigify, en caso de que no contengan ningún valor cuando el sistema de control vaya a ser generado; mientras que otras serán completamente controladas por el usuario.
- Nombre sistema de control
Cuando se genere un nuevo sistema de control (por oposición a sobrescribir uno ya creado) el valor de esta opción podrá ser usado para darle nombre.
En caso de que este campo se encontrara vacío, el nuevo objeto será nombrado basándose en el nombre del metarig, de acuerdo a las siguientes reglas:
Si el nombre contiene
META, será reemplazado porRIG.Si el nombre contiene
metarig, será reemplazado porrig.En cualquier otro caso, se agregará el prefijo
RIG-al nombre.
En caso de que se estuviera sobrescribiendo un sistema de control existente, especificado en la opción Sist. control objetivo, su nombre no será modificado, permitiéndole ser libremente renombrado, sin necesidad de mantener al valor de esta opción sincronizado.
- Sistema de control objetivo auto
Esta opción especificará el sistema de control ya generado, a ser sobrescrito al regenerar a partir de este metarig.
En caso de que esta opción se encontrara vacía, Rigify generará un nuevo sistema de control y almacenará su nombre en la misma.
Nota
Cuando la opción se encuentre vacía, Rigify creará un nuevo sistema de control, aún en caso de que ya existiera un objeto con un nombre coincidente.
- Script de interfaz auto
Esta opción especifica el bloque de datos del script generado a ser sobrescrito al regenerar, funcionando de una manera similar a la opción Sist. control objetivo.
El script controlará la interfaz en la Vista 3D que permite determinar las colecciones de huesos visibles, cambiar las propiedades personalizadas, convertir entre cinemática inversa y directa, entre otras opciones.
- Colección de controles auto
Esta referencia permite especificar la colección que contendrá los controles generados, funcionando de una manera similar a la opción Sist. control objetivo.
- Sobrescribir controles
Cuando esta opción esté activa, Rigify generará controles nuevos cada vez que el sistema de control sea regenerado. De forma predefinida, intentará reutilizar los controles ya generados que existan en la colección de controles, permitiendo su edición manual para ajustarlos de mejor manera al personaje.
- Simetrizar controles
Cuando esta opción esté activa, Rigify generará controles para los lados izquierdo y derecho como duplicados vinculados, usando una escala X negativa para la versión correspondiente al lado derecho. Esto asegurará la simetría y reducirá la cantidad de controles a ser retocados para ajustarlos al personaje.
Al reutilizar un control previamente generado, Rigify detectará si fue originalmente simetrizado (mediante la comprobación de su escala) para evitar invertir doblemente los controles. Por esta razón, para cambiar a controles simetrizados un personaje ya existente, se deberá borrar sus controles del lado derecho o usar Sobrescribir controles.
- Ejecutar script
Será posible configurar Rigify para ejecutar el script de Python contenido en un bloque de datos de texto, luego de la generación, para aplicar personalizaciones definidas por el usuario. El script se ejecutará con el sistema de control generado estando activo y seleccionado en modo Objeto.
El uso más simple de esto podría ser el ajuste de propiedades de las restricciones generadas cuando el tipo de sistema de control de Rigify no contenga ninguna opción relevante en su metarig. Esto podrá ser hecho usando la opción del menú contextual Copiar ruta de datos completa sobre la propiedad, pegándola dentro del script y realizando una asignación, por ejemplo:
import bpy

bpy.data.objects["rig"].pose.bones["MCH-spine.003"].constraints[0].influence = 0.6
La realización de tales cambios mediante un script asegurará que no se pierdan en caso de que el sistema de control fuera regenerado.
Los usuarios familiares con scripts de Rigify podrán importar módulos utilitarios de Rigify y acceder a la instancia del generador mediante
rigify.get_generator(). Aún así, deberá notarse que debido a que la generación ya está concluida, el único uso que se le podrá dar es el de leer los datos creados durante el proceso de generación.
Anexión o vinculación desde una biblioteca
Cuando se desee anexar o vincular un sistema de control desde otro archivo, por lo general será conveniente crear una nueva colección para cada personaje, que incluya al sistema de control generado y a la malla del mismo. (Asegurarse de incluir manualmente la malla dentro de la colección, en caso de que luego de incluir al sistema de control, ésta vuelva a aparecer fuera de la colección). No será estrictamente necesario (aunque sí práctico) incluir en la colección al metarig o a la colección de controles («WGTS_rig») usada por Rigify.
El bloque de datos de texto rig_ui_template.py, responsable de la interfaz del sistema de control, será vinculado automáticamente junto con el sistema de control, por lo que no será necesario hacerlo expresamente. Sin embargo, el script no será ejecutado hasta que no se haga manualmente desde el Editor de texto o hasta que el archivo no sea guardado y se reinicie Blender.