Mesh Primitives
Referencia
- Modo:
Object Mode, Edit Mode
- Menú:
- Atajo:
Mayús-A
Meshes are the most common object type used in 3D scenes. Blender provides a variety of built-in mesh primitives that serve as starting points for modeling. These primitives can be added in both Object Mode and Edit Mode, where they appear at the location of the 3D Cursor.
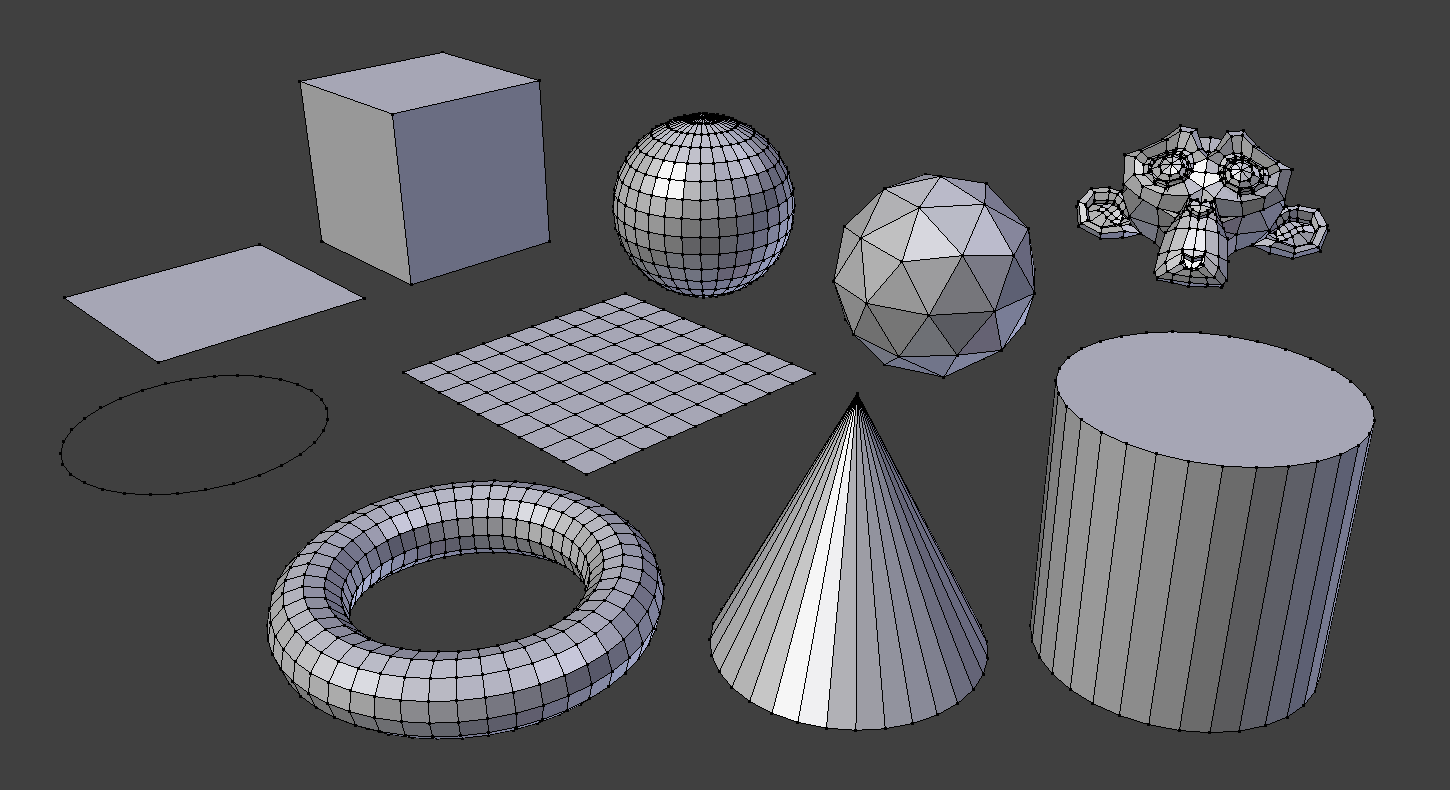
Blender’s standard mesh primitives.
Truco
Planar meshes like Plane, Circle, and Grid can become three-dimensional by moving vertices out of their original plane.
Nota
Additional primitives can be enabled through add-on extensions. See Get Extensions for more information.
Opciones en común
Estas opciones podrán ser especificadas en el panel Ajustar última operación, que aparece cuando se crea el objeto. Las opciones incluidas en más de una primitiva son:
- Generar UV
Generará un despliegue UV predefinido de la nueva geometría. Esto se definirá en la primera capa UV (que será agregada si fuera necesario).
- Align to View, Location, Rotation
Plano
The standard plane is a single quad face composed of four vertices, four edges, and one face. It lies flat and has no thickness, making it a purely two-dimensional object.
Planes are commonly used to represent surfaces such as floors, walls, tabletops, or mirrors. They are also frequently used as emitter objects, camera backgrounds, or for projection mapping.
- Tamaño
Sets the width and height of the plane (the full extent from edge to edge).
Ver también
Mesh Plane allows importing an image as a textured plane. The plane’s dimensions are automatically scaled to match the image’s aspect ratio.
Truco
Planes are useful as a starting point for modeling panels, ceilings, cloth simulations, or sculpting surfaces. Apply modifiers like Subdivision Surface or Displace to turn a flat plane into complex geometry.
Cubo
Adds a standard cube mesh composed of six quad faces, eight vertices, and twelve edges. This is one of the most basic and frequently used primitives in modeling, serving as a starting point for creating boxes, crates, buildings, or sculpting bases.
- Tamaño
Sets the total width, height, and depth of the cube (i.e., the full diameter along each axis). A size of 2 creates a cube that spans from -1 to +1 on all axes.
Truco
The cube is ideal for hard-surface modeling and is commonly used as a base for applying modifiers such as Subdivision Surface, Boolean, or Bevel.
Círculo
Adds a flat, 2D ring of vertices forming a polygonal approximation of a circle. This primitive is useful as a starting point for cylindrical objects, holes, pipe ends, or extrusion-based modeling workflows.
- Vértices
Number of vertices used to define the perimeter of the circle. Higher values result in a smoother shape.
- Tipo de relleno
Establece como se rellenará el interior del circulo:
- Abanico de triángulos:
Fills the circle with triangular faces sharing a central vertex.
- Enégono:
Fills the center with a single N-gon face.
- Nada:
Leaves the circle unfilled; only the perimeter vertices are created.
- Radio
Distance from the center to the outer edge of the circle.
Esfera
A UV sphere is composed of quad faces arranged in horizontal rings and vertical segments, with triangle fans at the poles. This structure mirrors how textures are typically mapped in 2D (hence the name «UV» sphere), making it well-suited for texturing.
It resembles lines of latitude and longitude on a globe, which also makes it useful for planetary models or spherical shapes with pole-to-pole UV seams.
- Segmentos
Number of vertical segments (longitudinal divisions). These are like meridians on a globe, running from the north to south pole.
- Anillos
Number of horizontal segments (latitudinal divisions). These are like parallels on a globe, stacked from top to bottom.
Nota
Rings correspond to face loops, not edge loops, so the actual number of visible edge loops is one less.
- Radio
Distance from the center to the outer surface of the sphere.
Truco
For clean shading, enable Smooth Shading and apply a Subdivision Surface modifier.
Esfera geodésica
An icosphere is a sphere built from equilateral triangles and has a more uniform distribution of vertices compared to a UV sphere. This makes it ideal for sculpting, simulations, or applications where topological regularity is important.
It is created by recursively subdividing the faces of an icosahedron, which is a polyhedron with 20 triangular faces.
- Subdivisiones
Number of recursive subdivision steps. Each step splits every triangle into four new triangles, increasing the mesh resolution exponentially.
Subdivision Level 1 creates the base icosahedron.
Higher levels smooth the surface and increase vertex count.
Advertencia
Subdividing an icosphere quickly increases the vertex count. For example, 10 subdivisions generate over 5 million triangles and may crash Blender.
- Radio
Distance from the center to the outer surface of the sphere.
Truco
Icospheres are often used in simulations, particle emitters, and sculpting workflows where uniformity and triangle-only topology are beneficial.
Cilindro
Creates a cylindrical mesh composed of two circular ends and vertical faces. This shape is commonly used to model objects like handles, rods, pillars, and barrels.
- Vértices
Number of vertices used to define the circular ends. Higher values result in a smoother circular profile.
- Radio
Radius of the cylinder’s circular ends, measured from the center to the perimeter.
- Profundidad
Height of the cylinder along the Z axis.
- Tipo de extremos
Determines how the top and bottom of the cylinder are filled:
- Nada:
No end caps are added. Only the side faces are created, forming a tube. Useful for modeling pipes or hollow containers.
- Enégono:
Each end is filled with a single N-gon face.
- Abanico de triángulos:
Each end is filled with triangular faces sharing a central vertex.
Cono
Creates a cone- or pyramid-shaped mesh. Useful for modeling objects like spikes, traffic cones, or wizard hats. You can also create frustums (truncated cones) or simple pyramids by adjusting the top radius.
- Vértices
Number of vertices used to define the circular base (or polygon base in the case of a pyramid). Higher values produce smoother curves.
- Radio 1
Radius of the base of the cone (bottom circle).
- Radio 2
Radius of the tip (top circle). A value of 0 creates a standard cone with a pointed tip. Non-zero values result in a frustum shape.
- Profundidad
Height of the cone along the Z axis.
- Tipo de extremos
Determines how the base of the cone is filled:
- Nada:
No bottom cap is added. Only the side faces are created. Useful for creating open containers or hollow cones.
- Enégono:
Fills the base with a single N-gon face.
- Abanico de triángulos:
Fills the base with triangular faces sharing a central vertex.
Truco
To create a pyramid, set Vertices to 4 and use N-gon or Triangle Fan as the cap type. Adjust Radius 2 to 0 to keep the top pointed.
Toroide
A doughnut-shaped primitive created by rotating a circle around an axis. This shape is commonly used for rings, pipes, and stylized details.
- Preajustes del operador
Saved torus settings that can be reused. These are stored as Python scripts in the presets directory.
- Segmentos mayores
Number of segments that make up the main circular ring of the torus. Think of this as the number of steps in the spin operation around the central axis.
- Segmentos menores
Number of segments making up the circular cross-section of the torus. Each segment is rotated around the main ring.
- Modo de dimensiones
Permitirá seleccionar el método utilizado para definir la forma y el tamaño del toroide:
- Mayor / Menor:
Define the torus using the radius of the main ring and the radius of the cross-sectional circle.
- Exterior / Interior:
Define the torus using the total outer radius and the radius of the central hole.
- Radio mayor Mayor / Menor
Distance from the center of the torus to the center of the cross section.
- Radio menor Mayor / Menor
Radius of the cross-sectional circle (thickness of the ring).
- Radio exterior Exterior / Interior
Total radius from the center of the torus to its outer edge.
- Radio interior Exterior / Interior
Radius of the hole at the center of the torus.
Cuadrícula
A regular grid composed of quadrilateral faces, useful as a base for landscapes, cloth, or organic surfaces. You can increase the number of subdivisions to create a more detailed mesh suitable for sculpting or simulation.
- Subdivisiones X
Number of face spans along the X axis.
- Subdivisiones Y
Number of face spans along the Y axis.
- Tamaño
Sets the width and height of the plane (the full extent from edge to edge).
Mona
Adds a stylized monkey head mesh named «Suzanne». Suzanne is a gift from old NaN to the community and remains in Blender as a playful «Easter egg» and is widely recognized as Blender’s mascot.
This primitive is commonly used for testing materials, lighting setups, and modifiers such as Subdivision Surface.
It serves a similar purpose to well-known test models like the Utah Teapot or the Stanford Bunny.
- Tamaño
Controls the overall scale of the mesh.